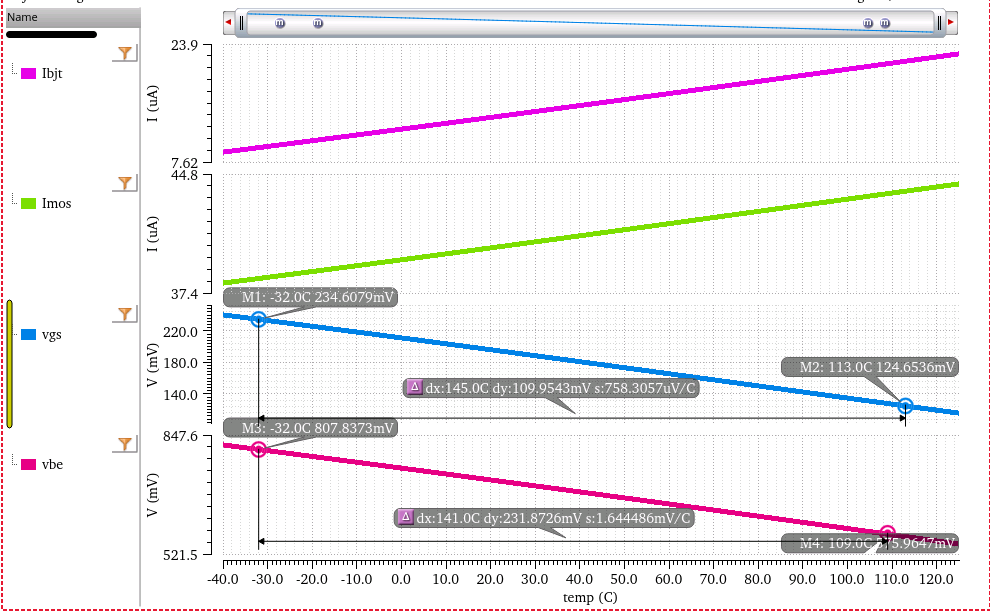
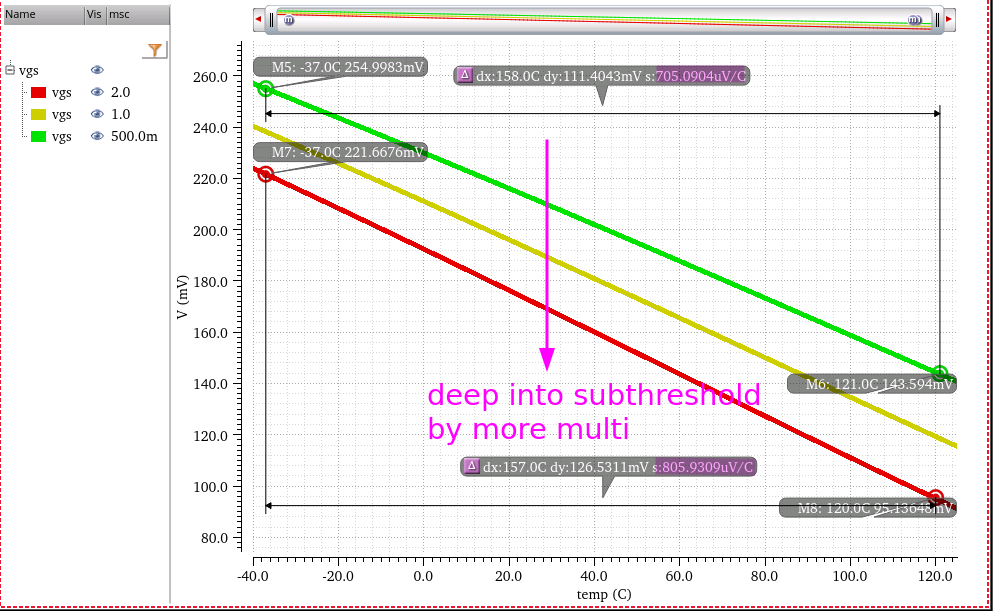
Though it is assumed that \(V_{BE}\)
is a linear function of temperature for first oder analysis.
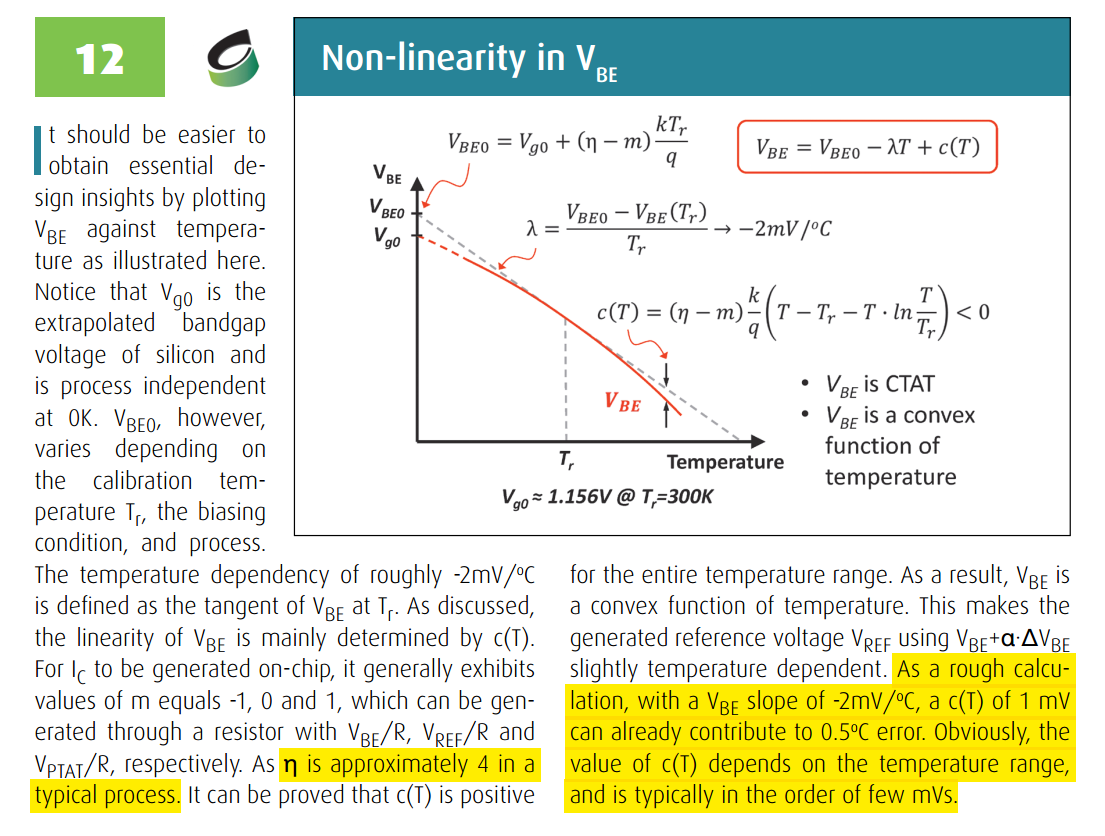
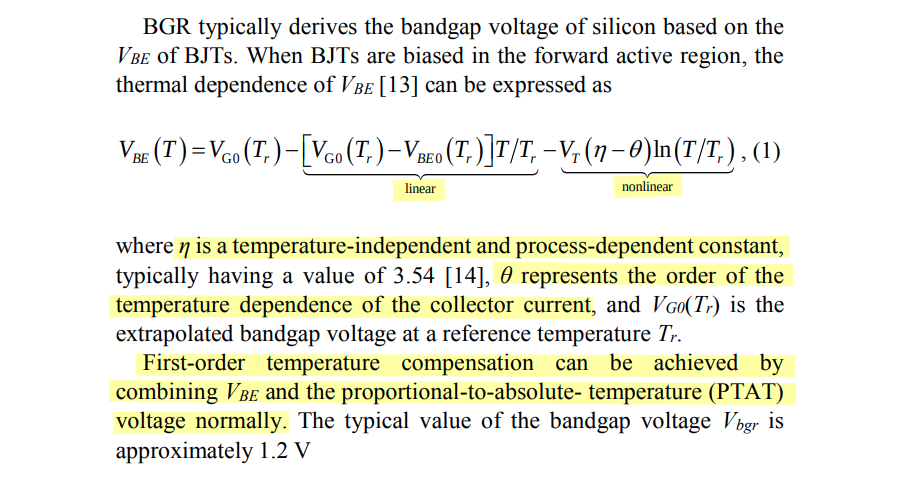
In practice, \(V_{BE}\) is
slightly nonlinear, the magnitude of this nonlinearity is
referred to as curvature.
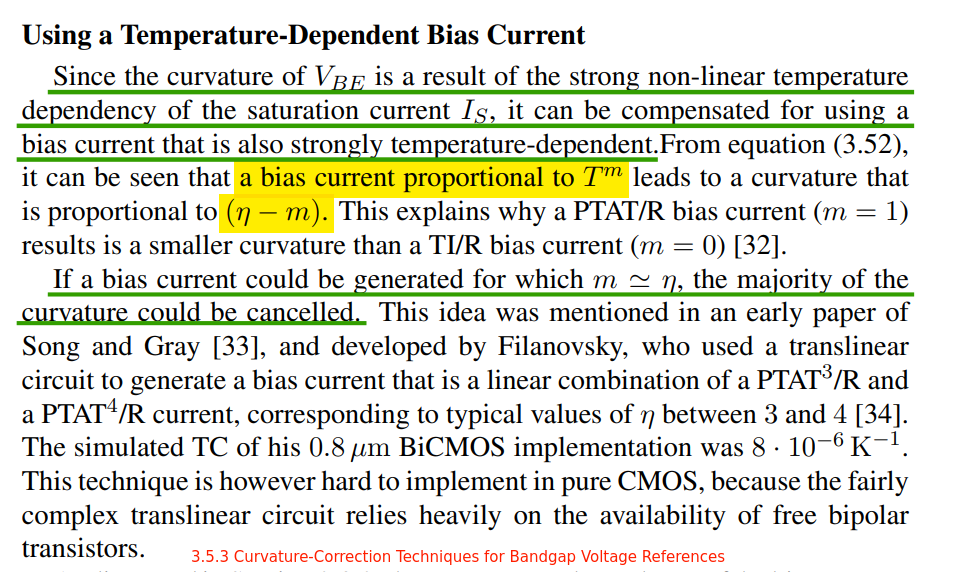
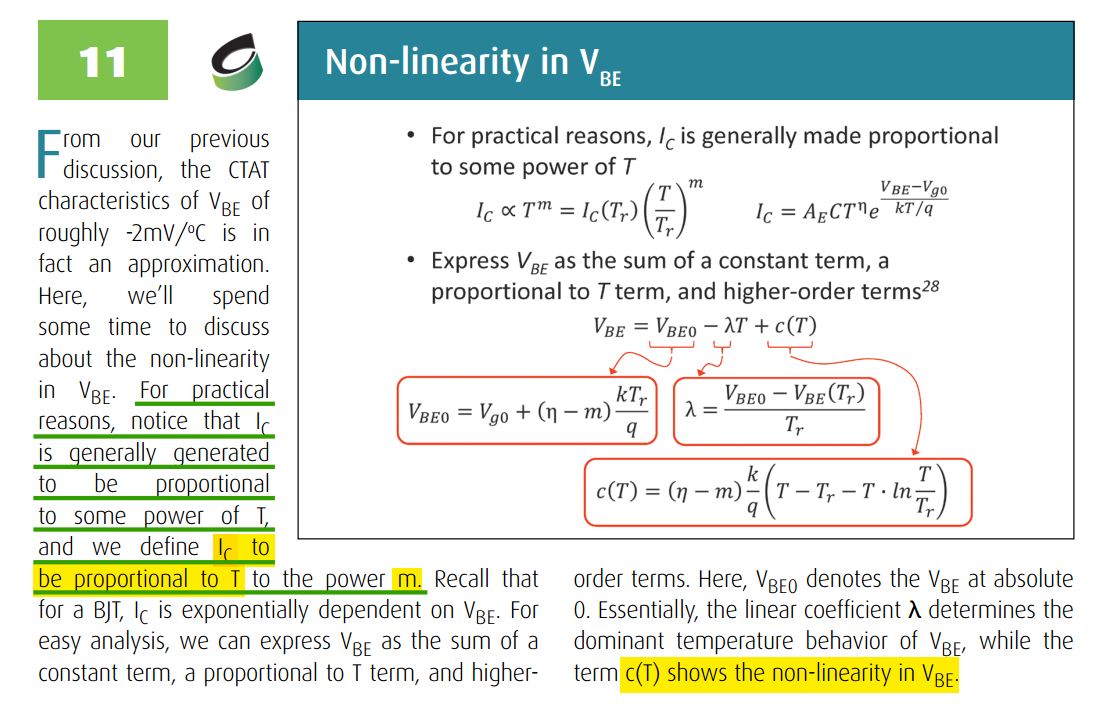
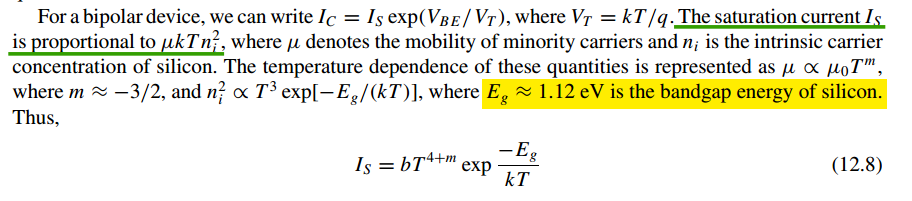
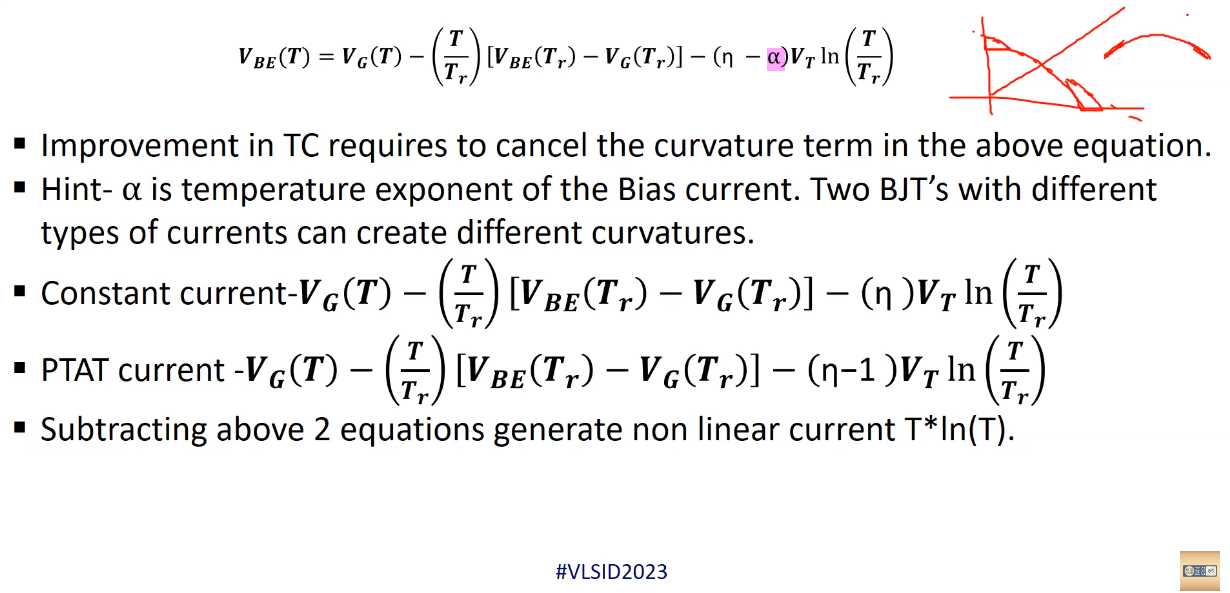
curvature depends on the temperature dependency of
the saturation current (\(I_s\)), and on that of the collector
current (\(I_c\)), it can be
written as \[
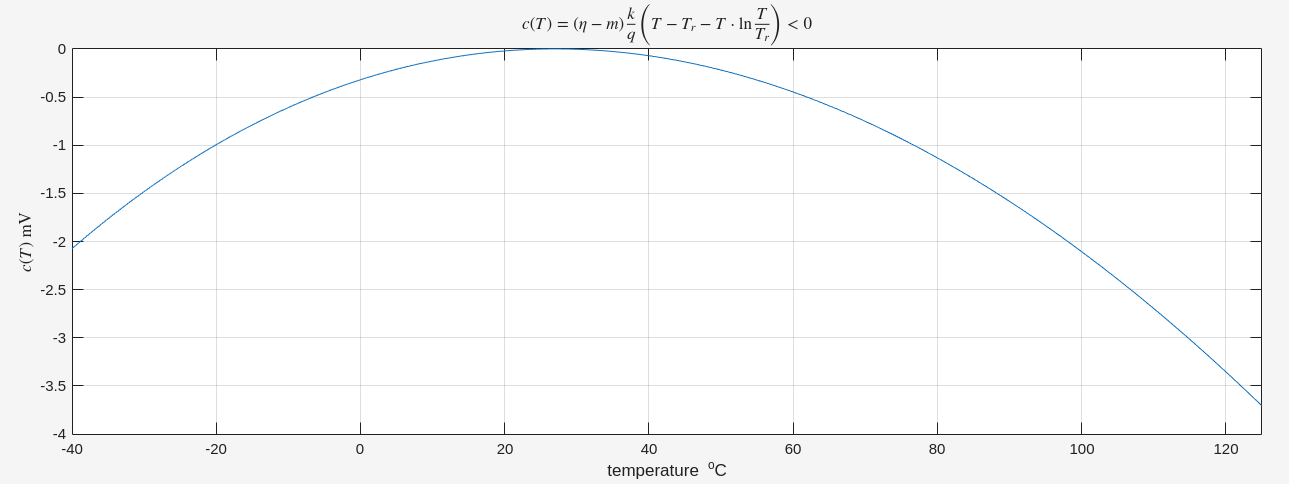
V_{curv}(T)=\frac{k}{q}(\eta-\delta)(T-T_r-T\cdot \ln(\frac{T}{T_r}))
\] where \(\eta\) = a constant
depending on the doping level, CMOS substrate pnp transistors have a
typically value of \(\eta \approx
4\)
\(\delta\) = order of the
temperature dependence of collector current (\(I_c\))
PTAT \(I_c\) help reduce \(V_{curv}(T)\), \(\delta=1\)
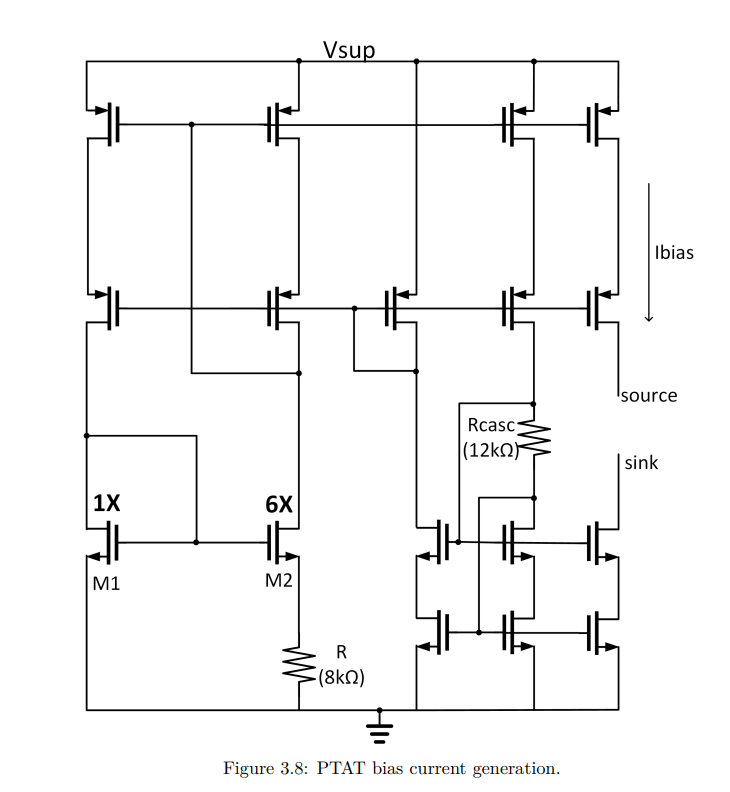
Although the temperature dependence of the bias current \(I_b\) doesn’t impact the accuracy of \(V_{BE}\), it does impact the systematic
nonlinearity or curvature of \(V_{BE}\), and hence the sensor's
systematic error. The curvature in \(V_{BE}\) can be reduced by using a PTAT
bias current.
\[
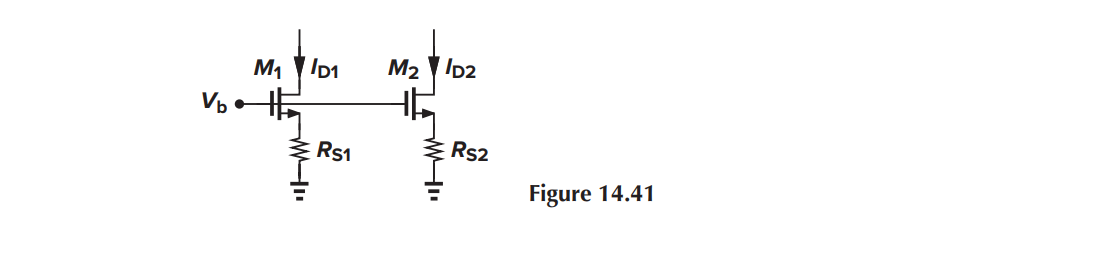
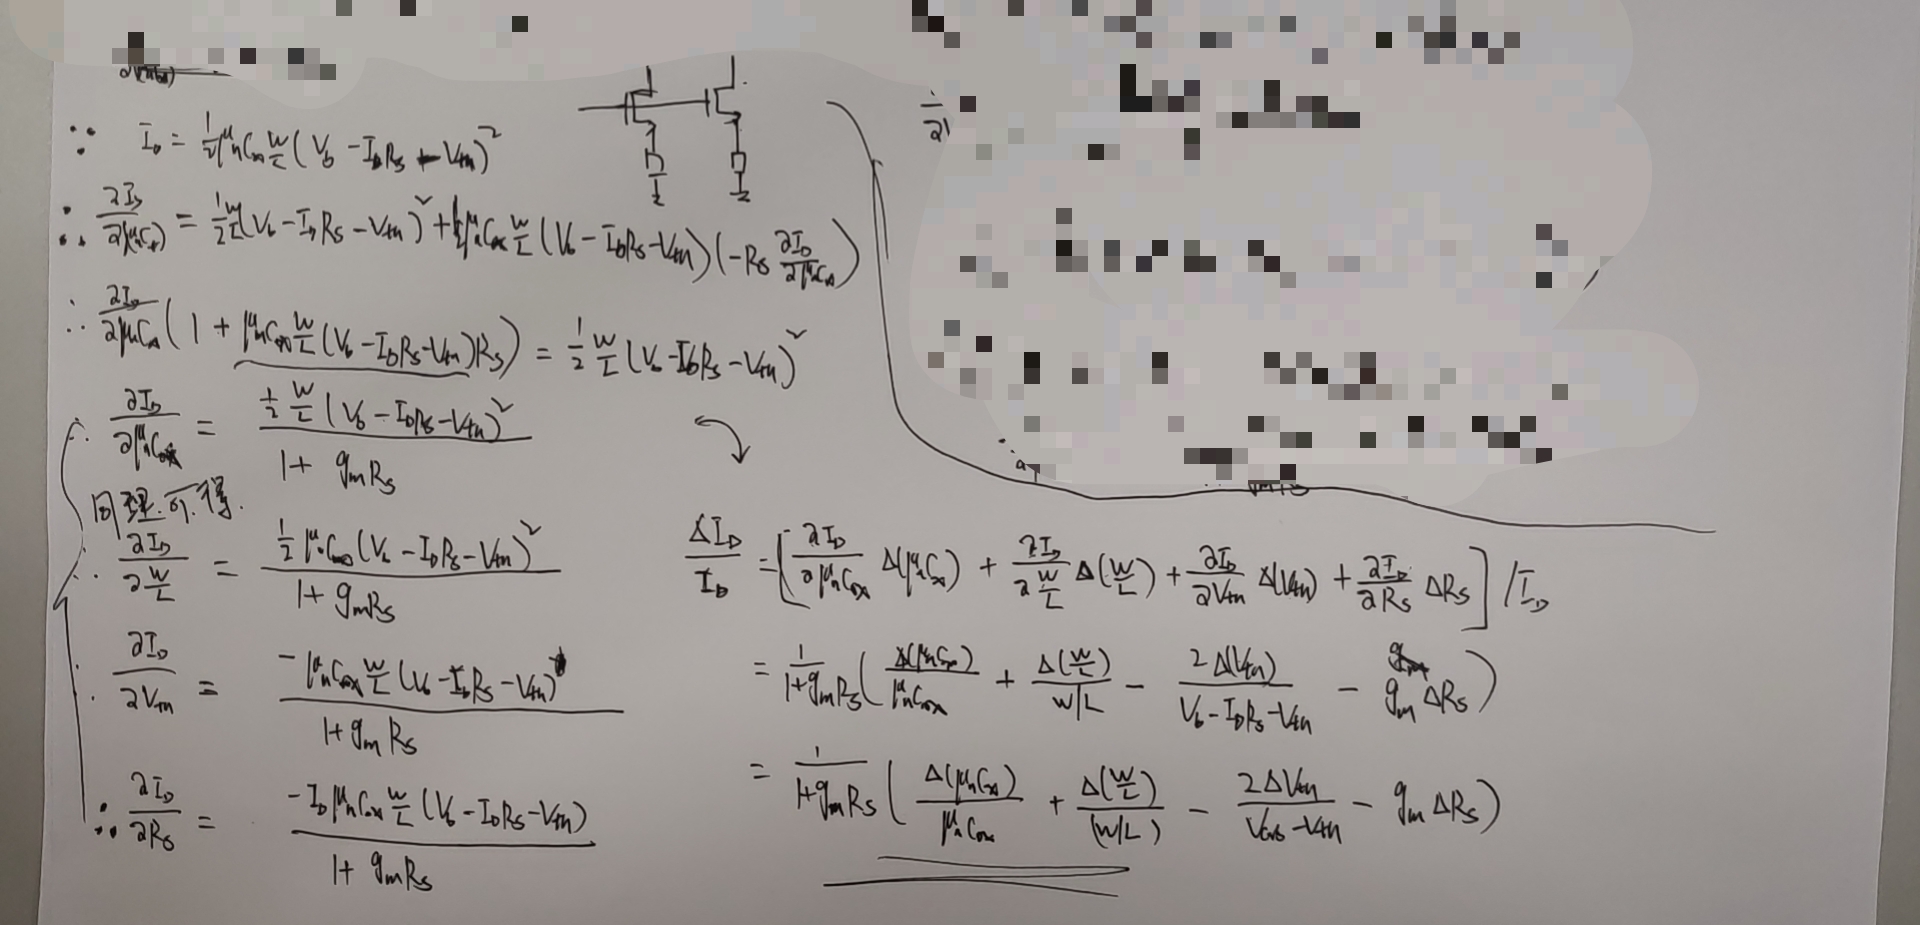
I_{bias} = \frac{0.7}{\beta \cdot R^2}
\] in which \(\beta=\frac{\mu_{n}\cdot
C_{ox}\cdot W}{L}\), where:
\(\mu_n\)=mobility,
\(C_{ox}\) = oxide capacitance
density,
\(\frac{W}{L}\) = dimension ratio of
unit NMOS used for \(M_1\) and \(M_2\)
\(\mu_n\) is complementary
to the absolute temperature and resitor R is implemented using
high-R flow in FinFET which has a low temperature dependency, the net
temperature dependency of \(I_{bias}\)
is proportional to the absolute temperature \[
I_{bias}\propto T
\]
Kamath, Umanath Ramachandra. "BJT Based Precision Voltage Reference
in FinFET Technology." (2021).
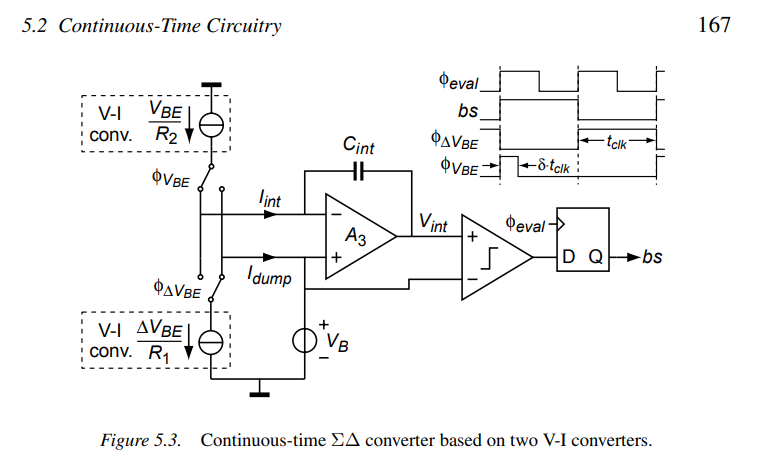
Errors due to V-I Finite
Gain
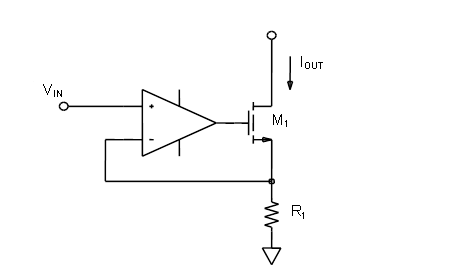
Finite gain introduces errors both in the V-I converters, finite loop
gain results in errors in the closed-loop transconductances.
Then, \(\alpha\) is obtained \[
\alpha =
\frac{(1+A_{OL2})A_{OL1}}{A_{OL2}(1+A_{OL1})}\cdot\frac{R_2}{R_1}
\] Since the loop gains in the two V-I converters cannot be
expected to match, the resulting errors in
both converters should be reduced to negligible
levels.
We get \[
\frac{\Delta \alpha}{\alpha}=\frac{1}{A_{OL1}}
\] Follow the same procedure, assume \(A_{OL1}=\infty\)\[
\frac{\Delta \alpha}{\alpha}=\frac{1}{A_{OL2}}
\] The finite gain introduces an error inversely proportional to
the loop gain \(A_{OL1}\),\(A_{OL2}\), the resulting errors in both
converters should be reduced to negligible levels
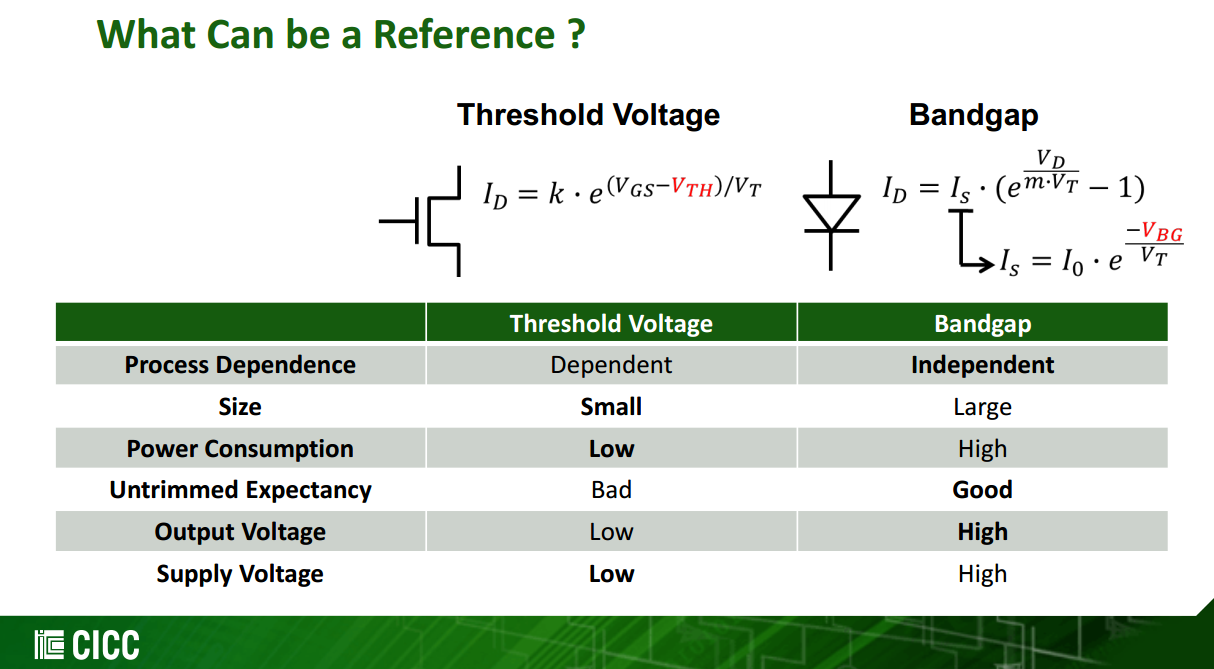
Why named as "bandgap
reference"
Let us write the output voltage as \[
V_{REF} = V_{BE} + V_T\cdot \ln n
\] and hence \[
\frac{\partial V_{REF}}{\partial T} = \frac{\partial V_{BE}}{\partial T}
+ \frac{V_T}{T}\ln n
\] Setting this to zero and substituting for \(\frac{\partial V_{BE}}{\partial T}\), we
have \[
\frac{V_{BE}-(4+m)V_T-E_g/q}{T}=-\frac{V_T}{T}\ln n
\] If \(V_T\ln n\) is found from
this equation and inserted in \(V_{REF}\), we obtain \[
V_{REF}=\frac{E_g}{q} + (4+m)V_T
\]
The term bandgap is used here because as \(T\to 0\), \(V_{REF} \to E_g/q\)
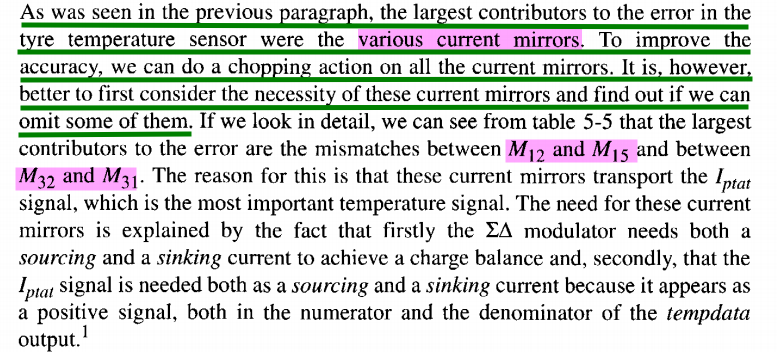
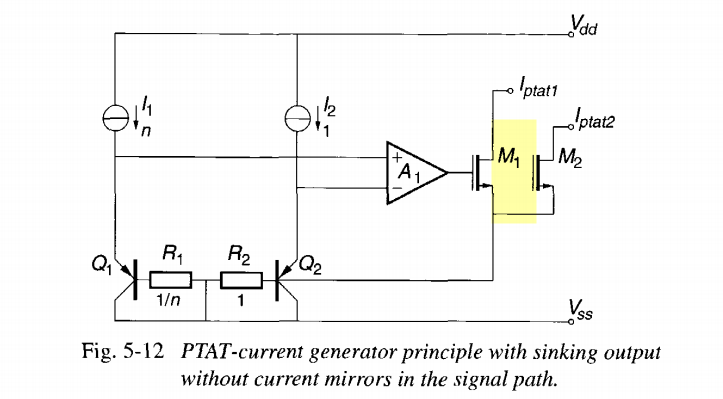
sinking
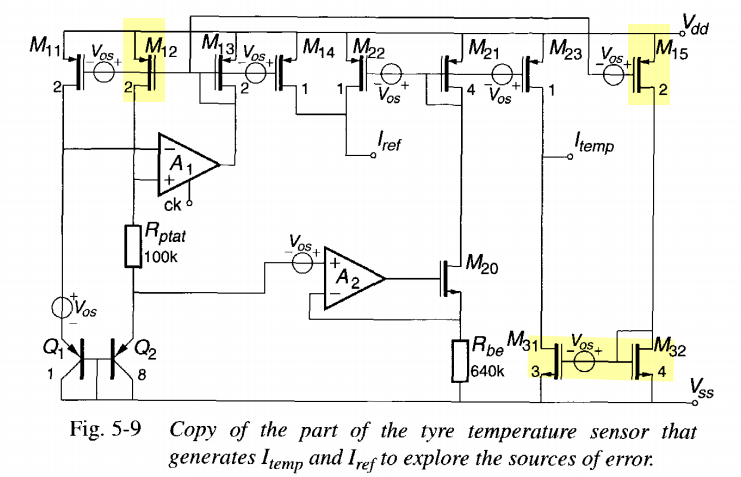
PTAT-current generator without current mirrors
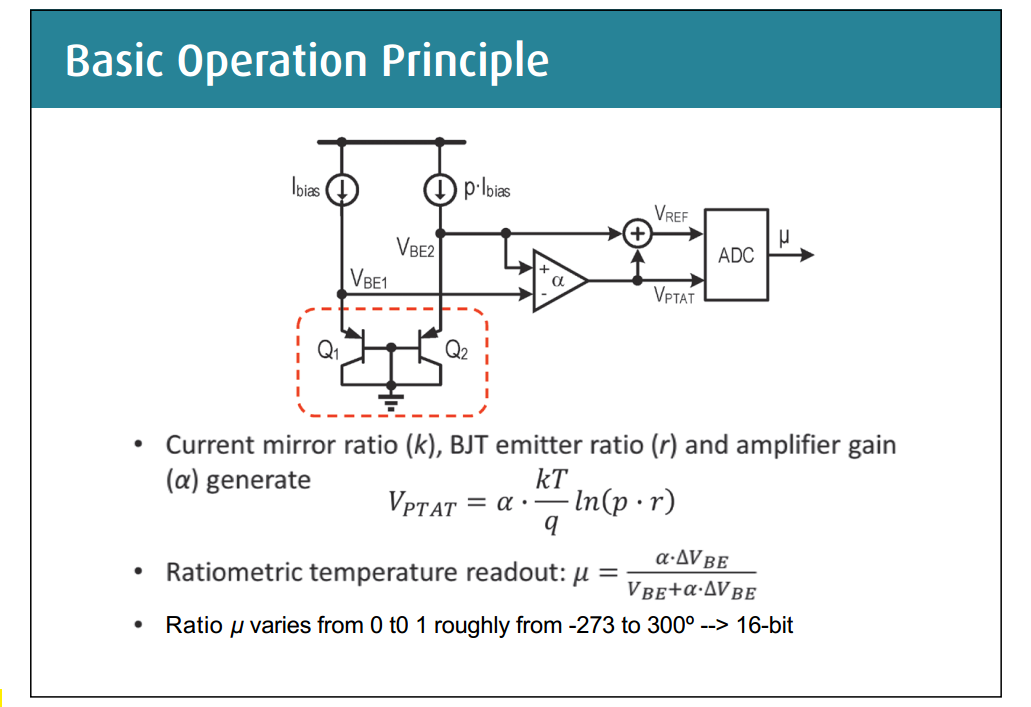
Take \(V_{PTAT}=\alpha \cdot \Delta
V_{BE}\) as input and \(V_{REF}\) as reference. The output \(\mu\) of the ADC will then be \[
\mu =\frac{V_{PTAT}}{V_{VREF}}=\frac{\alpha \cdot \Delta
V_{BE}}{V_{BE}+\alpha \cdot \Delta V_{BE}}
\] A final digital output \(D_{out}\) in degrees Celsius can
be obtained by linear scaling: \[
D_{out}=A\cdot \mu + B
\] where \(A\approx 600K\) and
\(B\approx -273K\)
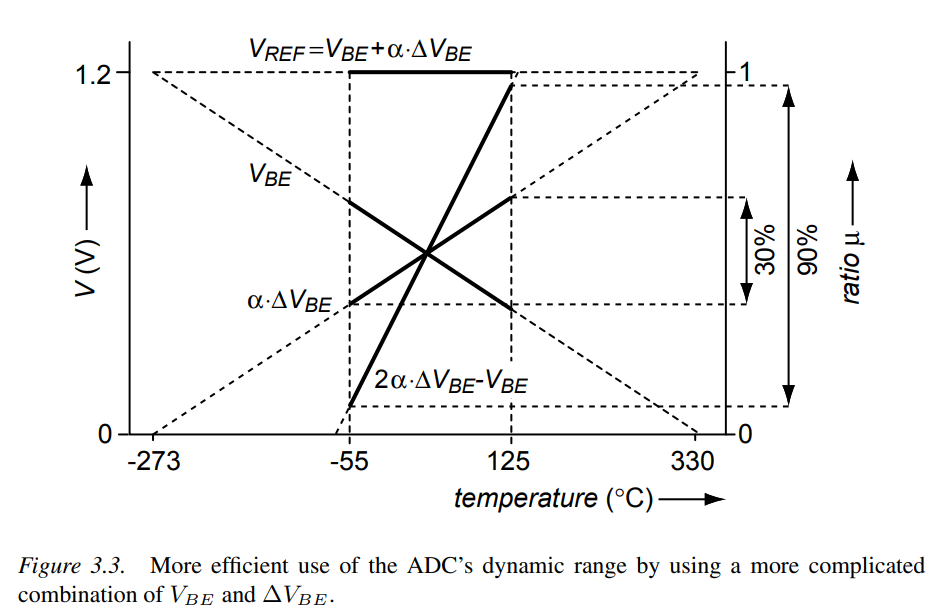
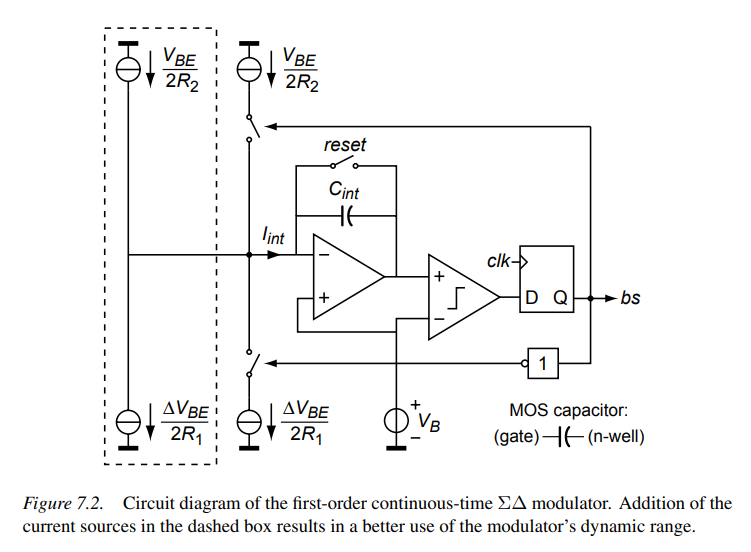
While the transfer is simple, it only uses about 30% of the of the
ADC (the extremes of the operating range correspond to \(\mu \approx 1/3\) and \(\mu \approx 2/3\)). The ratio results in a
rather inefficient use of the modulator's dynamic range.
For a first-order \(\Sigma\Delta\)
modulator, this means that about 1.5 bits of resolution
are lost
A more efficient transfer is \[
\mu '=\frac{2\alpha \cdot \Delta V_{BE}-V_{BE}}{V_{BE}+\alpha \cdot
\Delta V_{BE}}
\] With this more efficient combination, 90% of the
dynamic range is used rather than 30%. Thus, the required resolution
of the ADC is reduced by a factor of three.
In advanced process, like Finfet 16nm, 7nm, high resistance resistor
has +/-15% variation and MOM capacitor has
+/-30% variation.
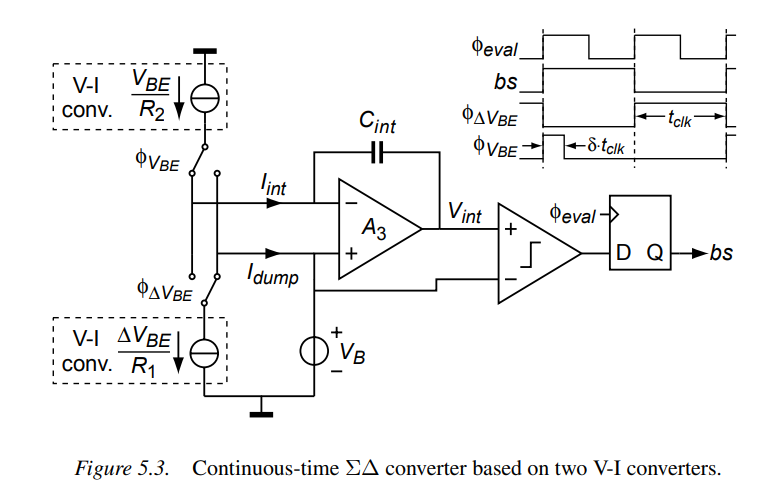
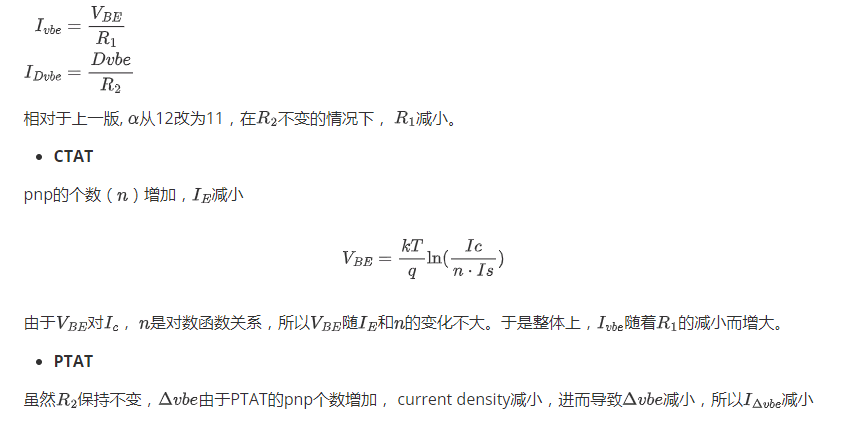
Then, \(R_1\) and \(R_2\) not only determine the \(\alpha\) but also the integrator's output
swing, so do \(V_{BE}\) and \(\Delta V_{BE}\), \(C_{int}\).
The integrator's output change per period
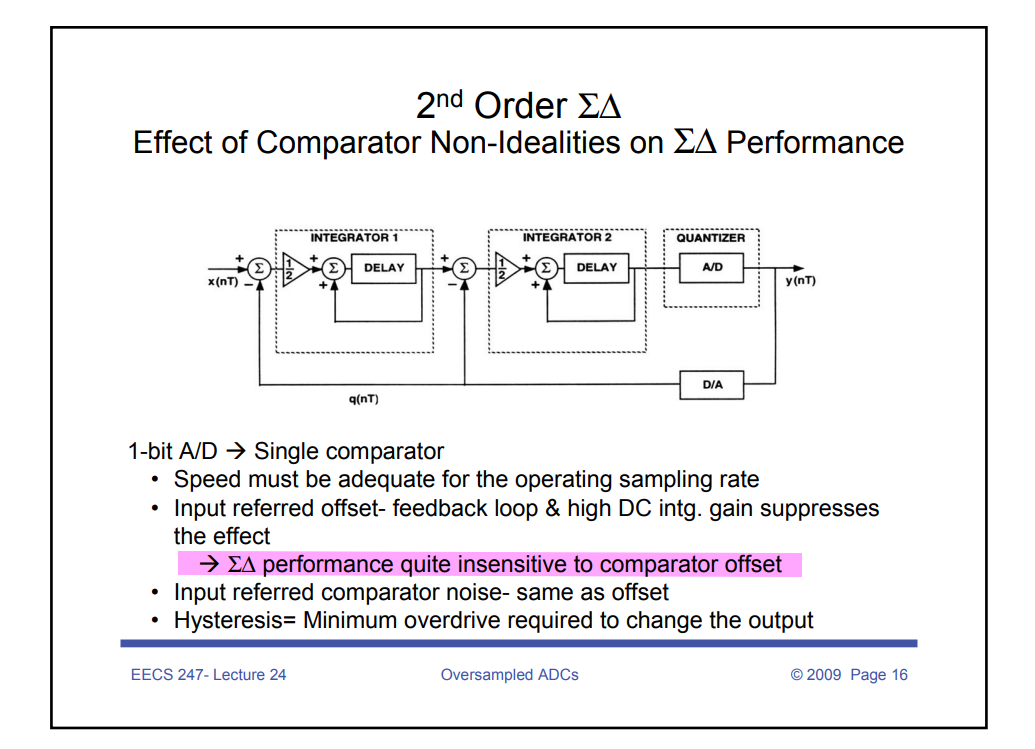
integrator, comparator offset
integrator offset
comparator offset
integrator design
application in sensor
Offset Errors
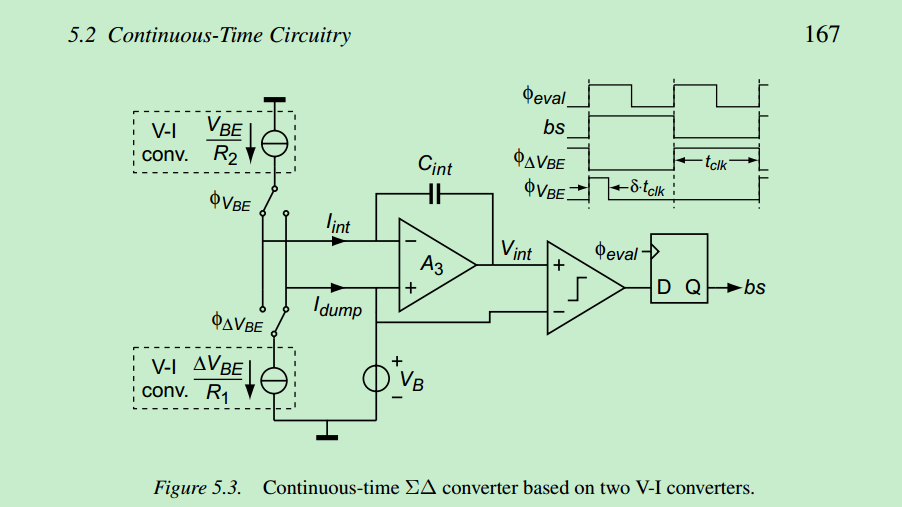
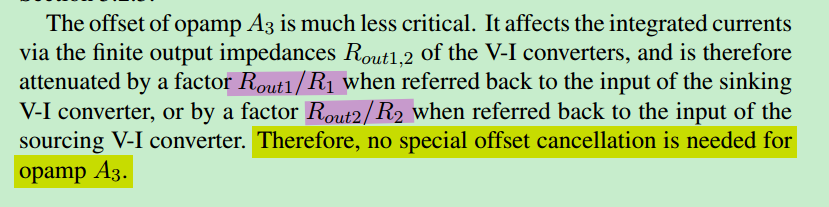
The offset of opamp \(A_3\) is
much less critical:
It affects the integrated currents via the finite output
impedances \(R_{out1,2}\) of the V-I
converters, and is therefore attenuated by a factor \(R_{out1}/R_1\) when referred back to the
input of the sinking V-I converter,
or by a factor \(R_{out2}/R_2\)
when referred back to the input of the sourcing V-I converter.
Therefore, no special offset cancellation is needed for opamp \(A_3\).
The current change due to offset of \(A_3\): \[\begin{align}
\frac{V_{BE,os}}{R_1} &= \frac{V_{ota,os}}{R_{out1}} \\
\frac{\Delta V_{BE,os}}{R_2} &= \frac{V_{ota,os}}{R_{out2}}
\end{align}\] Then, the input referenced offset is: \[\begin{align}
V_{BE,os} &=\frac{ V_{ota,os}}{R_{out1}/R_1} \\
\Delta V_{BE,os} &= \frac{ V_{ota,os}}{R_{out2}/R_2}
\end{align}\]
Errors due to Finite Gain
Finite gain of opamp \(A_3\) results
in a non-zero overdrive voltage at its input, which modulates the
current Iint due to the finite output impedances of the V-I
converters.
Assuming the opamp is implemented as a transconductance
amplifier, there are two main causes of this non-zero overdrive
voltage
The finite transconductance \(g_{m3}\) of the opamp, , which implies that
an overdrive voltage is required to provide the feedback
current
The finite DC gain \(A_{0,3}\),
which implies that an overdrive voltage is required to produce the
output voltage\(V_{int}\)
reference
Micheal, A., P., Pertijs., Johan, H., Huijsing., Pertijs., Johan, H.,
Huijsing. (2006). Precision Temperature Sensors in CMOS Technology.
C. -H. Chang, J. -J. Horng, A. Kundu, C. -C. Chang and Y. -C. Peng,
"An ultra-compact, untrimmed CMOS bandgap reference with 3σ inaccuracy
of +0.64% in 16nm FinFET," 2014 IEEE Asian Solid-State Circuits
Conference (A-SSCC), 2014, pp. 165-168, doi:
10.1109/ASSCC.2014.7008886.
Yan Lu; Chi-Seng Lam, "Selected Topics in Power, RF, and Mixed-Signal
ICs," in Selected Topics in Power, RF, and Mixed-Signal ICs ,
River Publishers, 2017
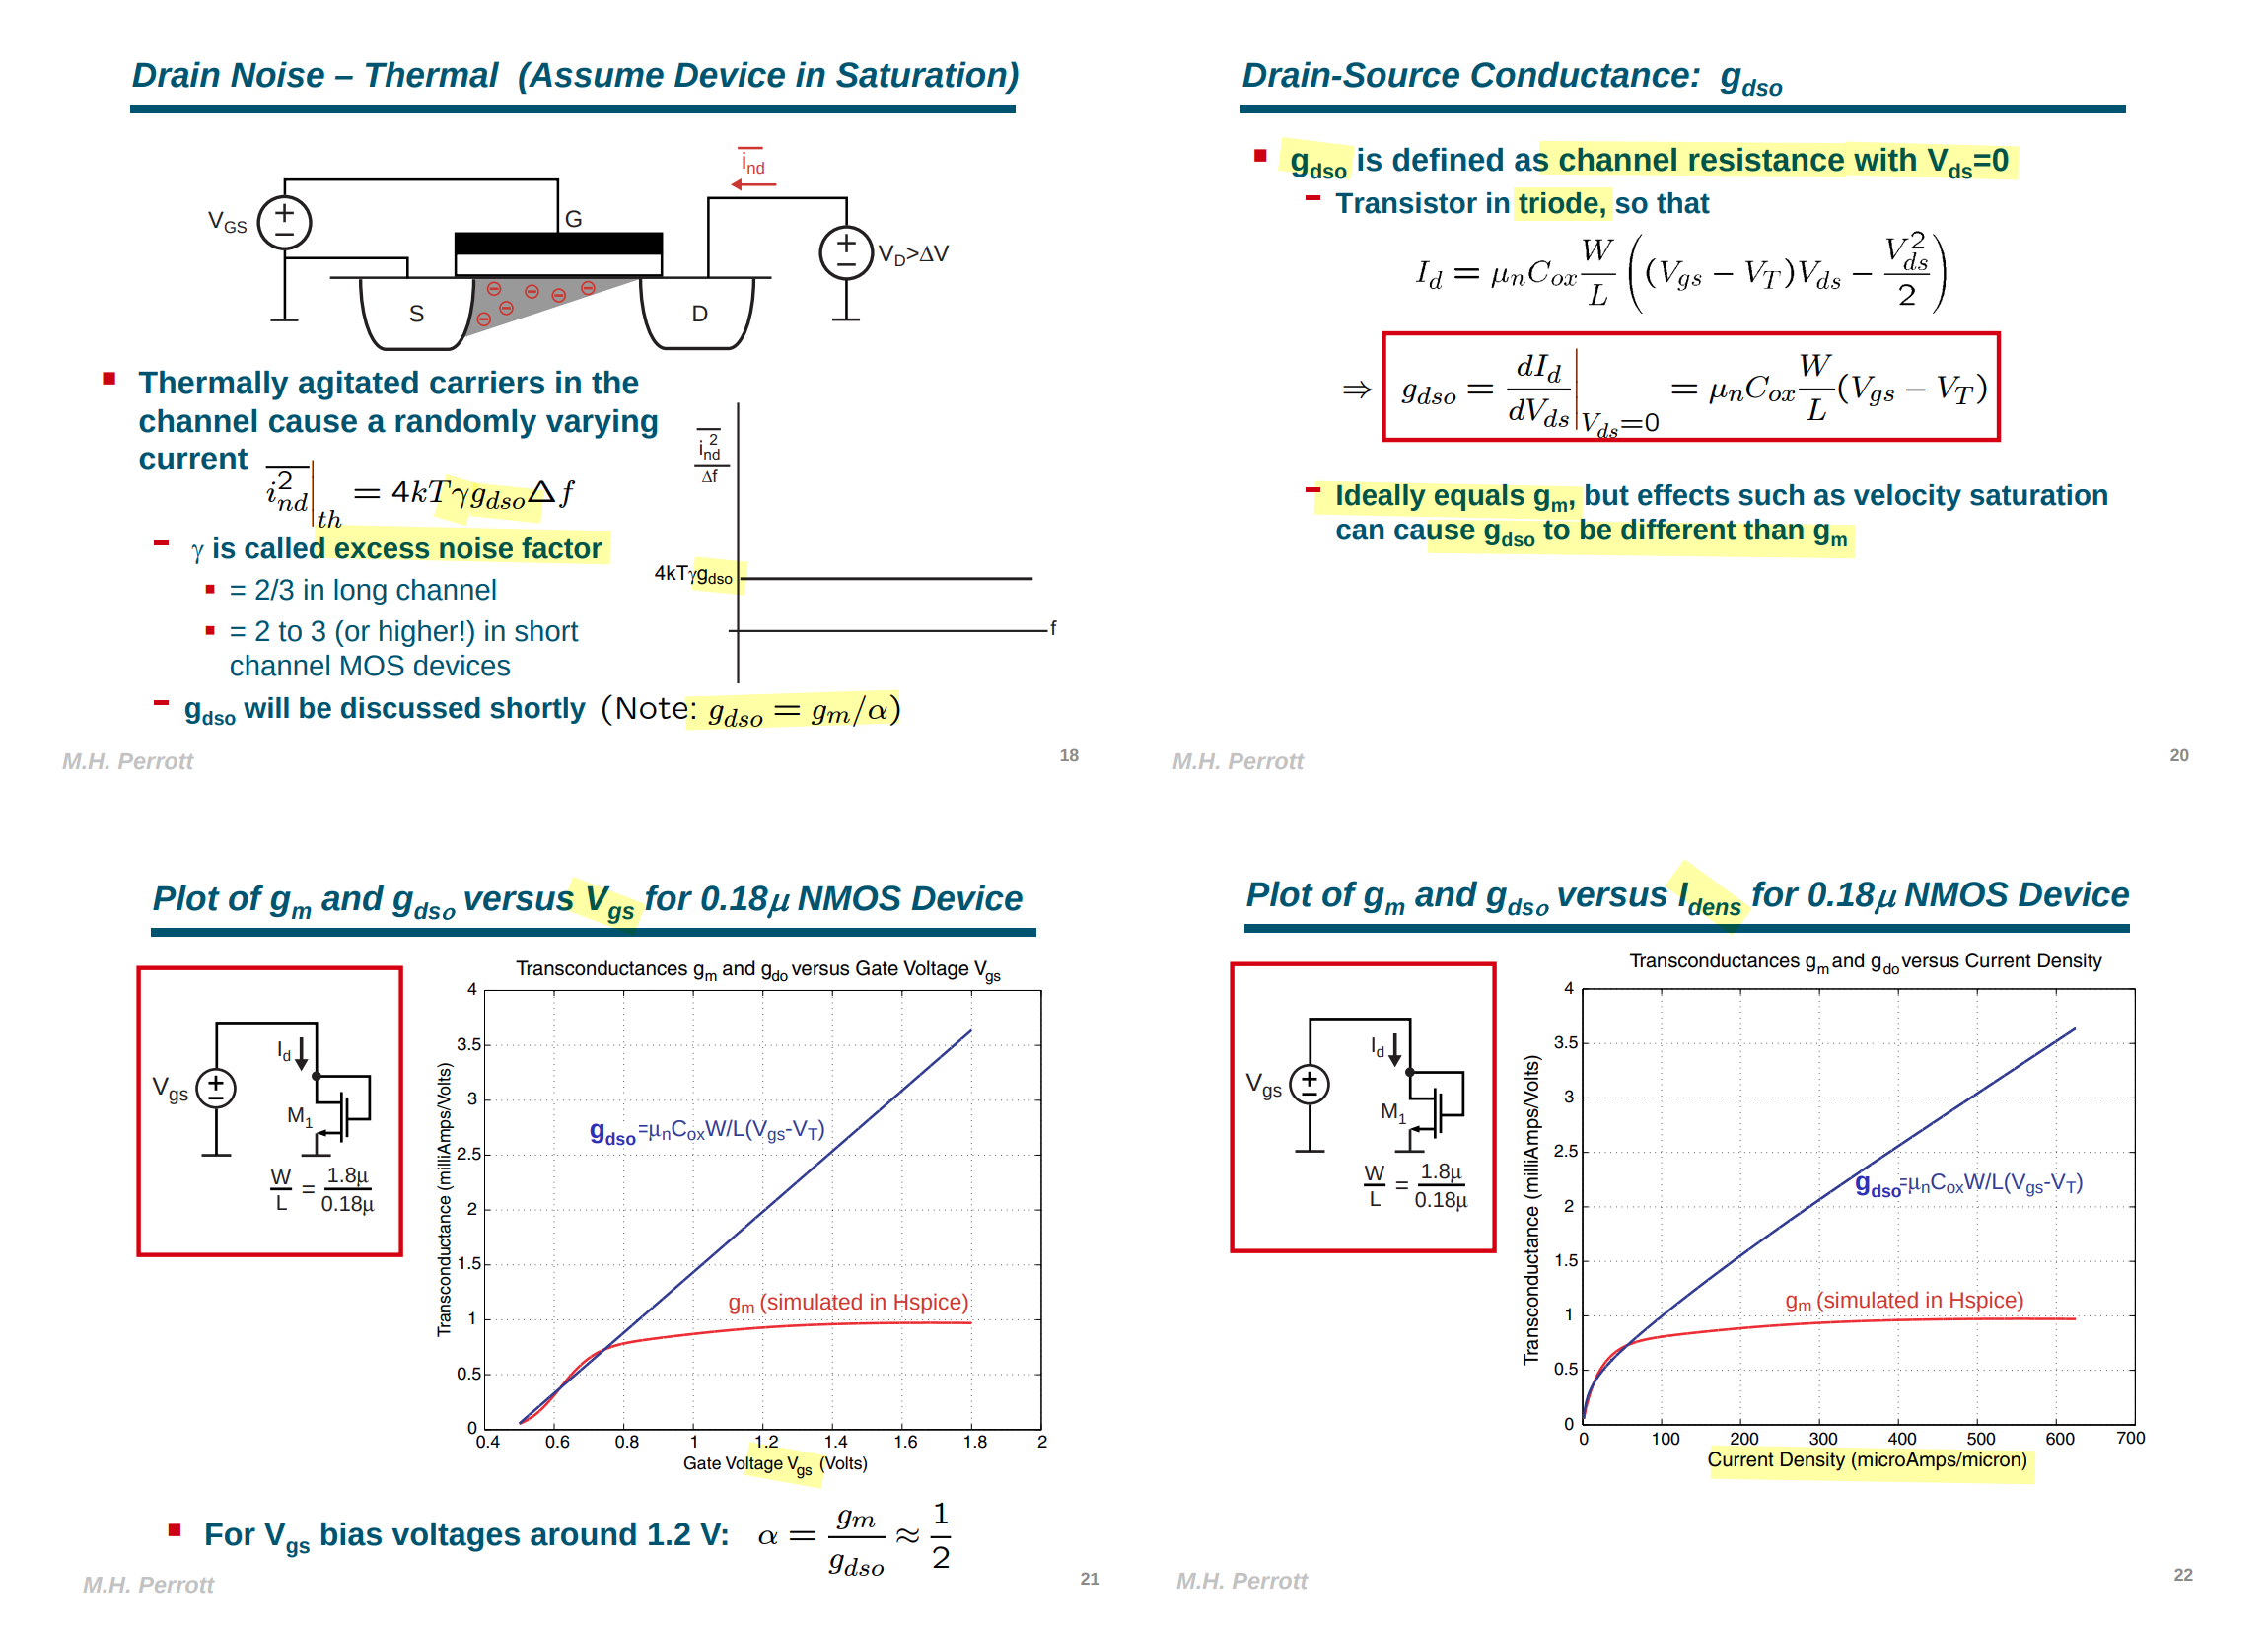
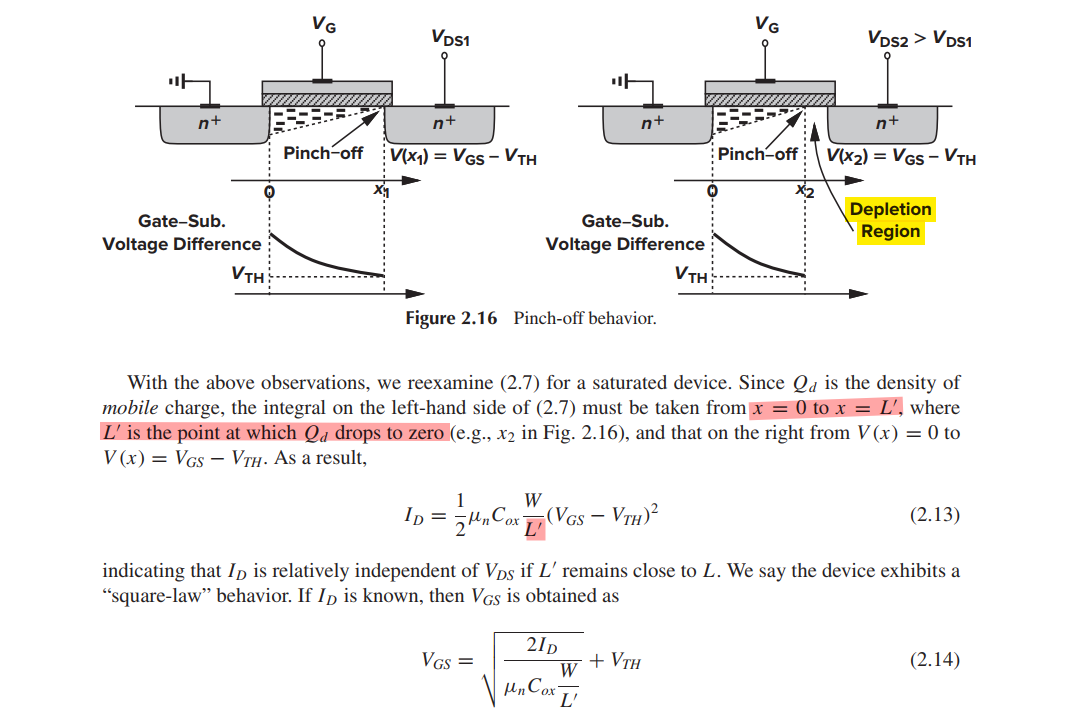
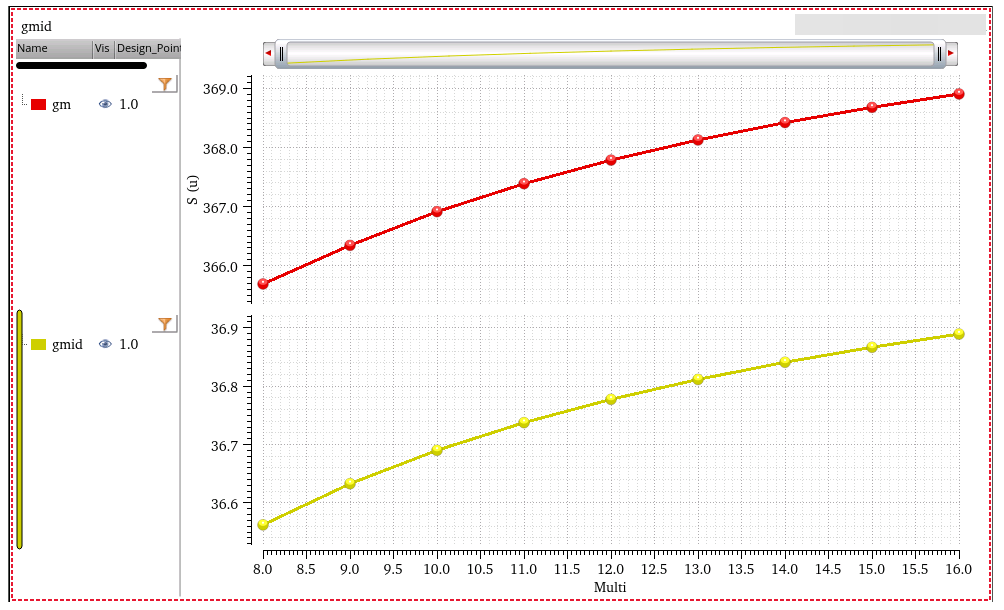
By square-law, the Eq \(g_m = \sqrt{2\mu
C_{ox}\frac{W}{L}I_D}\), it is possible to obtain a
higer transconductance by increasing \(W\) while maintaining \(I_D\) constant. However, if \(W\) increases while \(I_D\) remains constant, then \(V_{GS} \to V_{TH}\) and device enters the
subthreshold region. \[
I_D = I_0\exp \frac{V_{GS}}{\xi V_T}
\]
where \(I_0\) is proportional to
\(W/L\), \(\xi \gt 1\) is a nonideality factor, and
\(V_T = kT/q\)
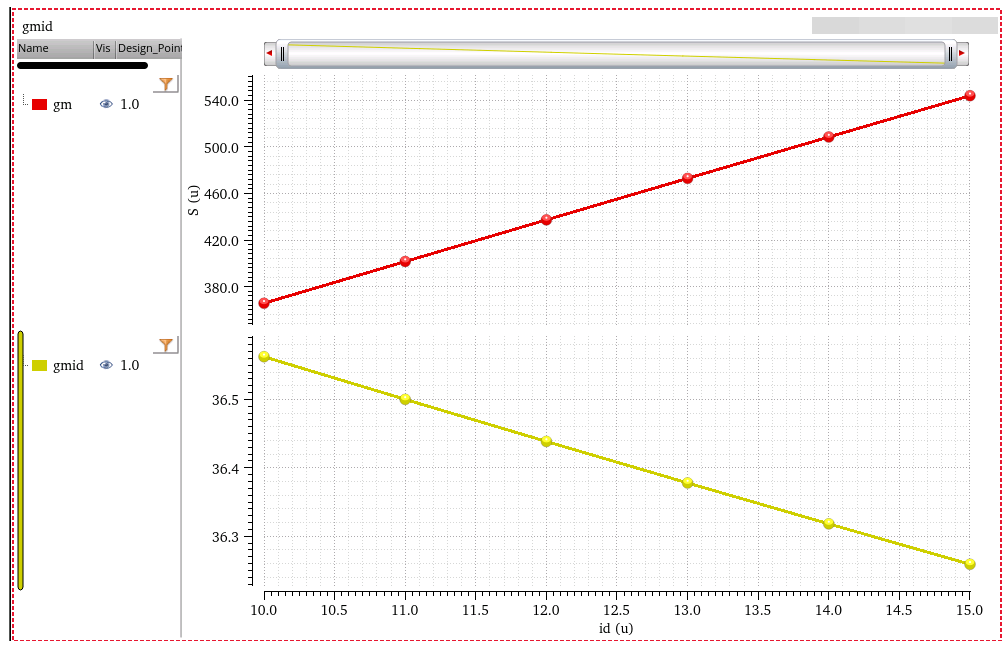
As a result, the transconductance in subthreshold region is \[
g_m = \frac{I_D}{\xi V_T}
\]
which is \(g_m \propto I_D\)
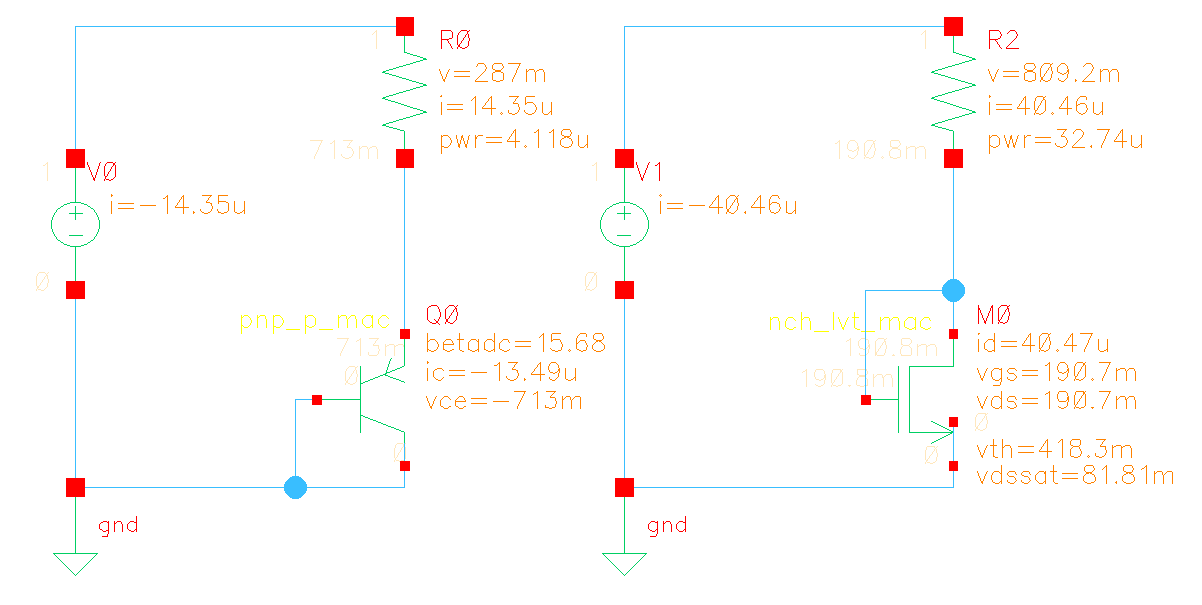
PTAT with subthreshold MOS
MOS working in the weak inversion region
("subthreshold conduction") have the similar
characteristics to BJTs and diodes, since the effect of diffusion
current becomes more significant than that of drift current
Hongprasit, Saweth, Worawat Sa-ngiamvibool and Apinan Aurasopon.
"Design of Bandgap Core and Startup Circuits for All CMOS Bandgap
Voltage Reference." Przegląd Elektrotechniczny (2012):
277-280.
Curvature Compensation
VBE
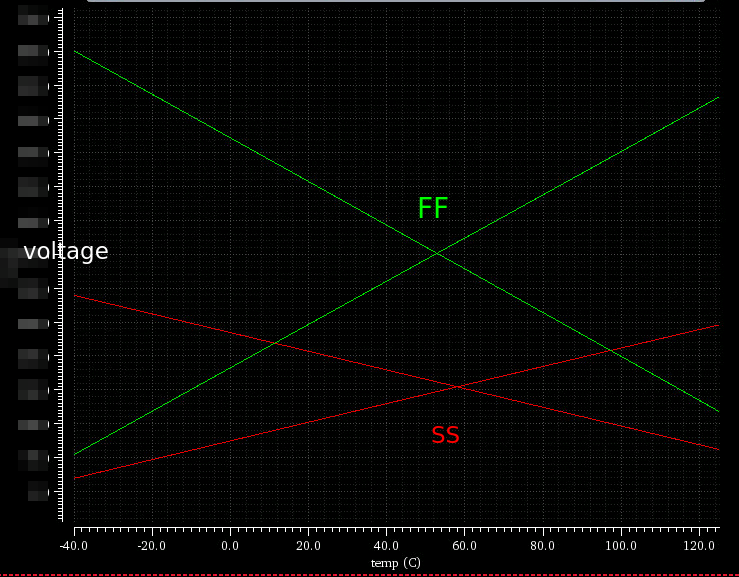
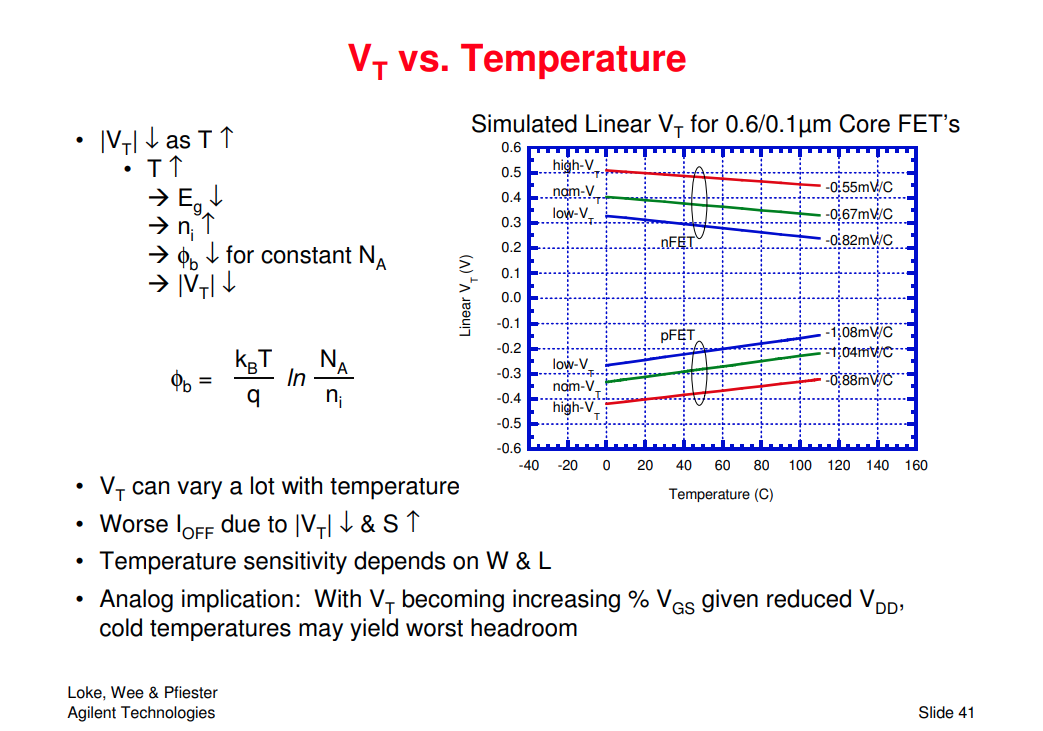
In advanced node, N4P, \(V_{BE}\) is
about -1.45mV/K
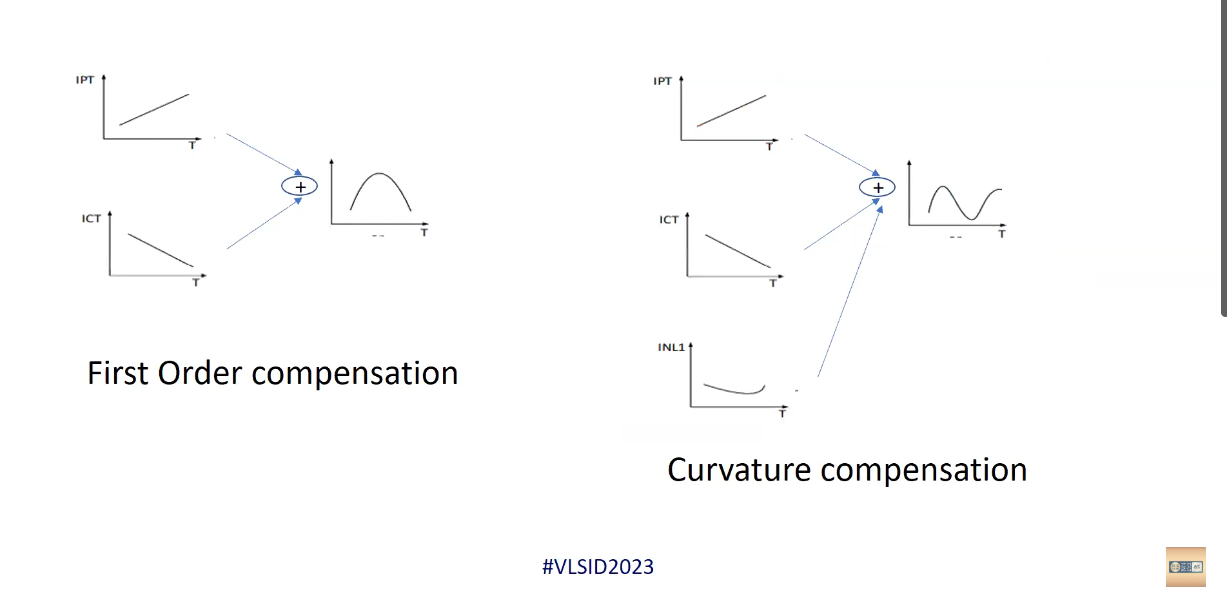
The first-order linear temperature
dependence term of \(V_{BE}\) can be
eliminated with IPTAT. \(V_T(\eta - \theta)\ln)T/T_r\) is the
high-order nonlinear temperature-dependent term of \(V_{BE}\), which requires high-order
curvature compensation
G. Zhu, Y. Yang and Q. Zhang, "A 4.6-ppm/°C High-Order Curvature
Compensated Bandgap Reference for BMIC," in IEEE Transactions on
Circuits and Systems II: Express Briefs, vol. 66, no. 9, pp.
1492-1496, Sept. 2019 [https://sci-hub.se/10.1109/TCSII.2018.2889808]
X. Fu, D. M. Colombo, Y. Yin and K. El-Sankary, "Low Noise, High
PSRR, High-Order Piecewise Curvature Compensated CMOS Bandgap
Reference," in IEEE Access, vol. 10, pp. 110970-110982, 2022
[https://ieeexplore.ieee.org/stamp/stamp.jsp?arnumber=9923910]
The parameter that shows the dependence of the reference voltage on
temperature variation is called the temperature coefficient and is
defined as: \[
TC_F=\frac{1}{V_{\text{REF}}}\left[
\frac{V_{\text{max}}-V_{\text{min}}}{T_{\text{max}}-T_{\text{min}}}
\right]\times10^6\;ppm/^oC
\]
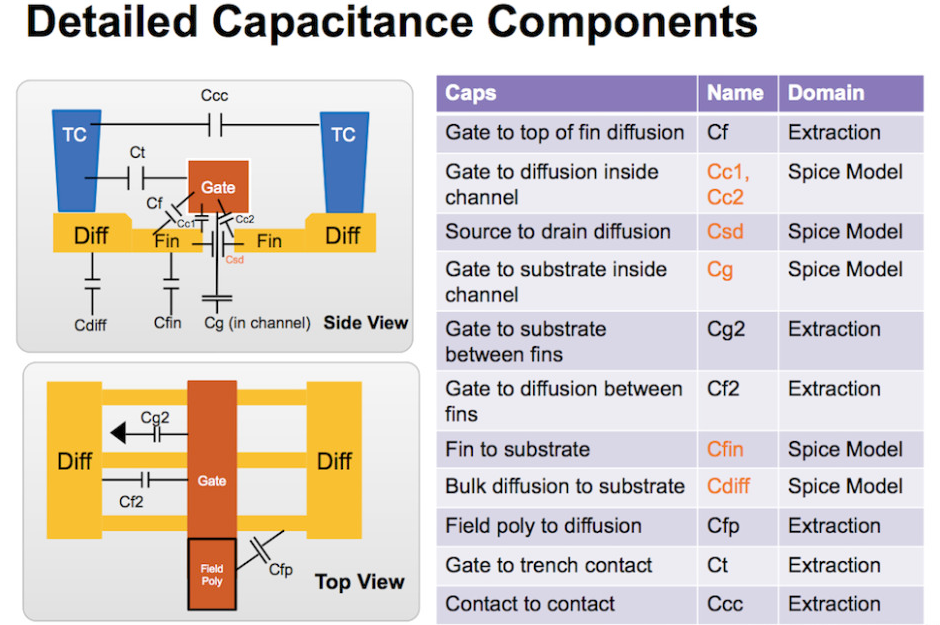
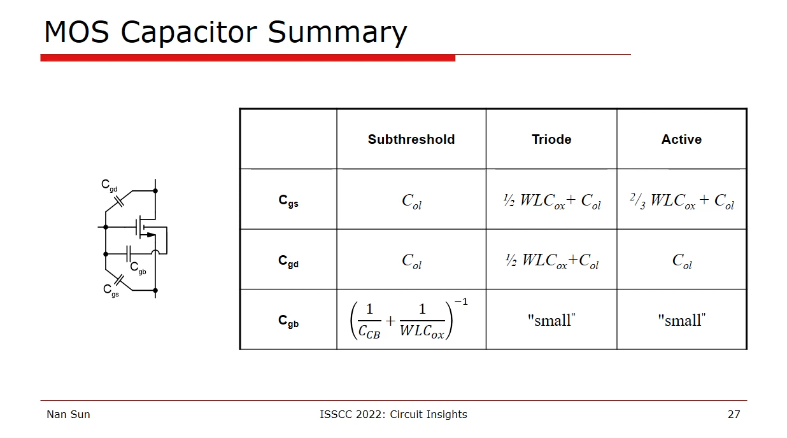
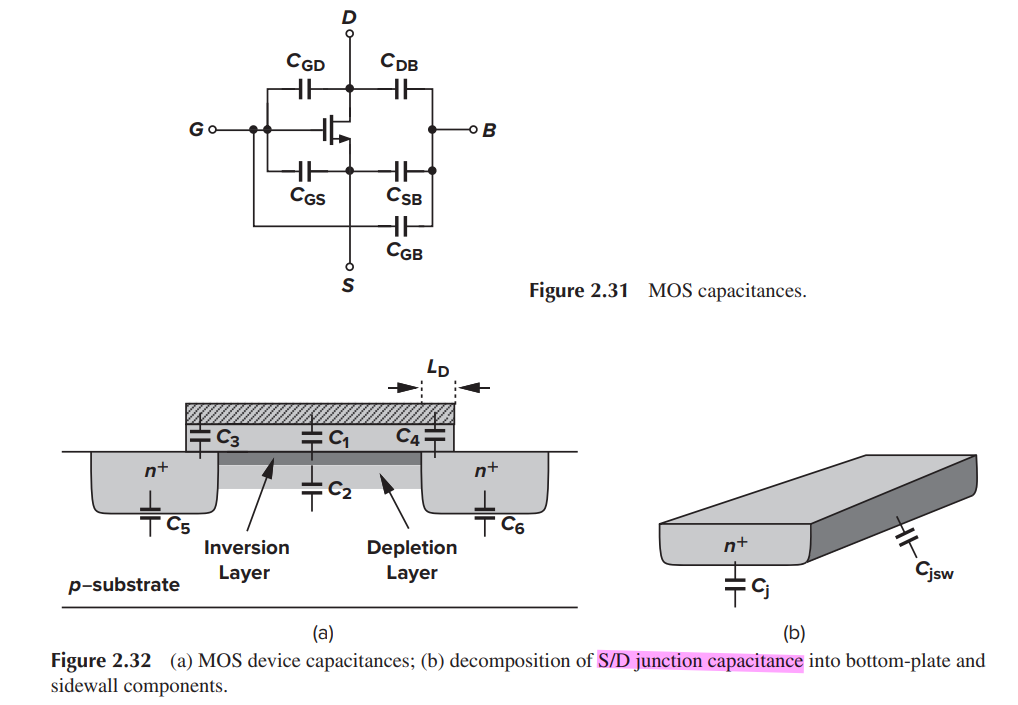
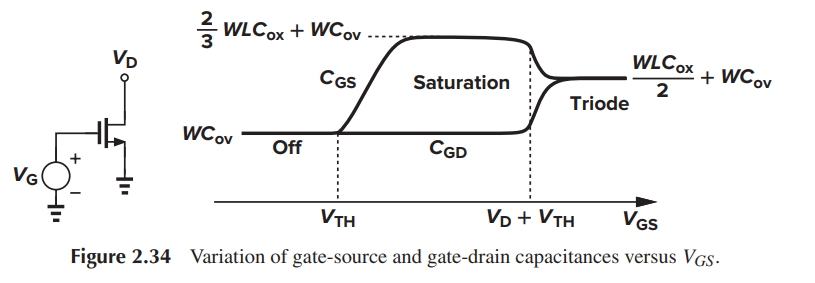
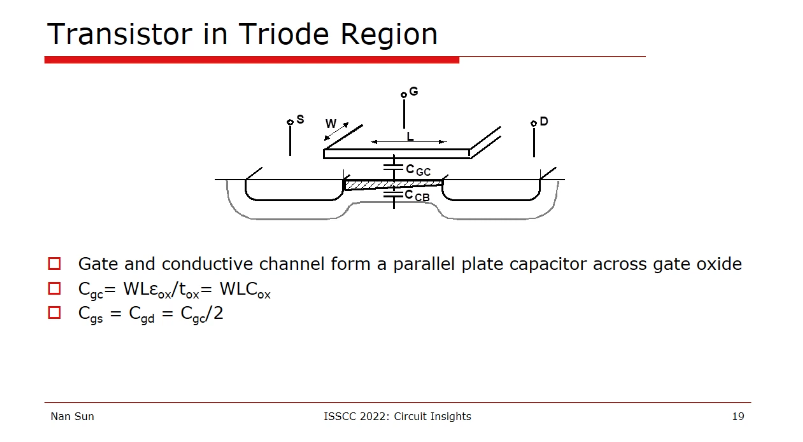
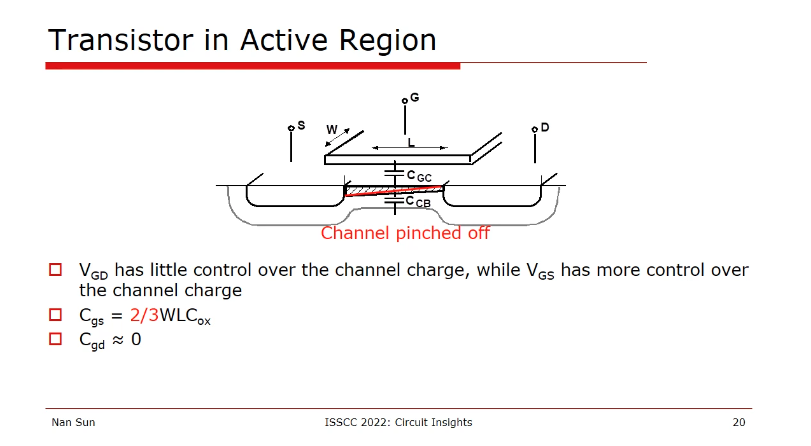
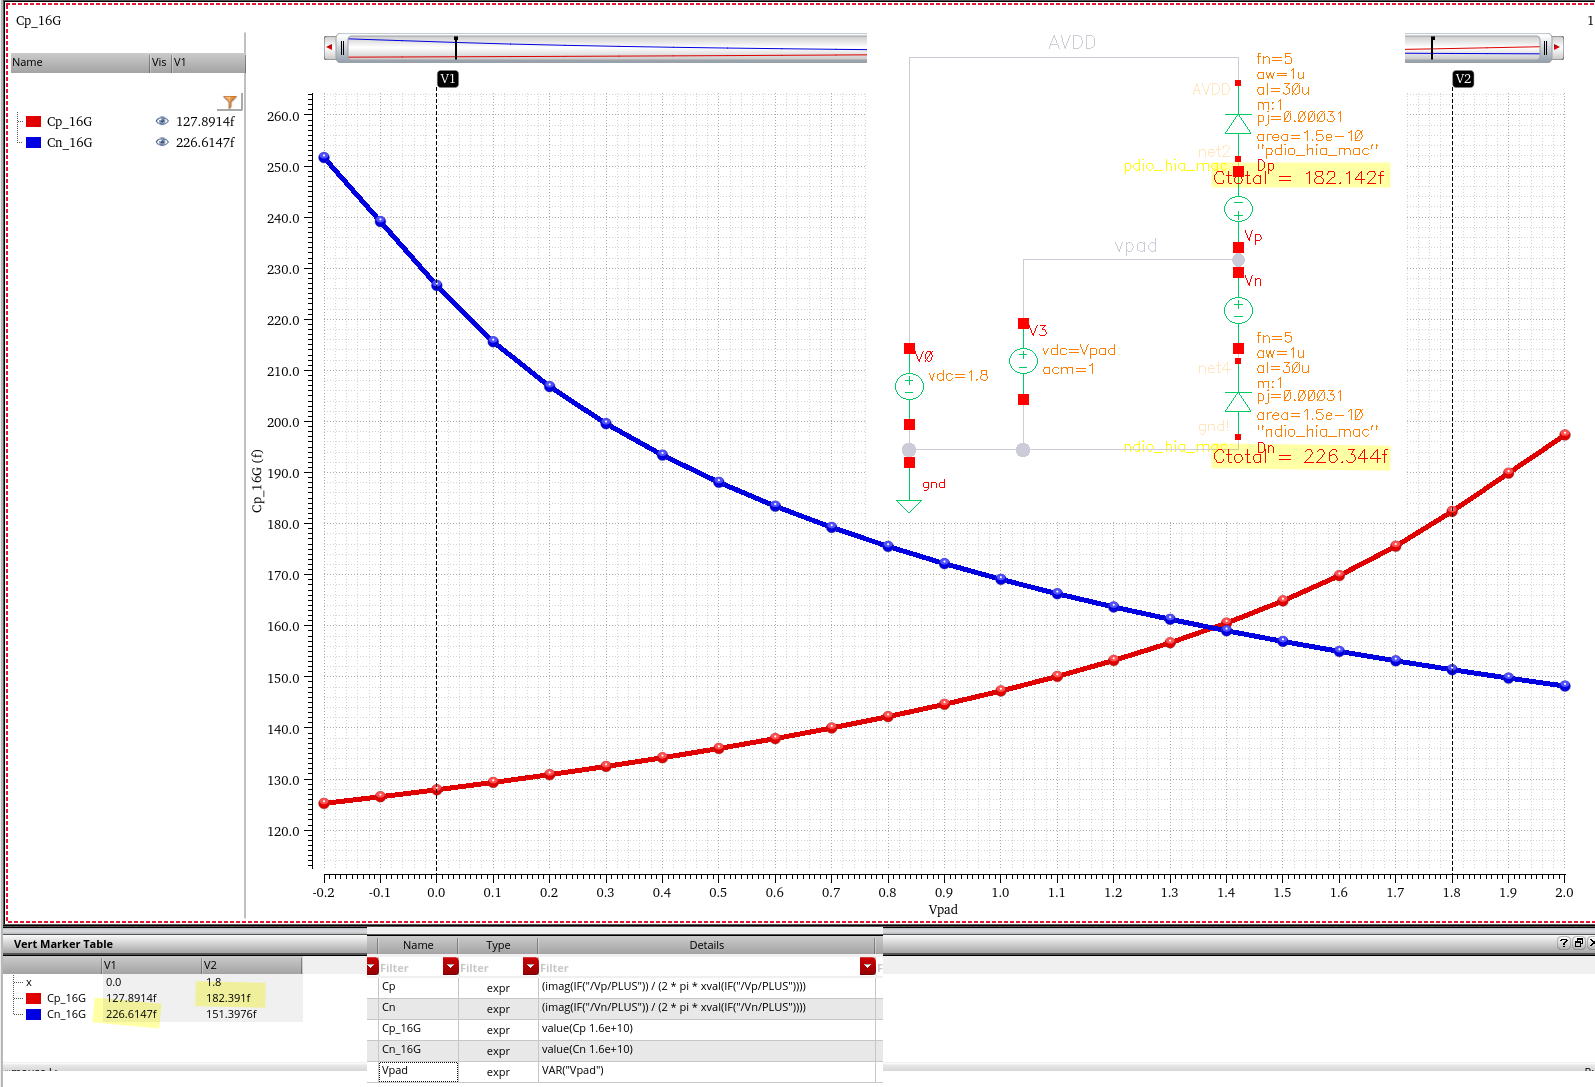
oxide capacitance (aka gate-channel
capacitance) between the gate and the channel\(C_1=WLC_{ox}\)
divided between \(C_{GS}\) and
\(C_{GD}\)
depletion capacitance between the channel
and the substrate\(C_2\)
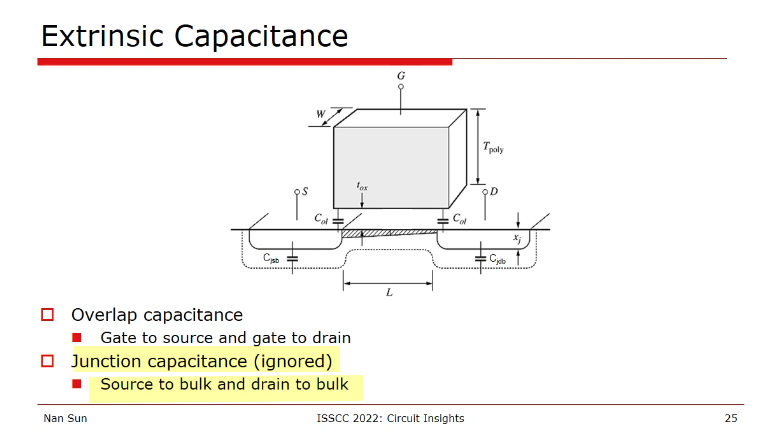
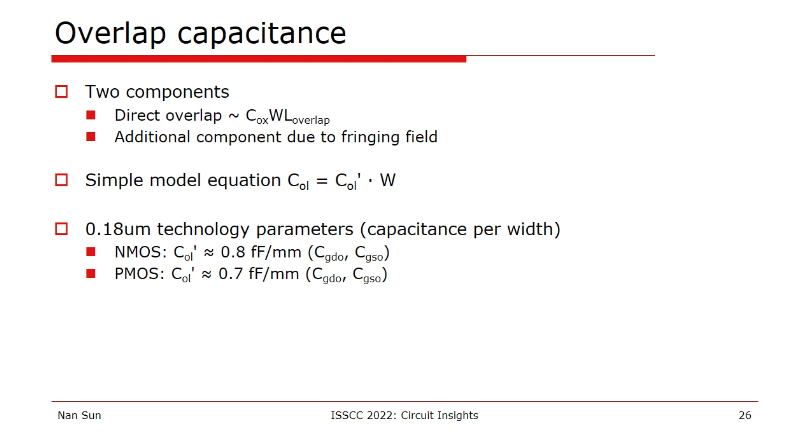
overlap capacitance: direct overlap and fringing
field
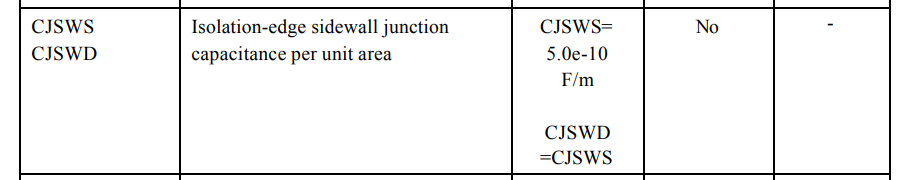
junction capacitance between the
source/drain areas and the substrate
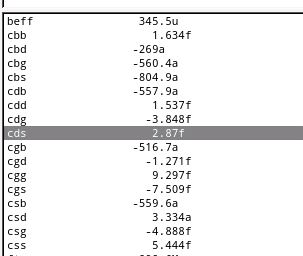
The value of \(C_{SB}\) and \(C_{DB}\) is a function of the source and
drain voltages with respect to the substrate
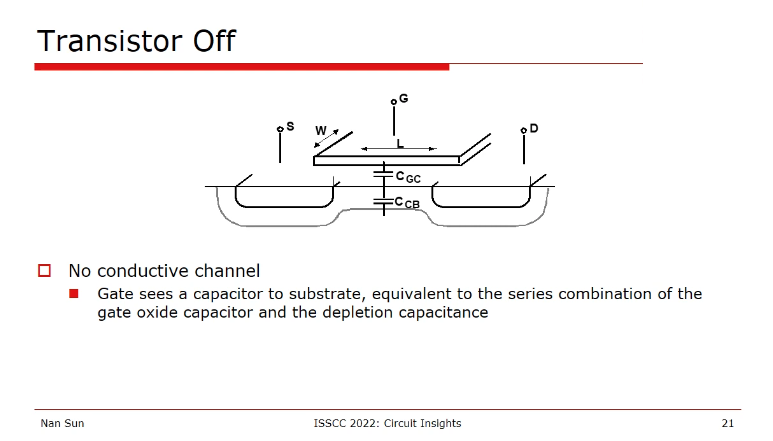
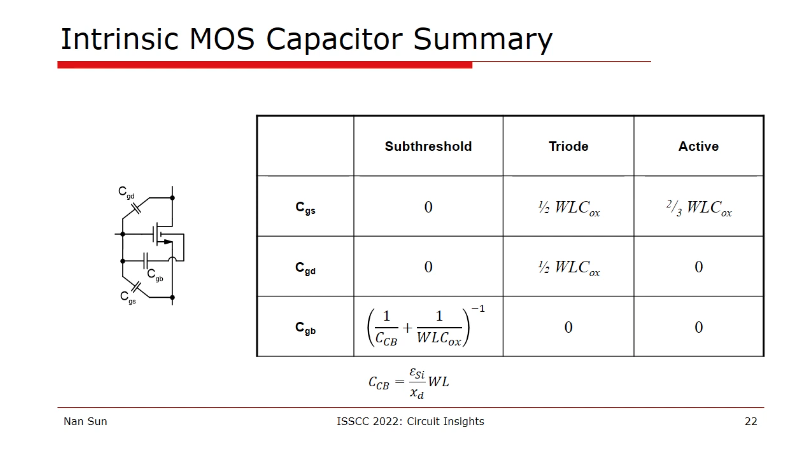
The gate-bulk capacitance is usually neglected in
the triode and saturation regions because the inversion layer acts as a
"shield" between the gate and the bulk.
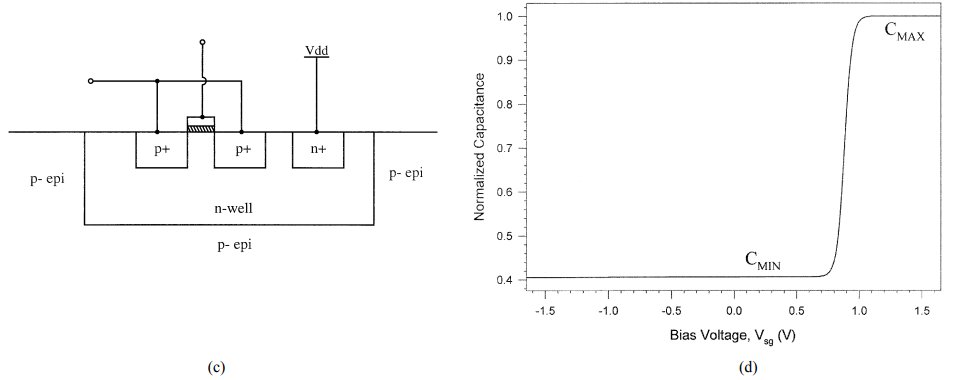
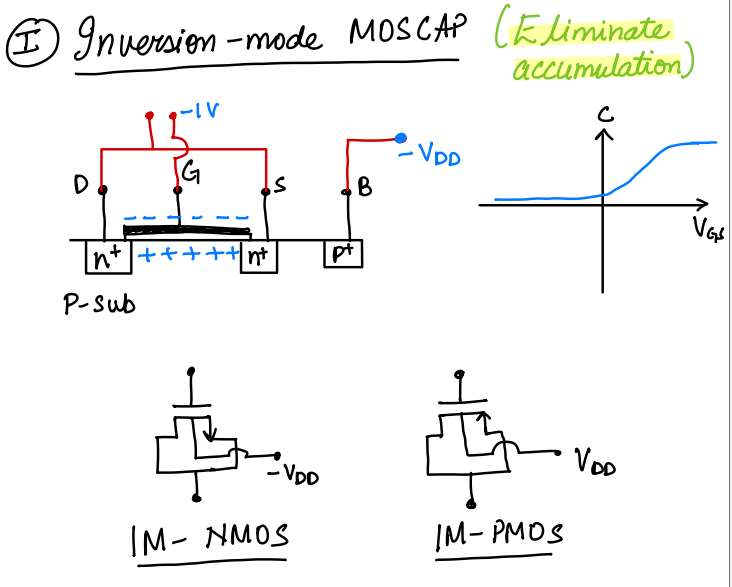
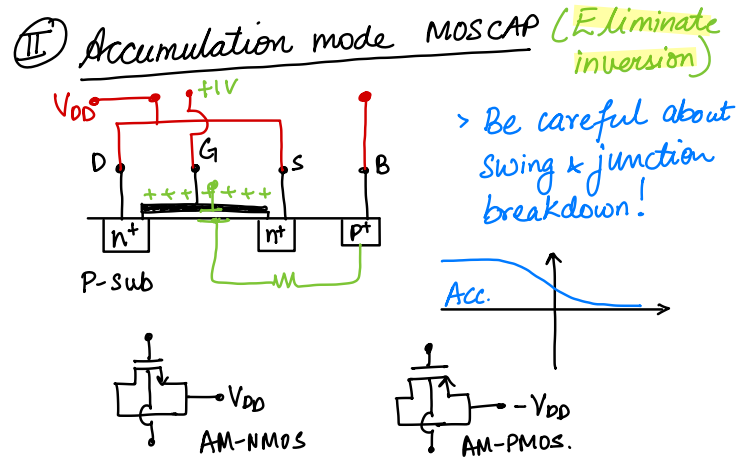
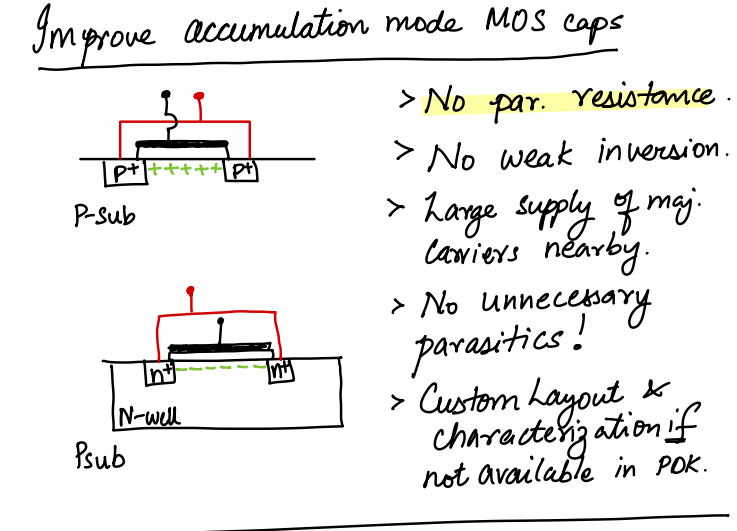
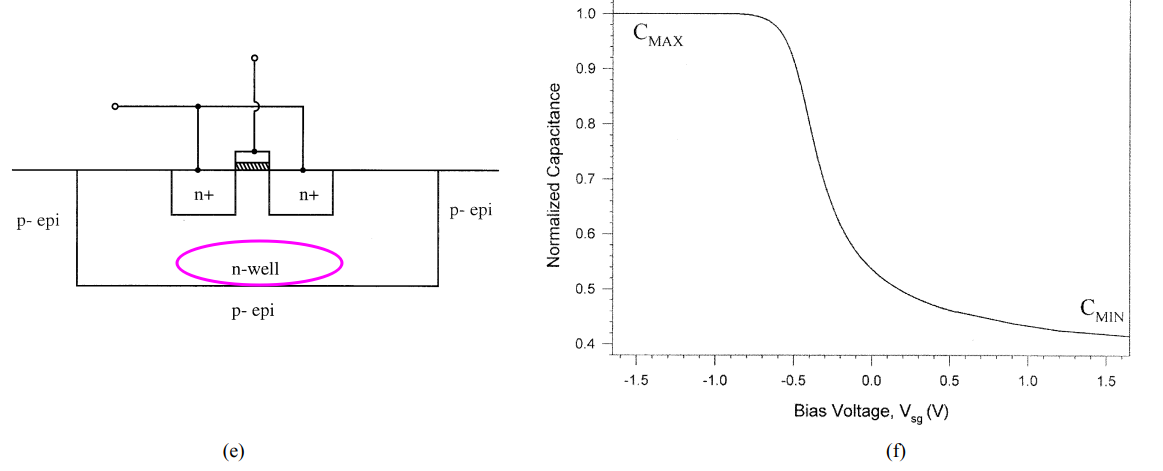
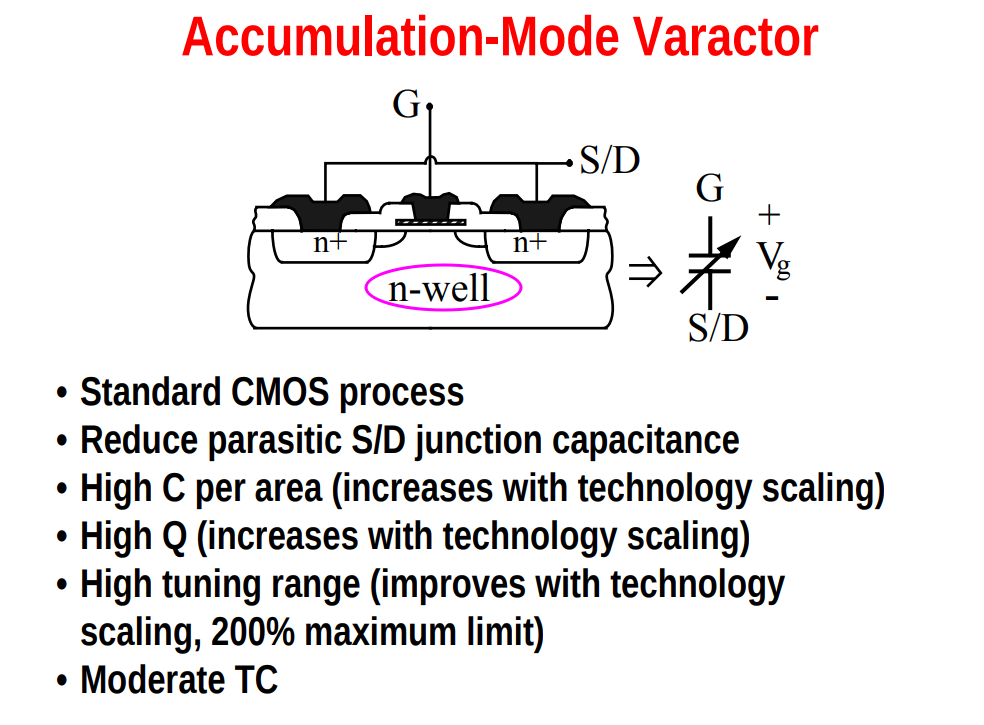
classification with Intrinsic and
Extrinsic MOS capacitor
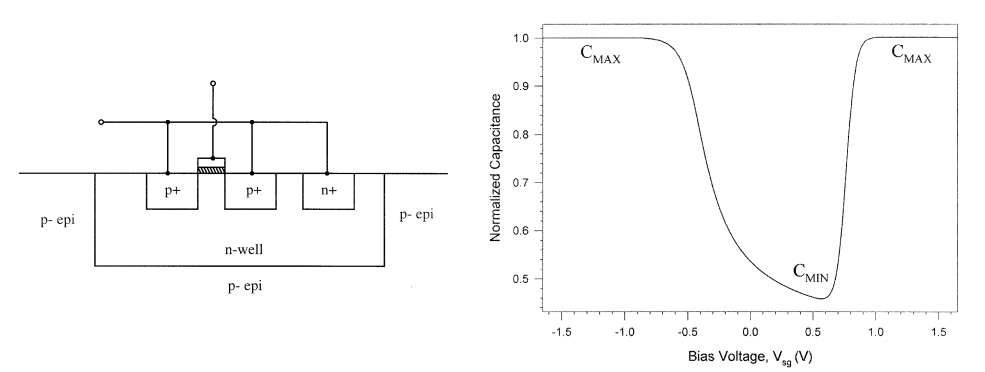
Notice: S/D and NWELL are connected togethor in
layout
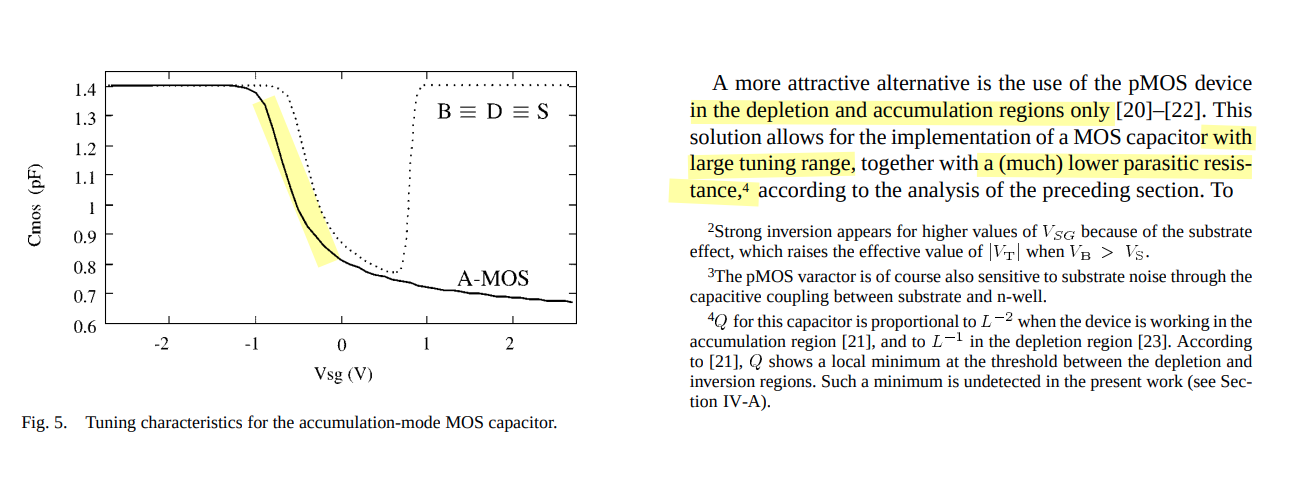
I-MOS vs . A-MOS
P. Andreani and S. Mattisson, "On the use of MOS varactors in RF
VCOs," in IEEE Journal of Solid-State Circuits, vol. 35, no. 6,
pp. 905-910, June 2000 [https://sci-hub.se/10.1109/4.845194]
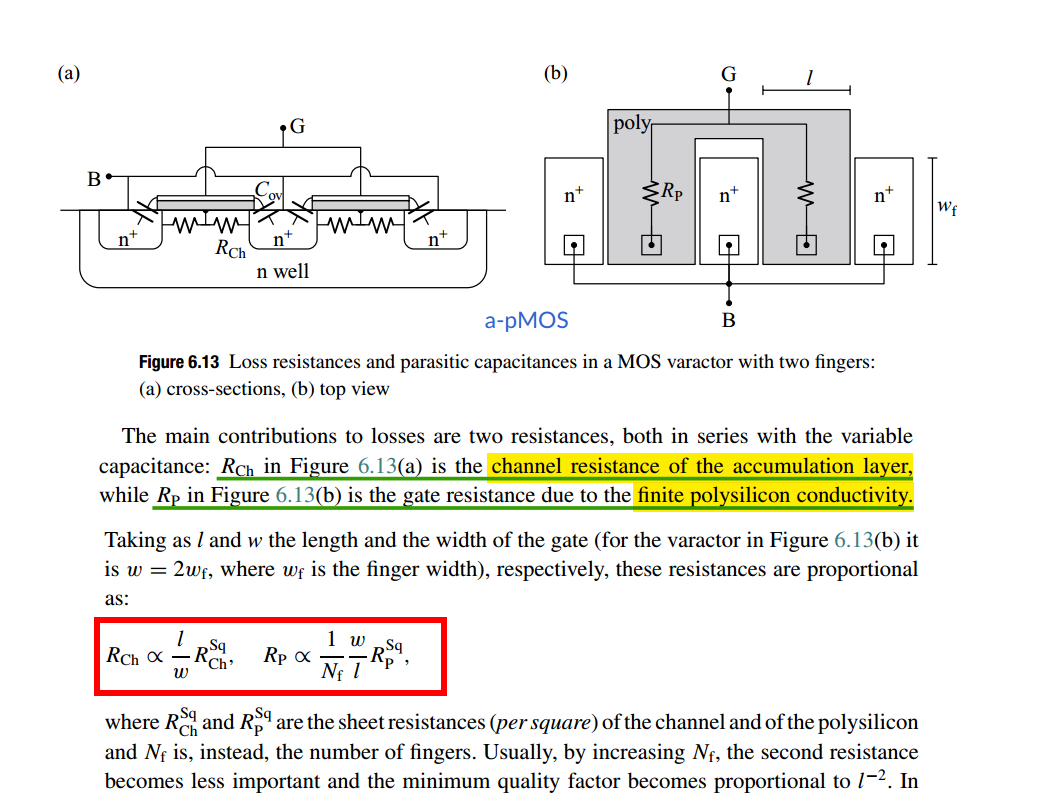
varactor losses
channel resistance & gate resistance
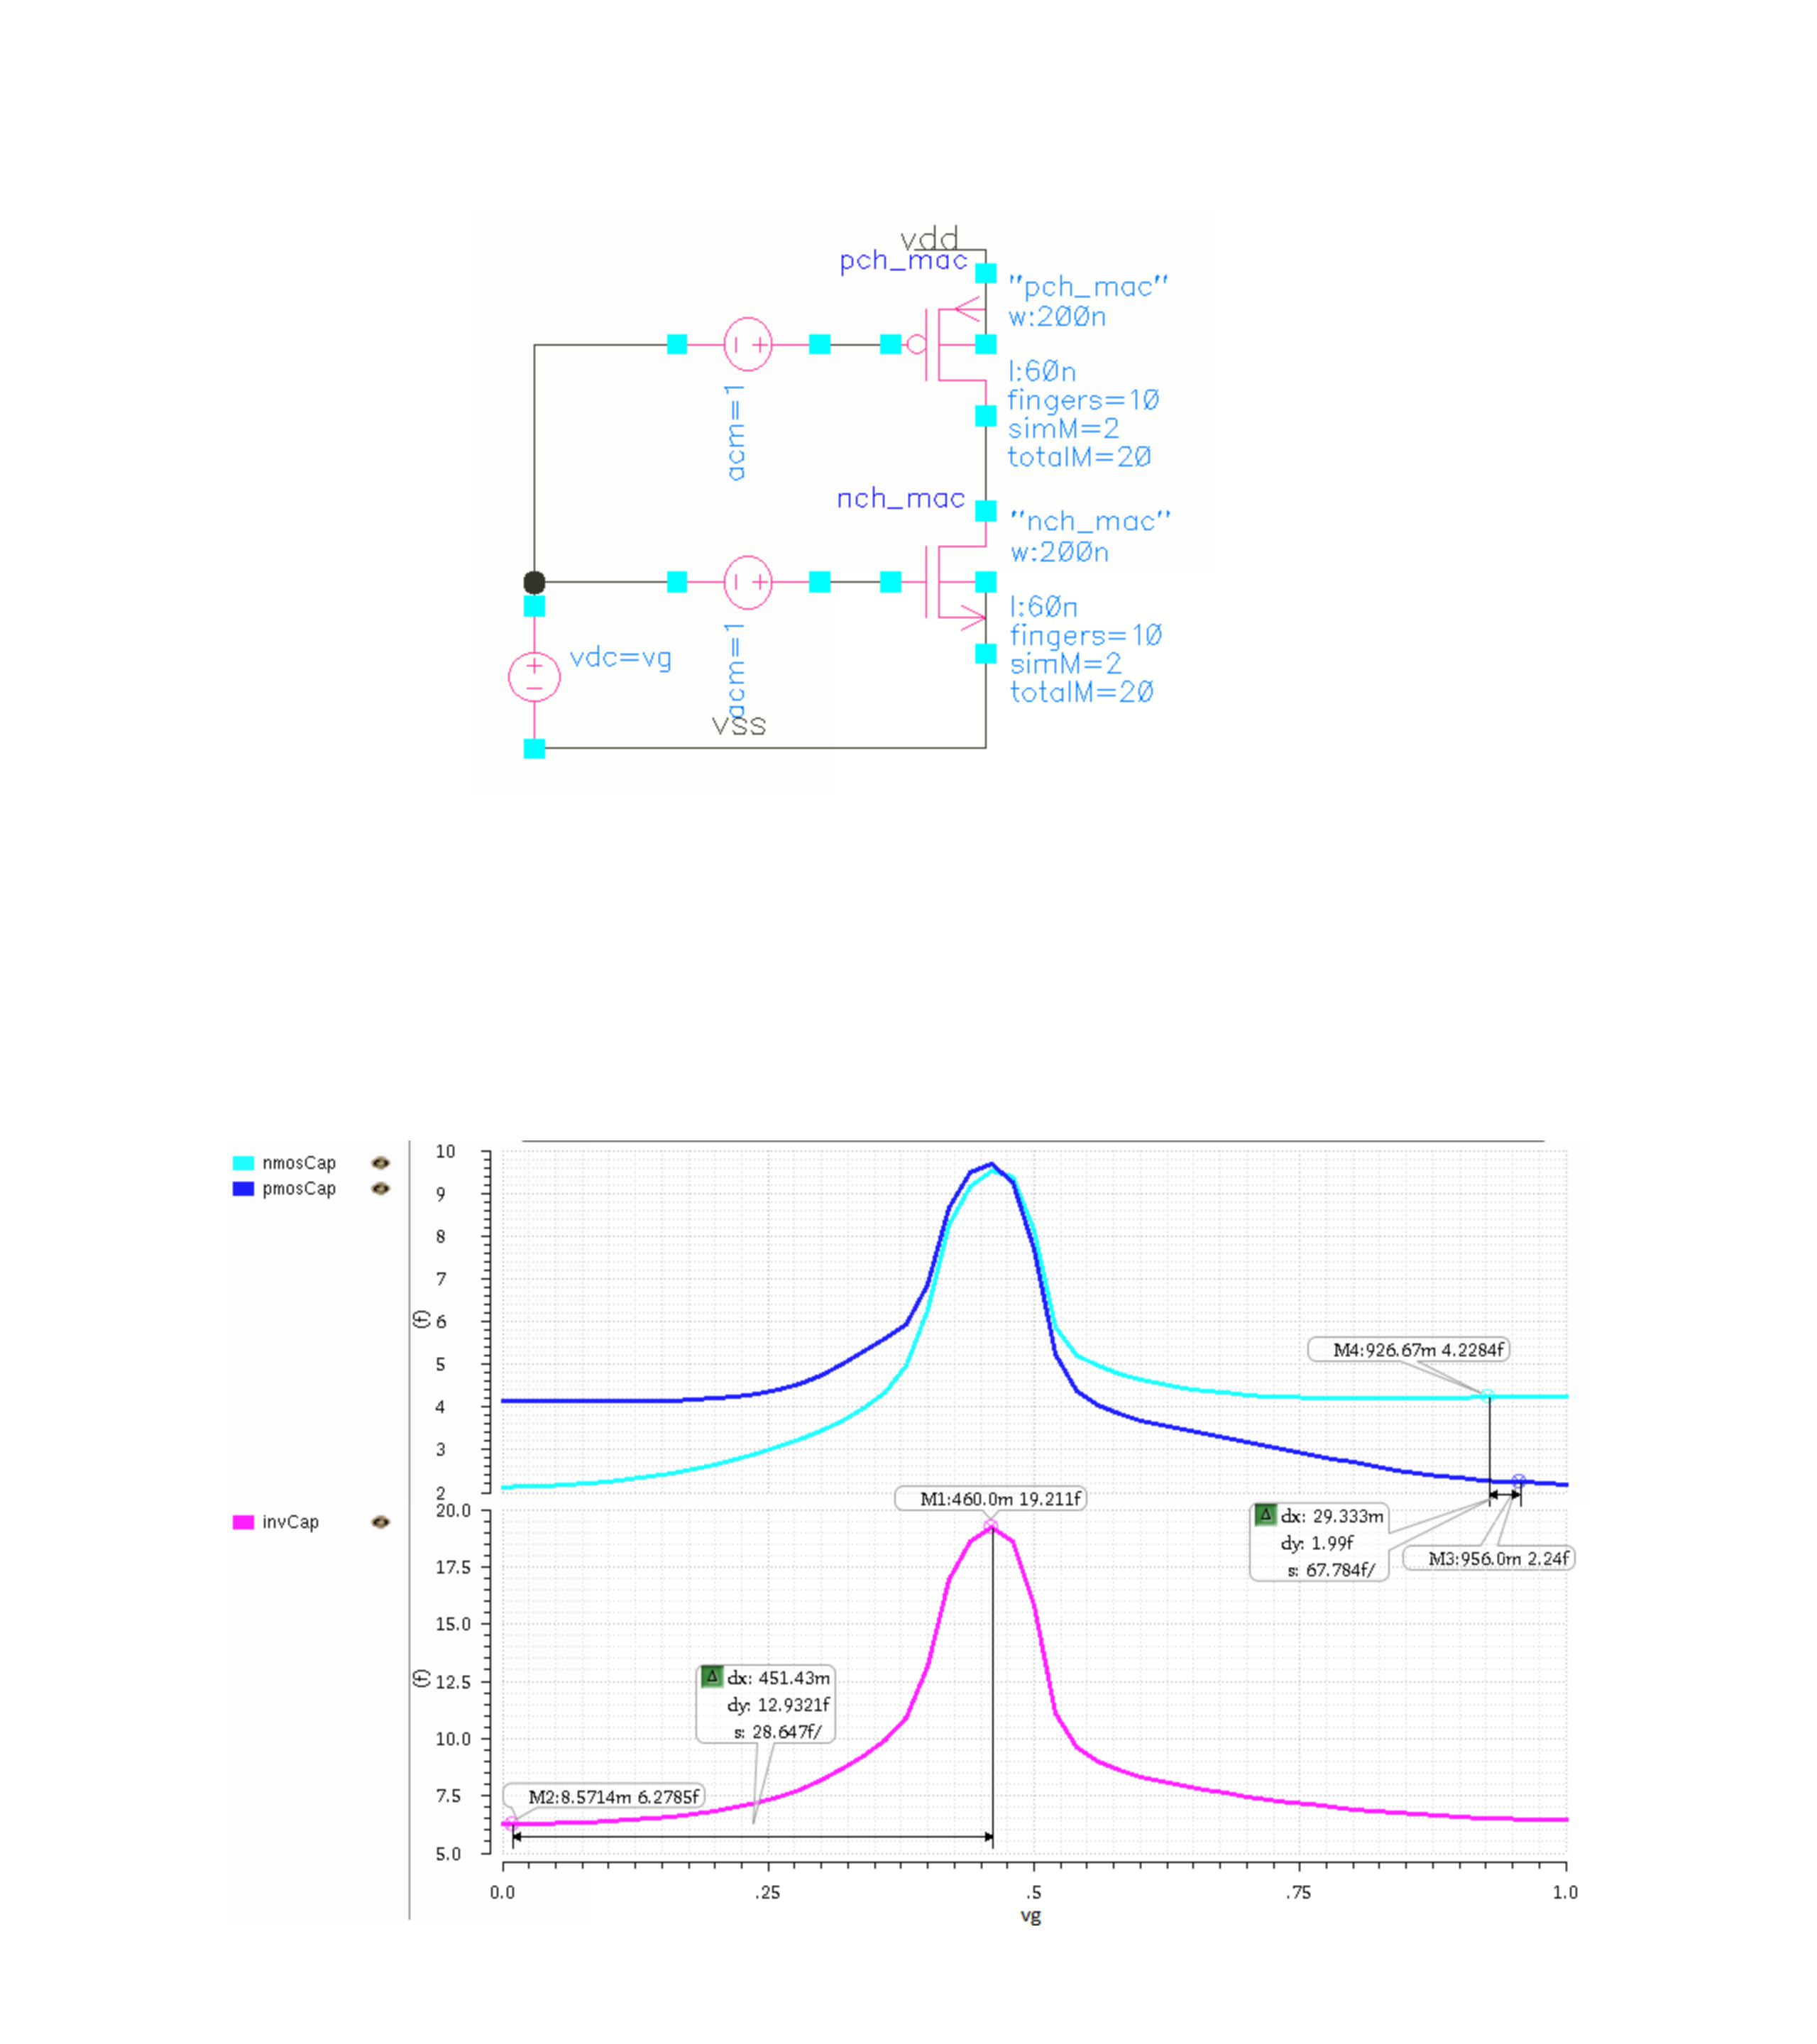
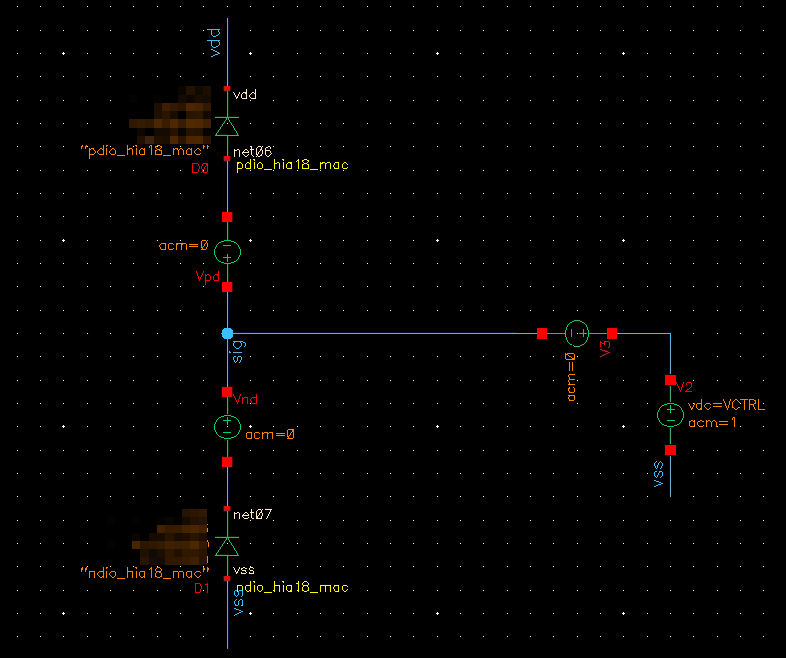
PDK varactor
nmoscap: NMOS in N-Well varactor
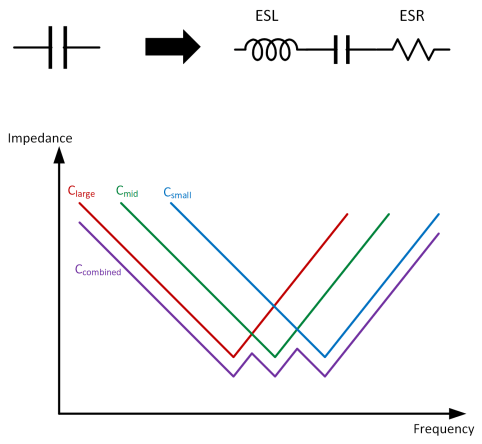
Base Band MOSCAP model (nmoscap) is built without effective series
resistance (ESR) and effective series inductance (ESL) calibrations,
which is for capacitance simulation only
LC-Tank MOSCAP model (moscap_rf) is for frequency-dependent Q factor
and capacitance simulations
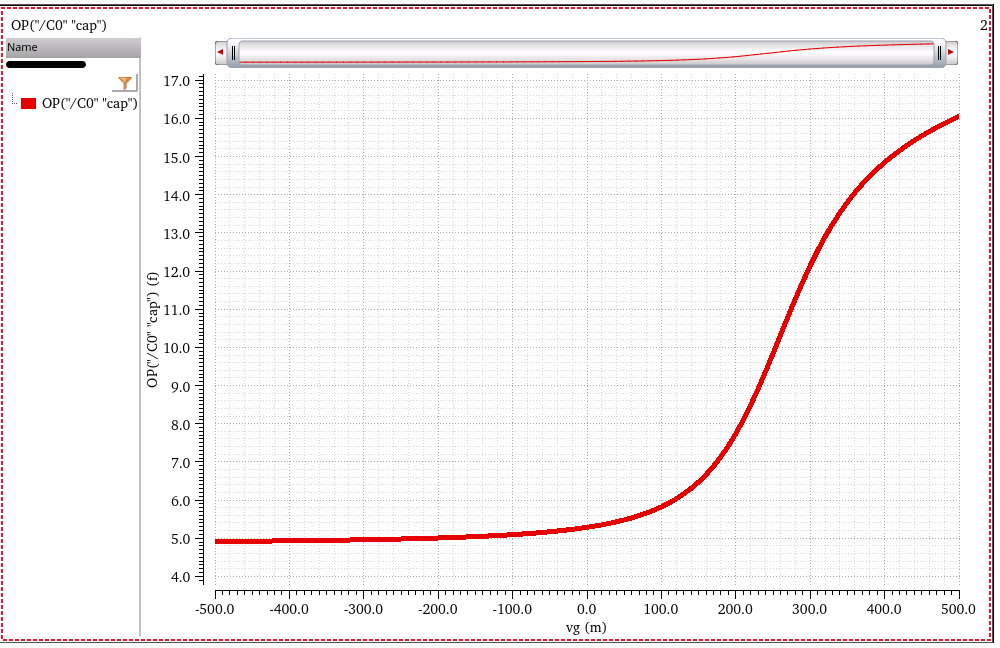
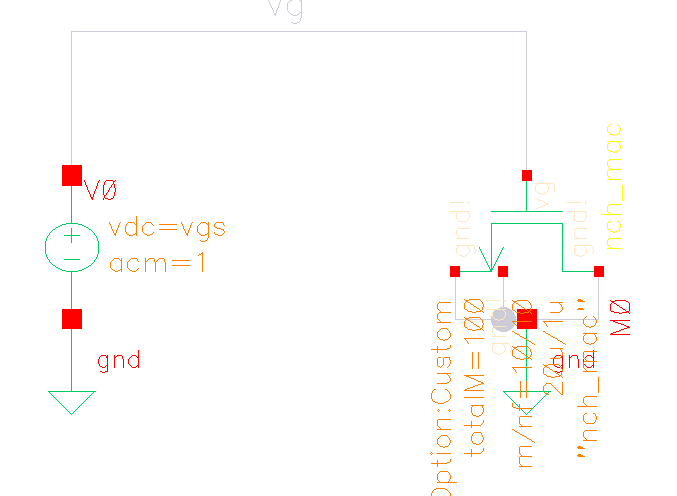
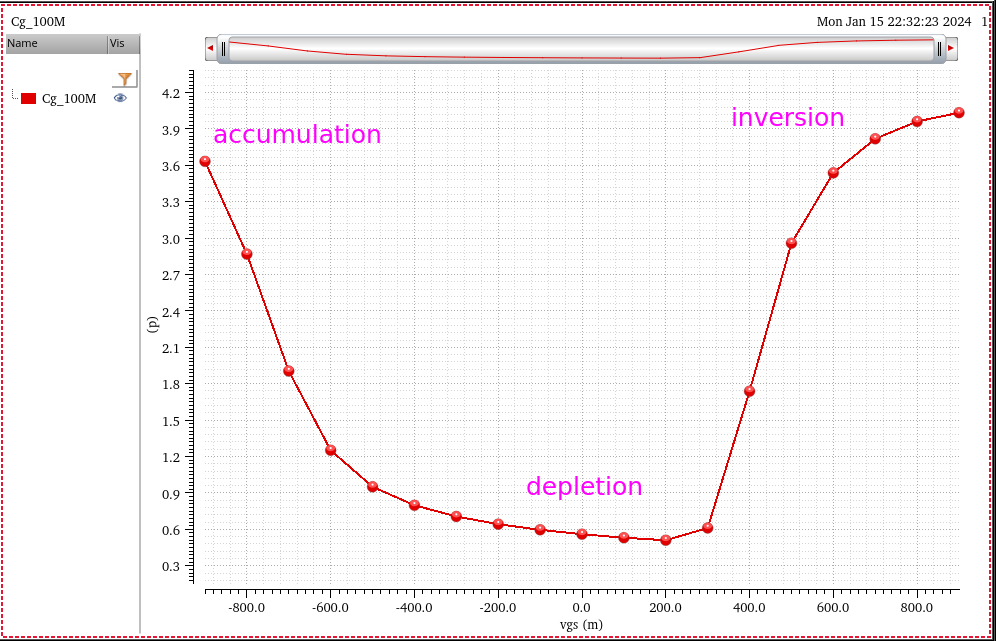
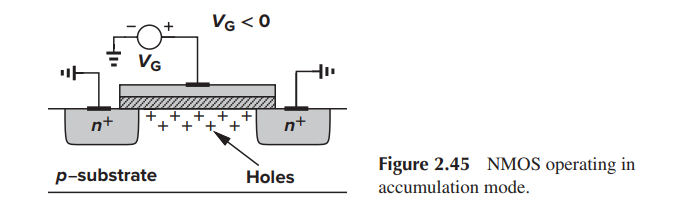
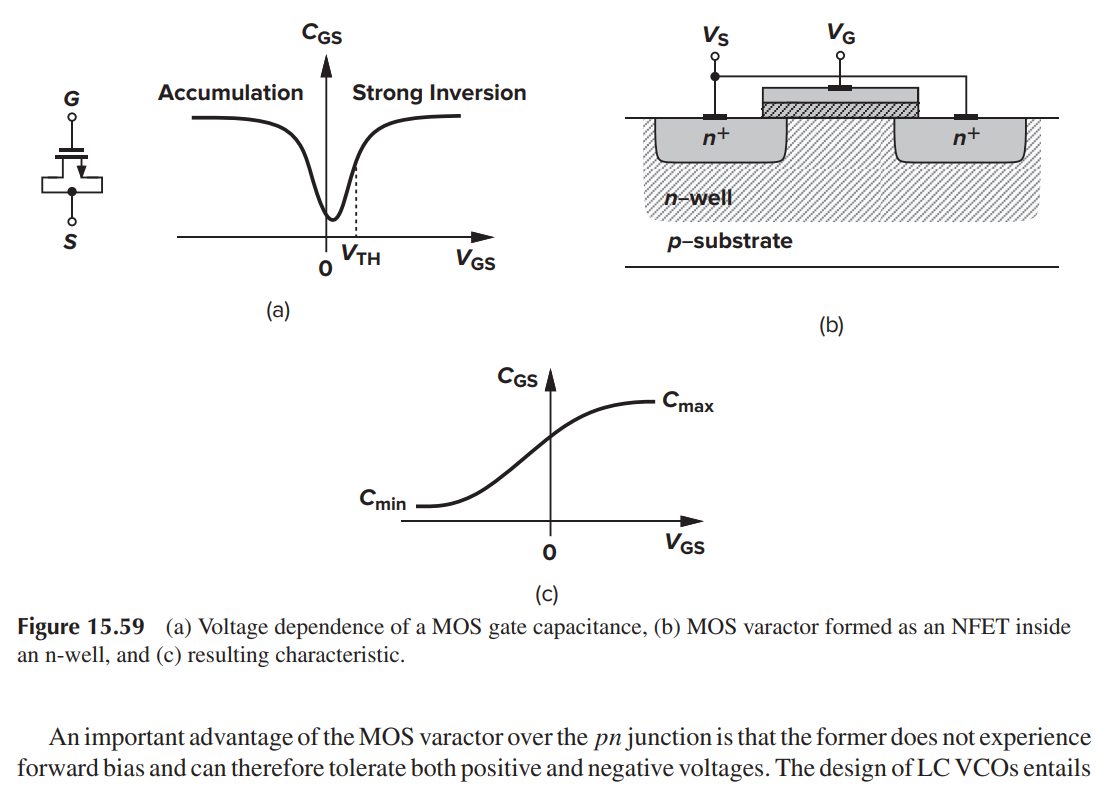
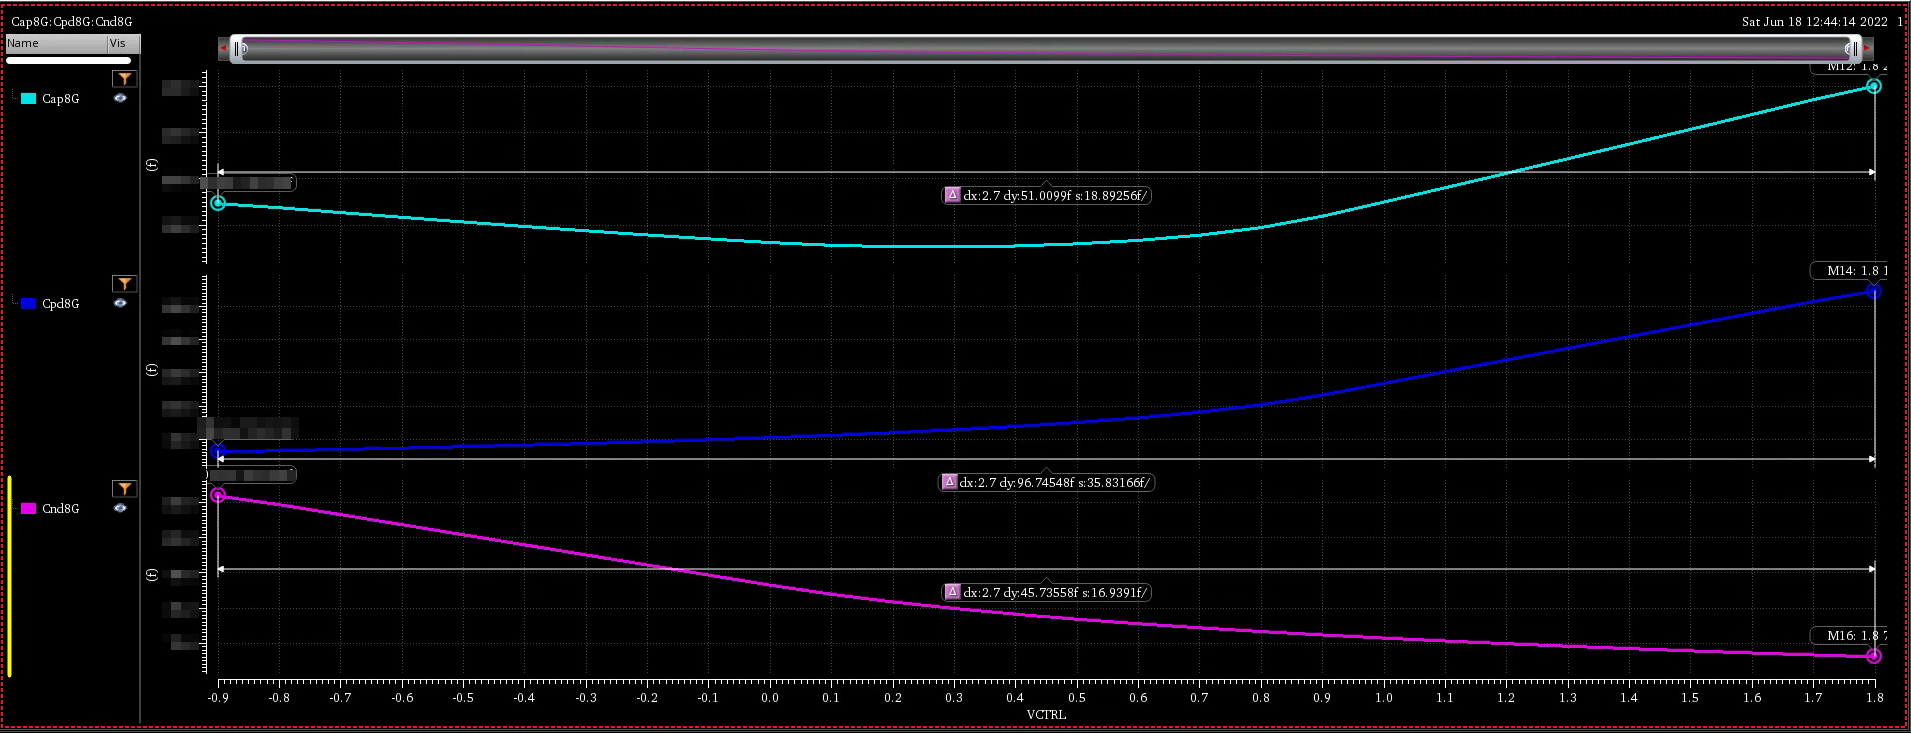
MOS Device as Capacitor
Voltage dependence
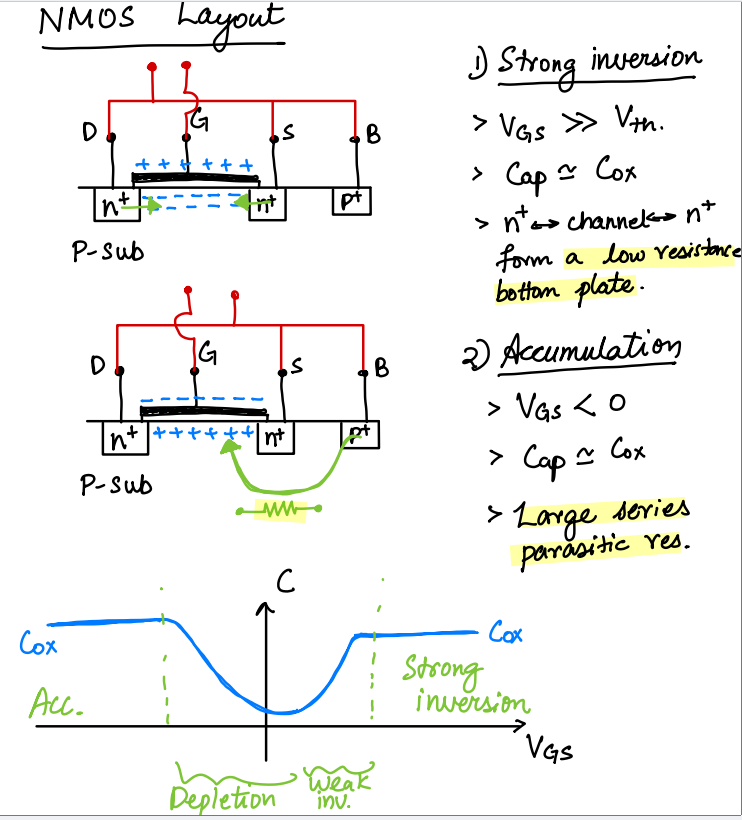
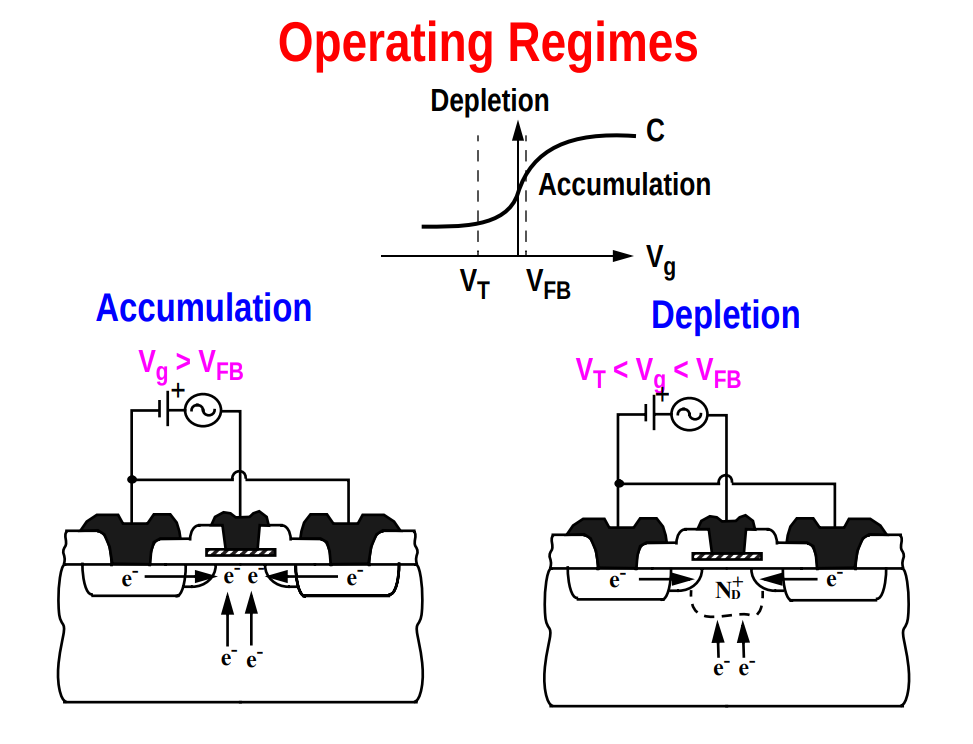
capacitance of MOS gate varies nonmonotonically
with \(V_{GS}\)
"accumulation-mode" varactor varies
monotonically with \(V_{GS}\)
Adam Teman. Practice 7: CMOS Capacitance [note,problem]
R. L. Bunch and S. Raman, "Large-signal analysis of MOS varactors in
CMOS -G/sub m/ LC VCOs," in IEEE Journal of Solid-State Circuits, vol.
38, no. 8, pp. 1325-1332, Aug. 2003 [https://sci-hub.jp/10.1109/JSSC.2003.814416]
T. Soorapanth, C. P. Yue, D. K. Shaeffer, T. I. Lee and S. S. Wong,
"Analysis and optimization of accumulation-mode varactor for RF ICs,"
1998 Symposium on VLSI Circuits. Digest of Technical Papers (Cat.
No.98CH36215), 1998, pp. 32-33, doi: 10.1109/VLSIC.1998.687993. URL: http://www-smirc.stanford.edu/papers/VLSI98s-chet.pdf
R. Jacob Baker, 6.1 MOSFET Capacitance Overview/Review, CMOS Circuit
Design, Layout, and Simulation, Fourth Edition
B. Razavi, Design of Analog CMOS Integrated Circuits 2nd
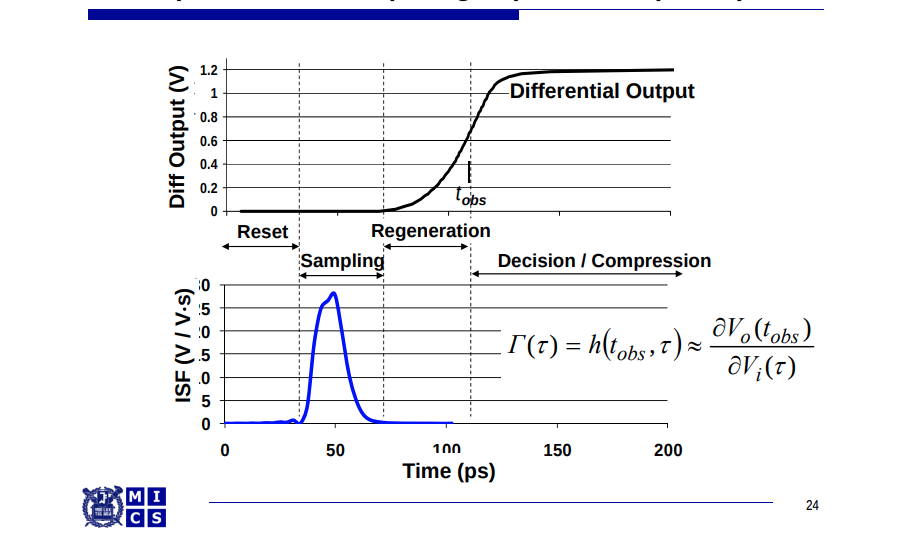
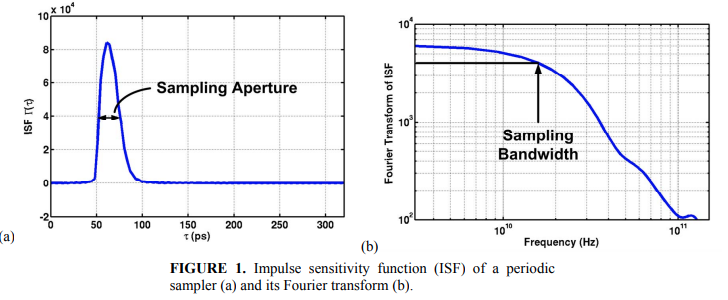
We define the ISF of the sampler as the sensitivity of its final
output voltage to the impulse arriving at its input at different times,
the ISF essentially describes the aperture of the sampler.
An ideal sampler would have the perfect aperture, i.e. sampling the
input voltage at exactly one point in time; thus, its ISF would be a
Dirac delta function, \(\delta(t-t_s)\)
where \(t_s\) is when sampling
occurs.
A realistic sampler would rather capture a weighted-average of the
input voltage over a certain time window. This weighting function is
called the sampling aperture and is equivalent to the ISF
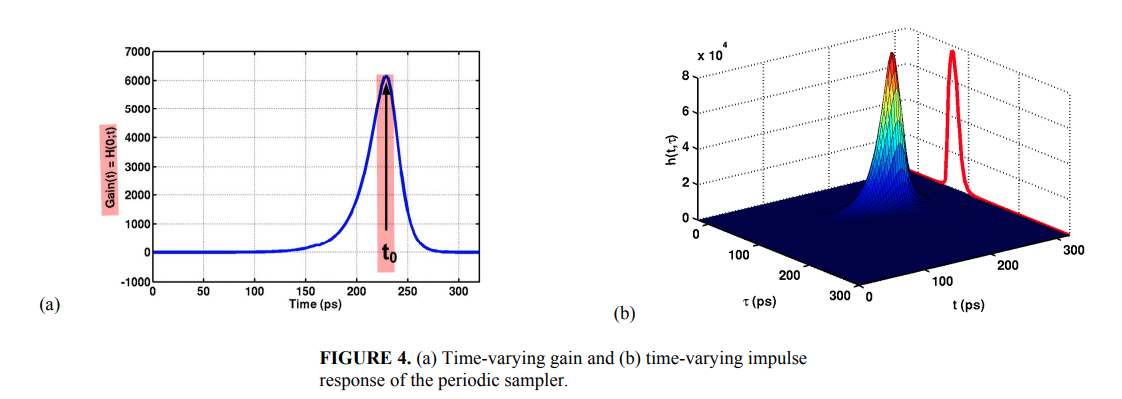
A time-varying impulse response\(h(t, \tau)\) is defined as the circuit
response at time \(t\) responding to an
impulse arriving at time \(\tau\).
In general, the ISF can be regarded as the time-varying
impulse response evaluated at one particular observation
time\(t=t_0\).
The system output \(y(t)\) is
related to the input \(x(t)\) as: \[
y(t) = \int_{-\infty}^{\infty}h(t, \tau)\cdot x(\tau)d\tau
\] Note that in a linear time-invariant (LTI) system, \(h(t,\tau)=h(t-\tau)\) and the above
equation reduces to a convolution.
If \(X(j\omega)\) is the Fourier
transform of the input signal \(x(t)\),
i.e. \[
x(t) = \frac{1}{2\pi}\int_{-\infty}^{\infty}X(j\omega)\cdot e^{j\omega
t}d\omega
\] Then \[\begin{align}
y(t) &=
\int_{-\infty}^{\infty}h(t,\tau)\left[\frac{1}{2\pi}\int_{-\infty}^{\infty}X(j\omega)\cdot
e^{j\omega\tau }d\omega \right]\cdot d\tau \\
&=\frac{1}{2\pi}\int_{-\infty}^{\infty}X(j\omega)\left[\int_{-\infty}^{\infty}h(t,\tau)\cdot
e^{j\omega\tau}d\tau\right]\cdot d\omega \\
&=\frac{1}{2\pi}\int_{-\infty}^{\infty}X(j\omega)\left[\int_{-\infty}^{\infty}h(t,\tau)\cdot
e^{-j\omega(t-\tau)}d\tau\right]\cdot e^{j\omega t}\cdot d\omega \\
&=\frac{1}{2\pi}\int_{-\infty}^{\infty}X(j\omega)\cdot
H(j\omega;t)\cdot e^{j\omega t}\cdot d\omega
\end{align}\]
where \(H(j\omega;t)\) is
time-varying transfer function, defined as the Fourier
transform of the time-varying impulse response. \[
H(j\omega;t)=\int_{-\infty}^{\infty}h(t,\tau)\cdot
e^{-j\omega(t-\tau)}d\tau
\] And it follows that: \[
Y(j\omega)=H(j\omega;t)\cdot X(j\omega)
\] And
For linear, periodically time-varying (LPTV) systems, \(h(t, \tau) = h(t+T, \tau+T)\) and \(H(j\omega; t) = H(j\omega; t+T)\) where
\(T\) is the period of the time-varying
dynamics of the system.
Since \(H(j\omega;t)\) is periodic
in \(T\), The time-varying transfer
function \(H(j\omega;t)\) can be
expressed in a Fourier series: \[
\color{red}H(j\omega;t)=\sum_{m=-\infty}^{\infty}H_m(j\omega) \cdot
e^{jm\omega_c t}
\] where \(\omega_c\) is the
fundamental frequency of the periodic system. \(H_m(j\omega)\) represent the frequency
response of the system at the \(m\)-th
harmonic output sideband to a unit \(j\omega\) sinusoid.
The above equation link time-varying transfer function \(H(j\omega;t)\) with PAC simulation
output
The response to a periodic impulse train, that is: \[
x(t)=\sum_{n=-\infty}^{\infty}\delta(t-\tau-nkT)
\] The idea is that if the impulse response of the system settles
to zero long before the next impulse arrives, then the system response
to this impulse train would be approximately equal to the periodic
repetition of the true impulse response, i.e. \[
y(t) \cong \sum_{n=-\infty}^{\infty}h(t;\tau+nkT)
\] and \(y(t)\) would be
approximately equal to \(h(t;\tau)\)
for \(\tau \leq t \le \tau+kT\)
Without loss of generality and for computation convenience, we set
\(k=1\) thereafter.
The Fourier transform \(X(j\omega)\)
of the T-periodic impulse train is: \[
X(j\omega)=\omega_c\sum_{n=-\infty}^{\infty}\delta(\omega-n\omega_c)\cdot
e^{-j\omega\tau}
\] Then the response \(y(t)\)
is: \[
y(t)=\frac{1}{T}\sum_{n=-\infty}^{\infty}H(jn\omega_c;t)\cdot
e^{jn\omega_c\cdot(t-\tau)}
\] The expression for the approximate time-varying impulse
response: \[
h(t,\tau) \cong y(t)= \left\{ \begin{array}{cl}
\frac{1}{T}\sum_{n=-\infty}^{\infty}\sum_{m=-\infty}^{\infty}H_m(jn\omega_c)\cdot
e^{jm\omega_ct+jn\omega_c\cdot (t-\tau)} & : \ \tau \leq t \lt
\tau+T \\
0 & : \ \text{elsewhere}
\end{array} \right.
\] Finally, the ISF \(\Gamma(\tau)\) is equal to \(h(t,\tau)\) when \(t=t_0\) if \(t_0
\gt \tau\)\[
\Gamma(\tau)\cong
\frac{1}{T}\sum_{n=-\infty}^{\infty}\sum_{m=-\infty}^{\infty}H_m(jn\omega_c)\cdot
e^{jm\omega_ct_0+jn\omega_c\cdot (t_0-\tau)}
\] In practice, the summations are carried out over finite ranges
of n and m, for example, -50~50
For each combination of n and m,
the PAC analysis needs to be performed to compute \(H_m(jn\omega_c)\) — \(m\)-th harmonic response to the excitation
at \(n\omega_c\)
The detailed procedure for characterizing the ISF of this sampler is
outlined as follows:
First, apply the proper input voltages that place the sampler in
a metastable state and perform PSS
Second, perform PAC
Third, based on the simulated PAC response, pick a time point
\(t_0\) at which the ISF is to be
computed and derive the ISF
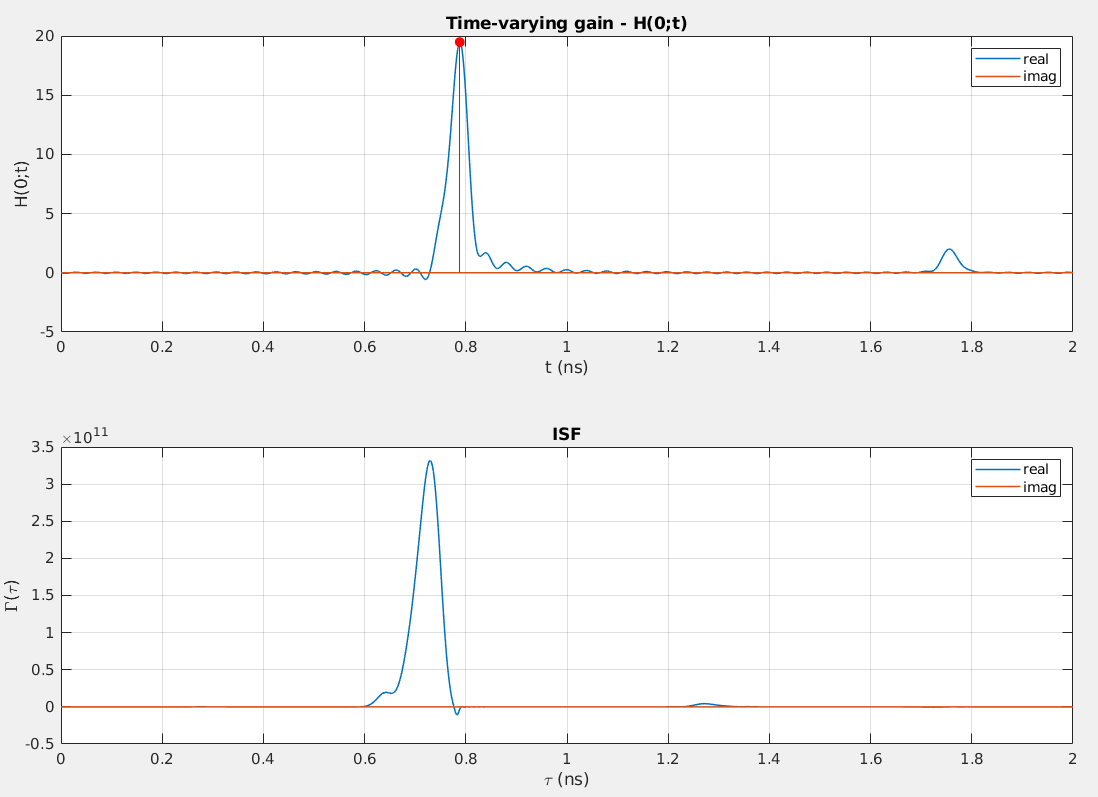
One possible candidate for the ISF measurement point \(\color{red}t_0\) is the time at which the
output voltage is amplified to the largest value. Figure 4(a) plots PAC
response of the sampler to a small signal DC
input — the time-varying transfer function evaluated at \(\color{red}\omega=0\)\[
H(0;t)=\sum_{m=-\infty}^{\infty}H_m(0) \cdot e^{jm\omega_c t}
\]
The total area under the ISF is the sampling gain, which is equal to
the time-varying gain measured at \(t_0\) to a small signal DC input (\(\omega=0\))
Because we have \(H(j\omega;t)=\int_{-\infty}^{\infty}h(t,\tau)\cdot
e^{-j\omega(t-\tau)}d\tau\), i.e. Fourier transform \[
H(0;t)=\int_{-\infty}^{\infty}h(t,\tau)d\tau =
\int_{-\infty}^{\infty}\Gamma(\tau)d\tau
\]
1 2
time-varying gain at t0 H(0;t0): 19.486305 The total area under the ISF: 19.990230
clock frequency should be low enough to assure system response
settle to zero.
Beat Frequency os PSS should be clock frequency
For PAC setup,
the Sweeptype is absolute
Input Frequency Sweep Range(Hz) should be large
enough.
Sweep Type should be Linear and
Step Size should equal PSS Beat
Frequency(Hz)
SideBands should large enough, like 50 (i.e. 50*2 +1,
positive, negative and 0)
Specialized Analyses should be None
one example: clock, i.e. beat frequency = 8G PAC: input frequency
sweep from -400G to 400G and step is 8G, which is beat frequency, here
K=1 Eq.(9) of paper
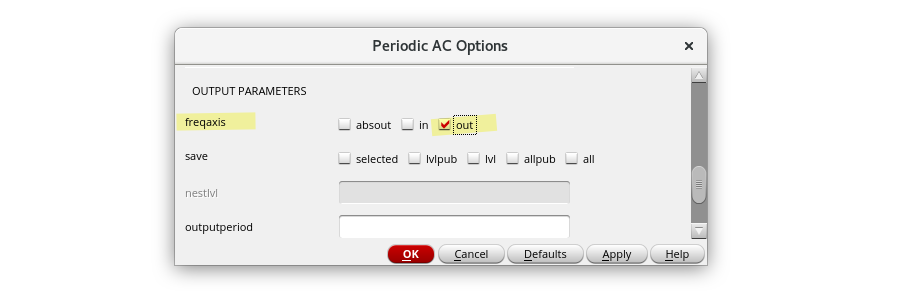
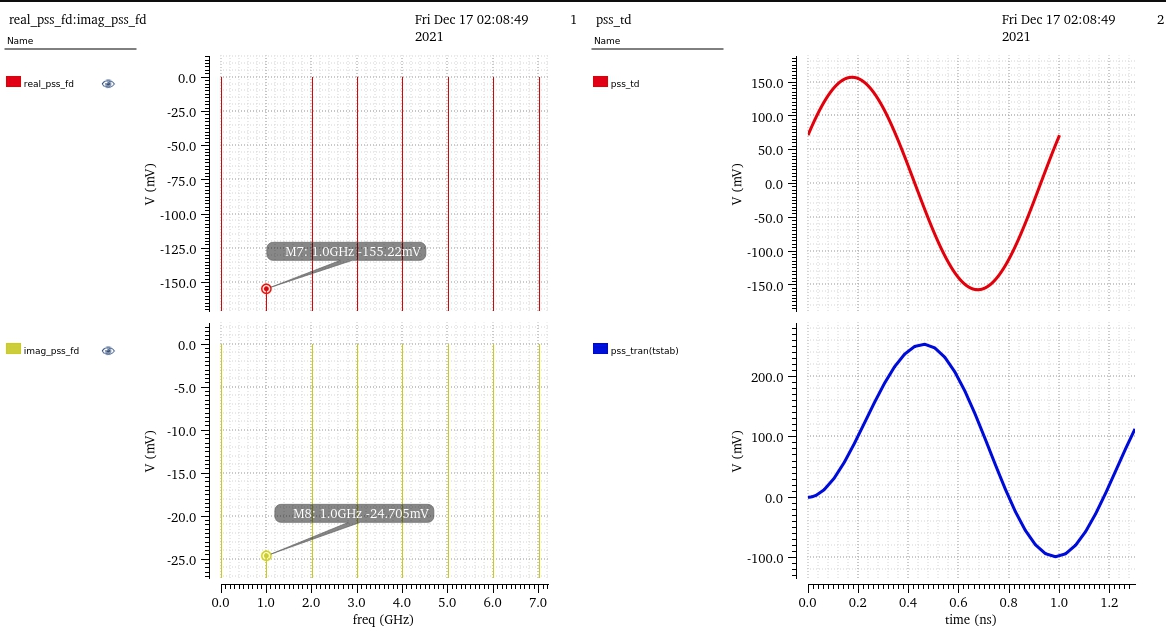
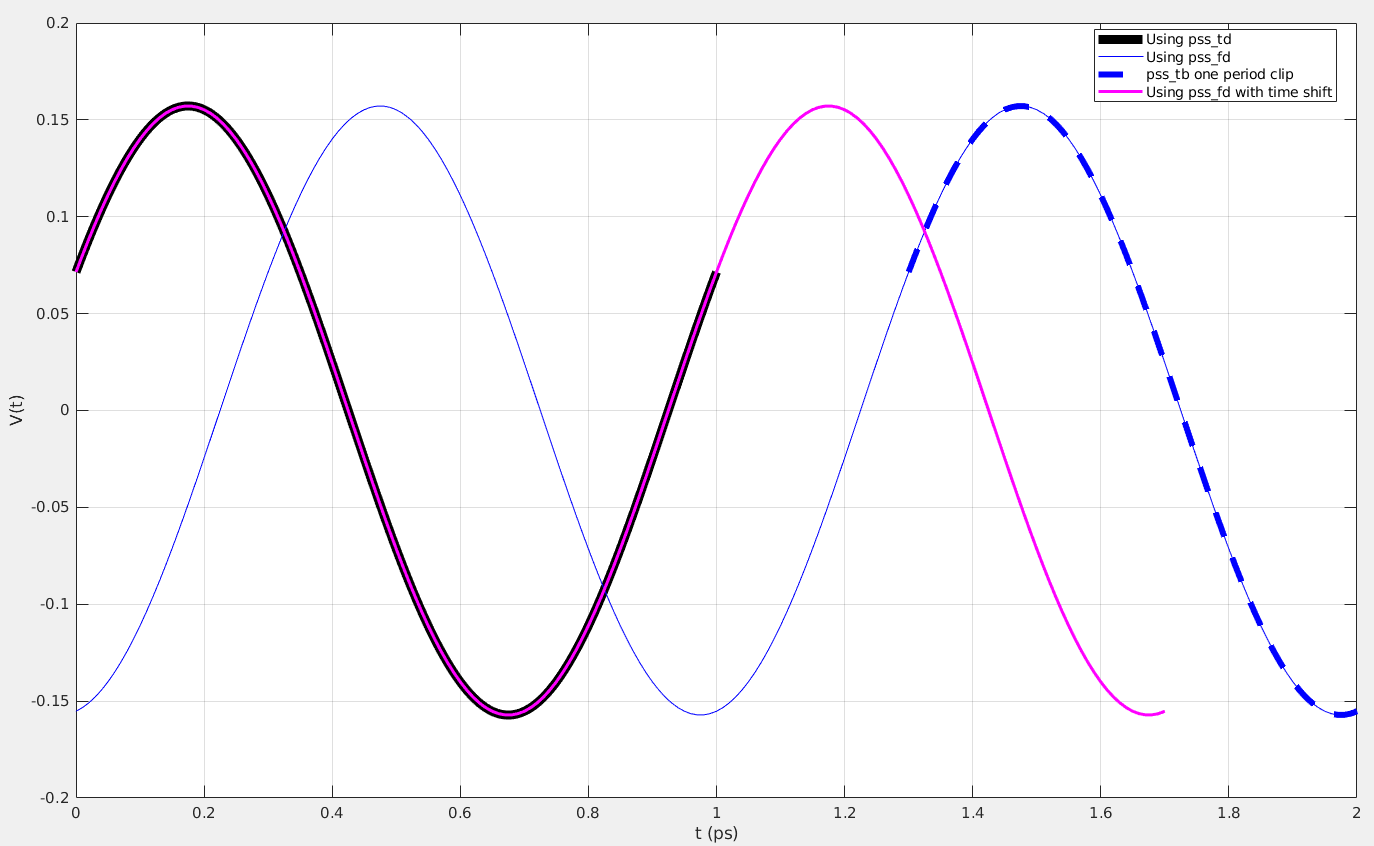
freqaxis=out: freqaxis of PAC not only
affect "Direct Plot"'s output but also simuation data i.e. the phase
shift(imaginary part)
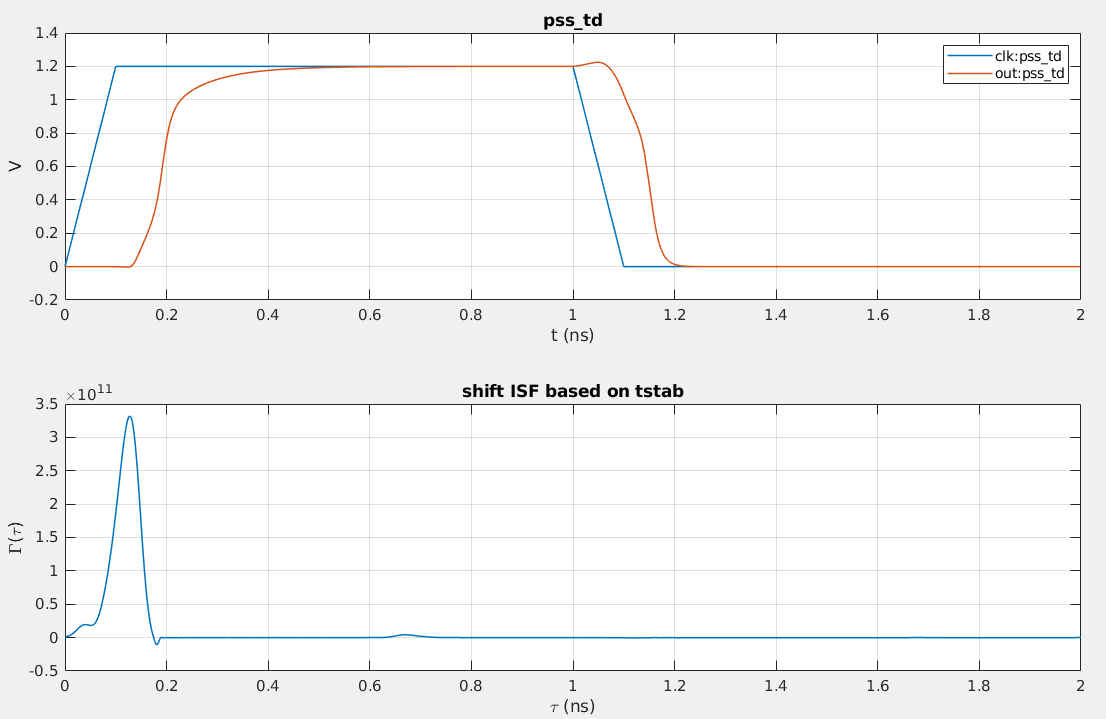
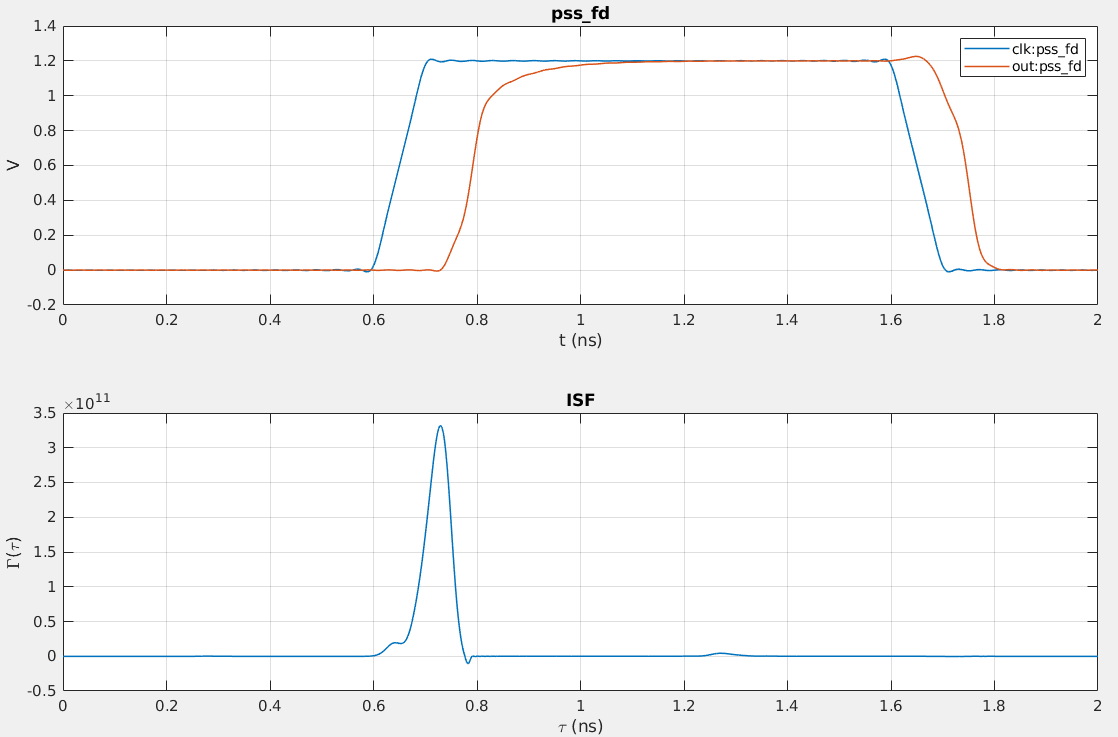
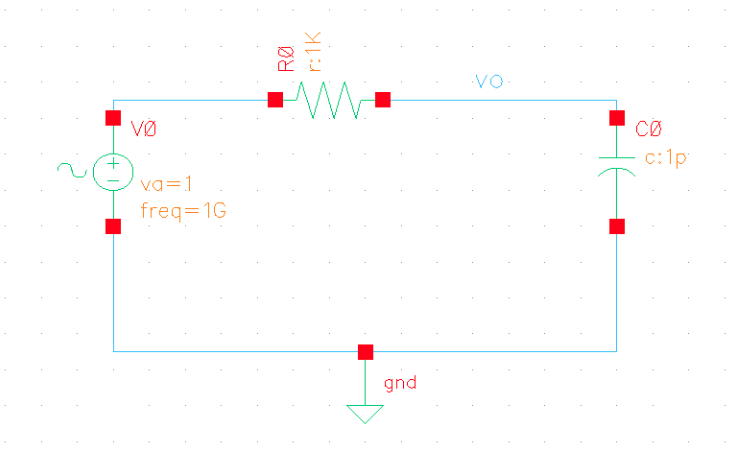
************************************************** Periodic Steady-State Analysis `pss': fund = 1 GHz ************************************************** DC simulation time: CPU = 208 us, elapsed = 211.954 us.
============================= `pss': time = (0 s -> 1.3 ns) =============================
Opening the PSF file ../psf/pss.tran.pss ...
Output and IC/nodeset summary: save 1 (current) save 2 (voltage)
Important parameter values in tstab integration: start = 0 s outputstart = 0 s stop = 1.3 ns period = 1 ns maxperiods = 20 step = 1.3 ps maxstep = 40 ps ic = all useprevic = no ...
xlabel('t (ps)'); ylabel('V(t)'); legend('Using pss\_td', 'Using pss\_fd', 'pss\_tb one period clip', 'Using pss\_fd with time shift', 'location', 'east');
Transient Method
TODO 📅
reference
J. Kim, B. S. Leibowitz and M. Jeeradit, "Impulse sensitivity
function analysis of periodic circuits," 2008 IEEE/ACM International
Conference on Computer-Aided Design, 2008, pp. 386-391, doi:
10.1109/ICCAD.2008.4681602. [https://websrv.cecs.uci.edu/~papers/iccad08/PDFs/Papers/05C.2.pdf]
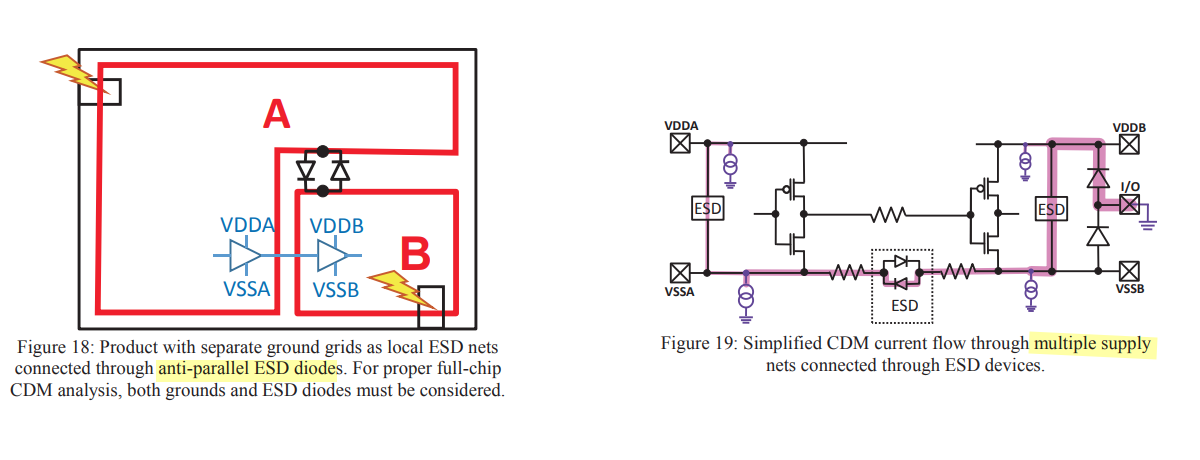
M. Etherton et al., "A new full-chip verification
methodology to prevent CDM oxide failures," 2015 37th Electrical
Overstress/Electrostatic Discharge Symposium (EOS/ESD), Reno, NV,
USA, 2015 [pdf]
M. Di, H. Wang, F. Zhang, C. Li, Z. Pan and A. Wang, "Does CDM ESD
Protection Really Work?," 2019 IEEE Workshop on Microelectronics and
Electron Devices (WMED), Boise, ID, USA, 2019 [https://sci-hub.se/10.1109/WMED.2019.8714145]
On-Chip Decoupling
Capacitors
Y. -C. Huang and M. -D. Ker, "Study on CDM ESD Robustness Among
On-Chip Decoupling Capacitors in CMOS Integrated Circuits," in IEEE
Journal of the Electron Devices Society, vol. 9, pp. 881-890, 2021
[pdf]
Y. -C. Huang and M. -D. Ker, "Investigation of CDM ESD Protection
Capability Among Power-Rail ESD Clamp Circuits in CMOS ICs With
Decoupling Capacitors," in IEEE Journal of the Electron Devices
Society, vol. 11, pp. 84-94, 2023
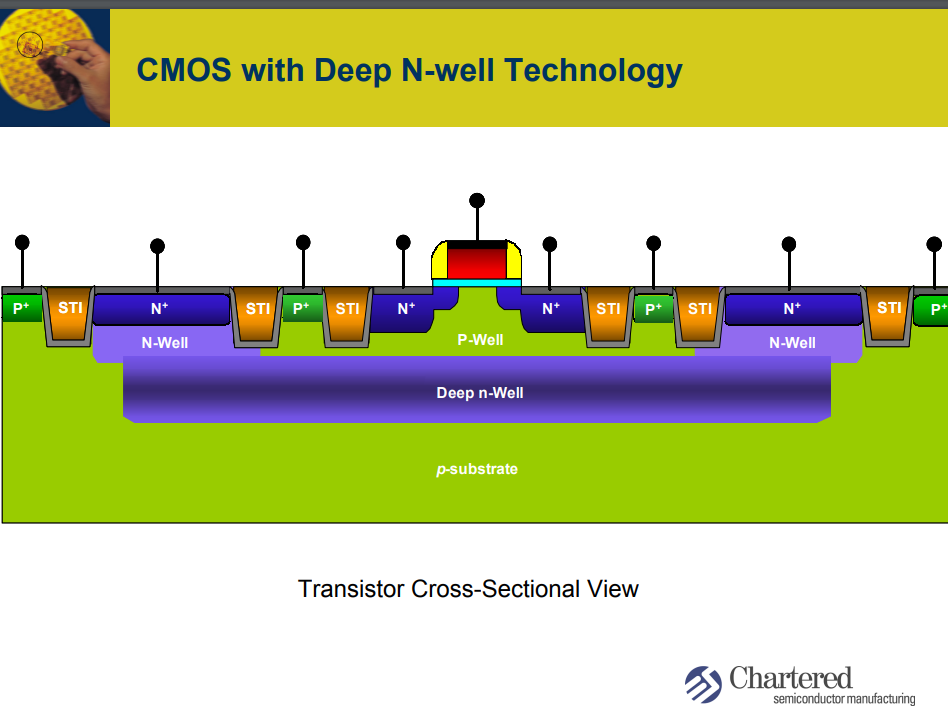
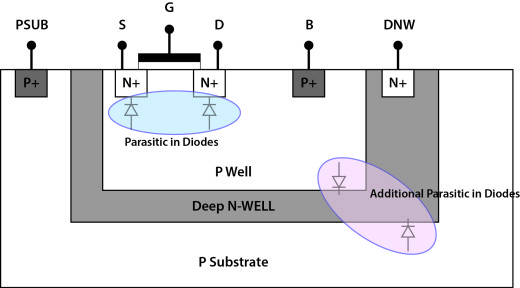
NMOS capacitor with DNW owing to the
parasitic junction that formed between P-substrate and the
DNW to reduce the probability of ESD damage on the
thin gate oxide layer of NMOS capacitor.
Therefore, it results in higher CDM ESD robustness than that of the
other two designs with decoupling capacitors realized by of
varactor and NMOS
capacitor
Circuit-Level CDM Model
H. Wang, F. Zhang, C. Li, M. Di and A. Wang, "Chip-Level CDM Circuit
Modeling and Simulation for ESD Protection Design in 28nm CMOS,"
2018 14th IEEE International Conference on Solid-State and
Integrated Circuit Technology (ICSICT), Qingdao, China, 2018
Today's cognition ondie CDM charge is stored in the
substrate
The circuit model is divided into three parts:
IC package
substrate resistance & capacitance
protection devices & circuit elements
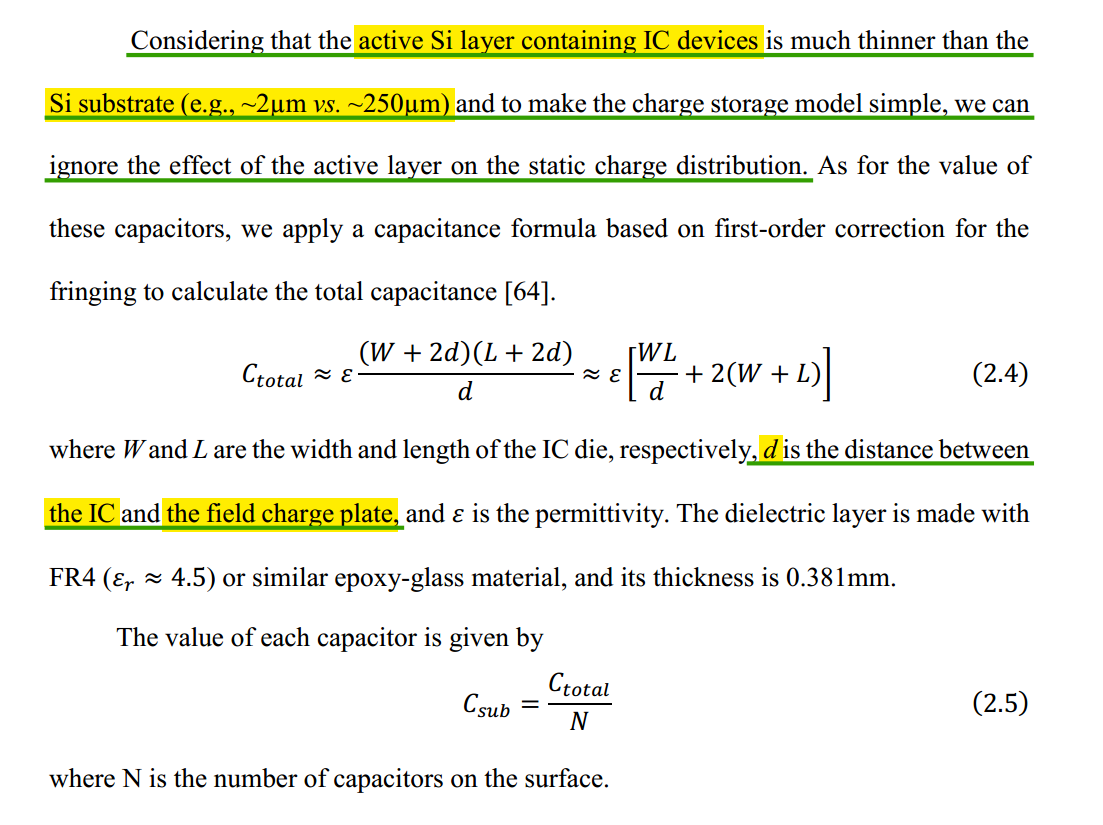
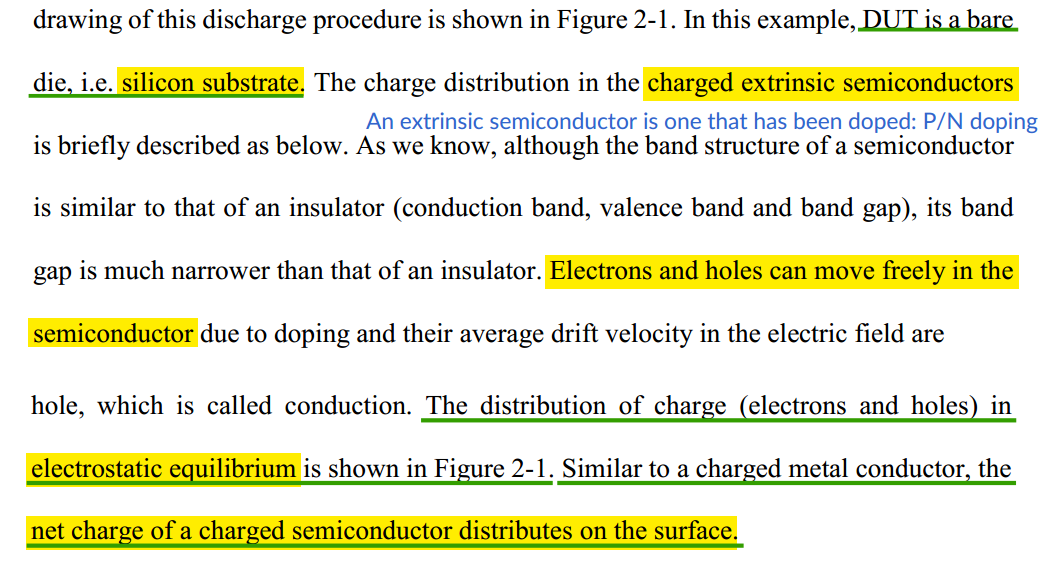
all charges are considered be distributed to the
surface of an IC die, i.e., Si
substrate
The surface-stored charges are modeled
using the capacitors at the surfaces of the IC
substrate
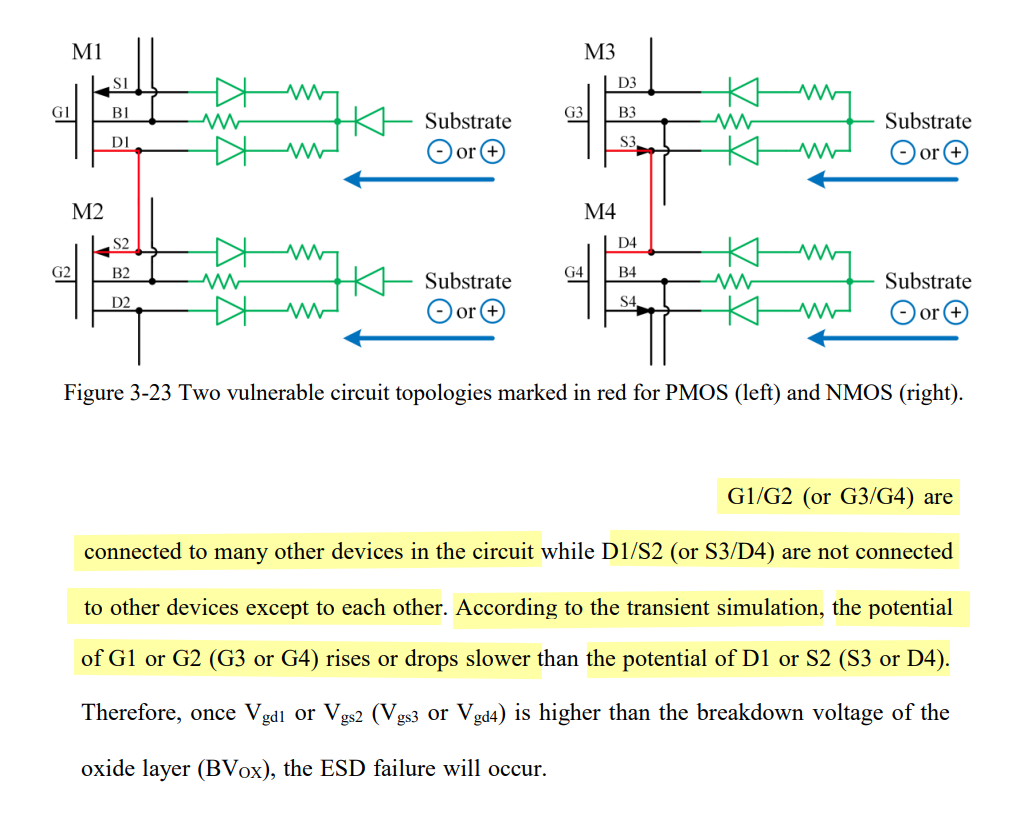
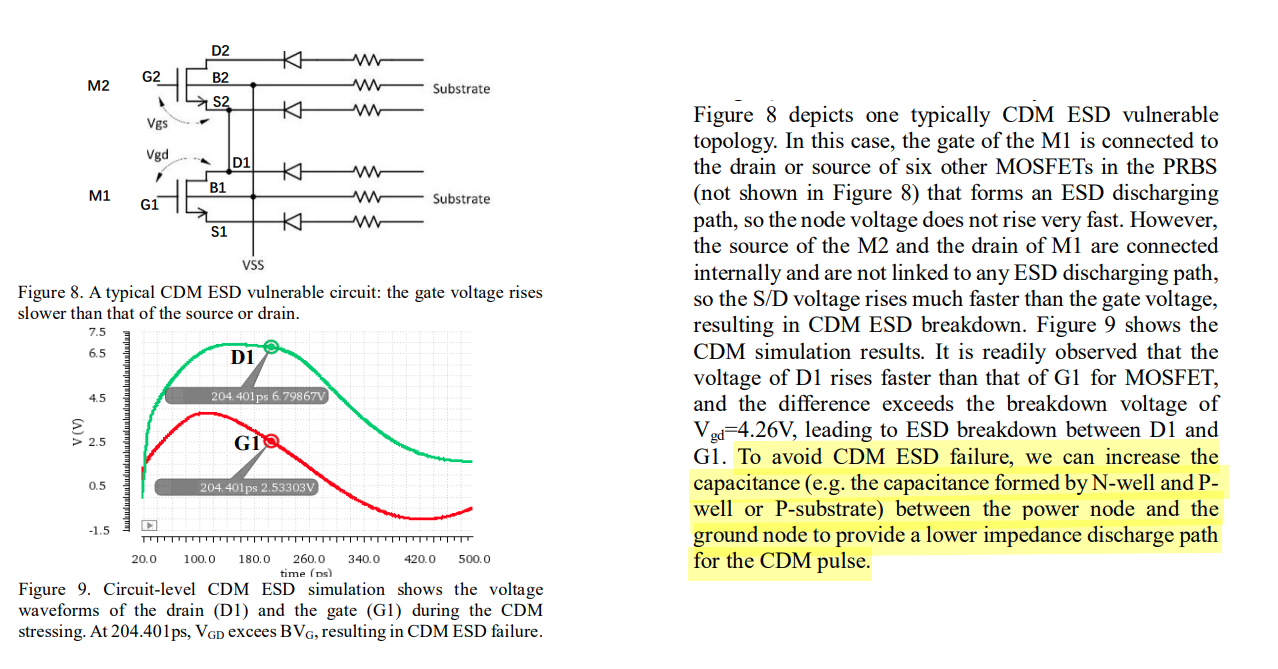
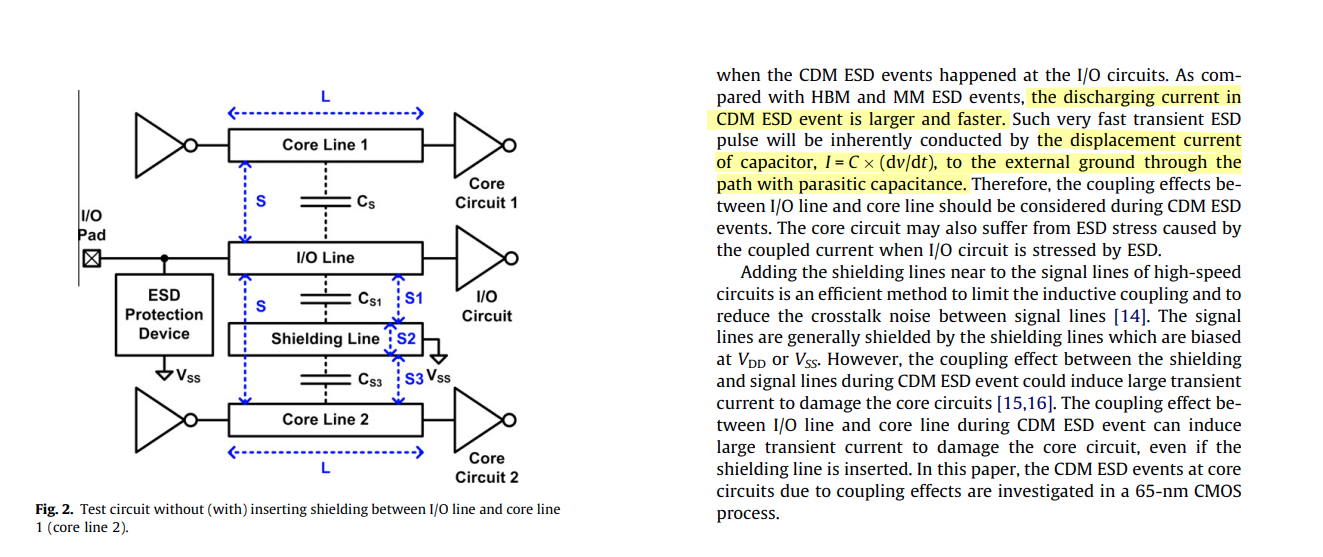
A Vulnerable Circuit Topology — cascode topology
Parasitic Capacitance Path
Lin, Chun-Yu, Tang-Long Chang and Ming-Dou Ker. "Investigation on CDM
ESD events at core circuits in a 65-nm CMOS process." Microelectron.
Reliab. 52 (2012) [pdf]
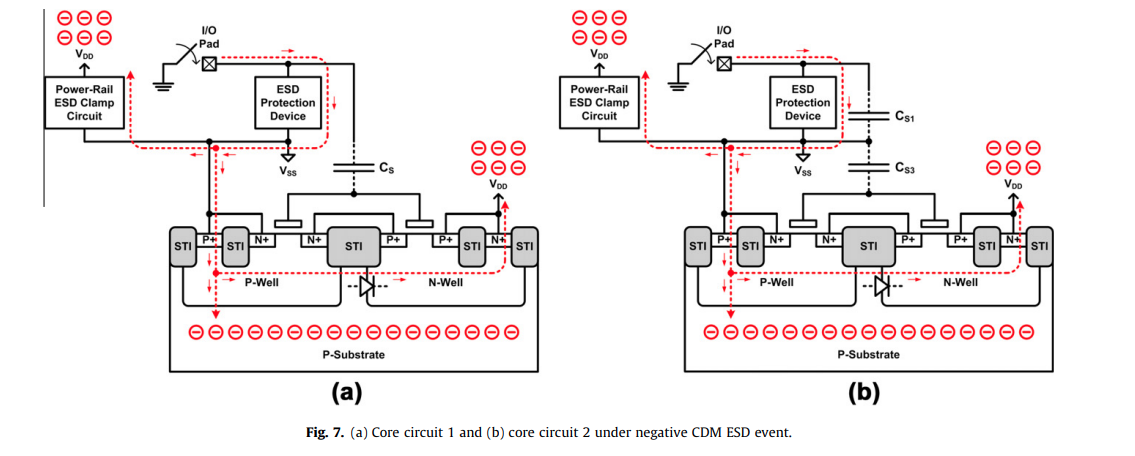
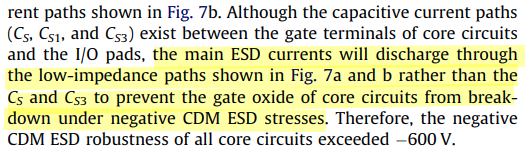
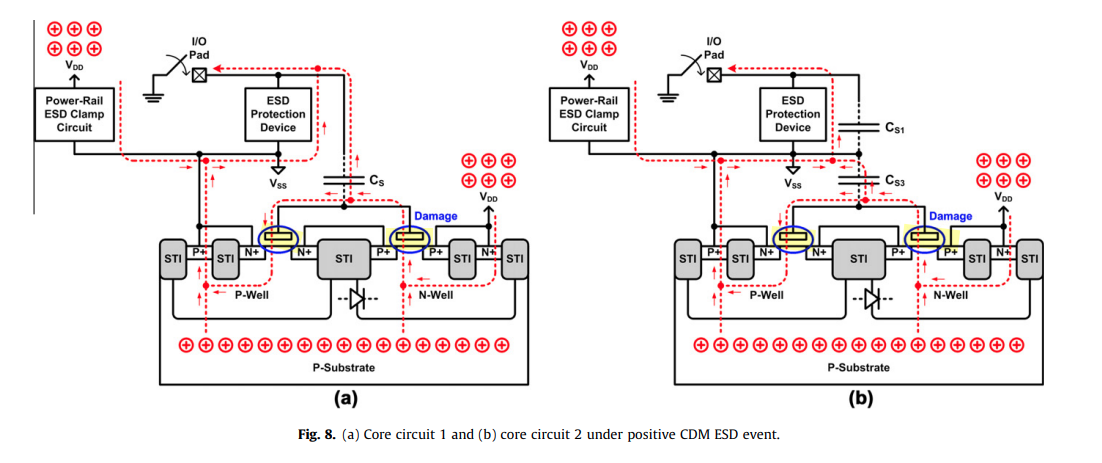
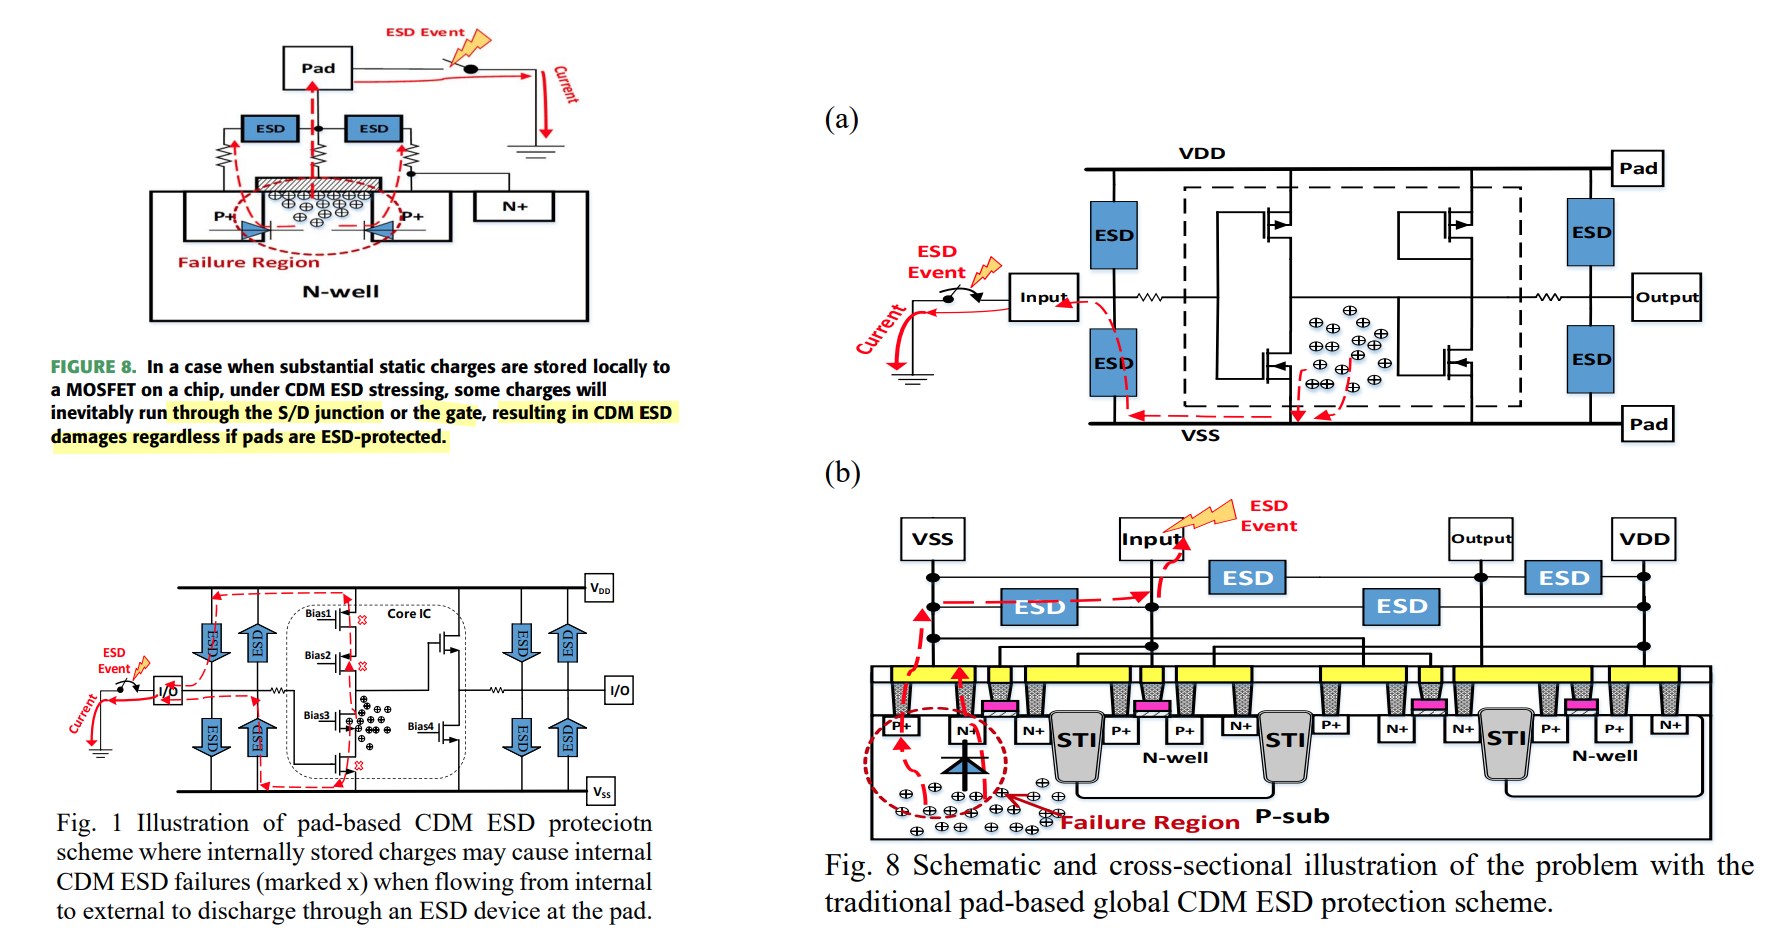
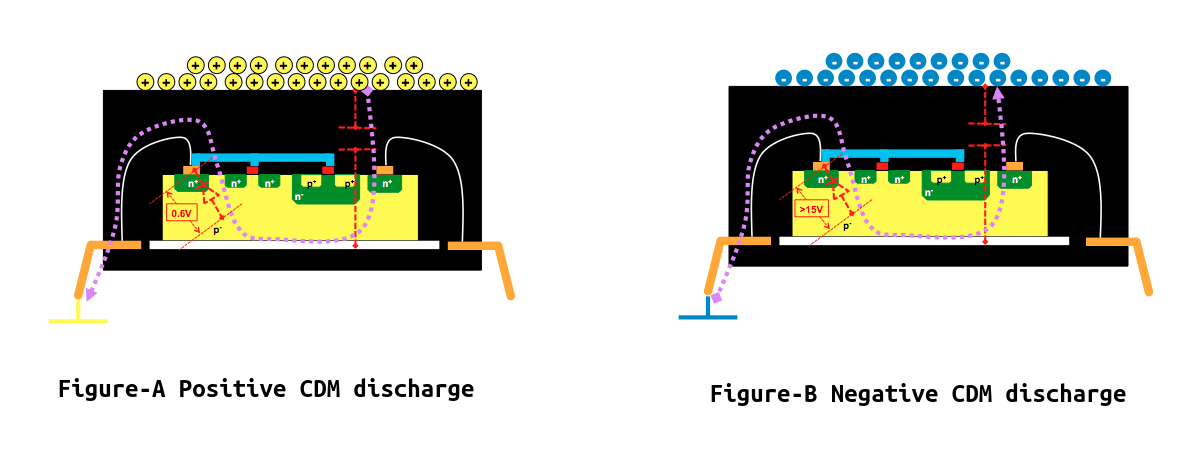
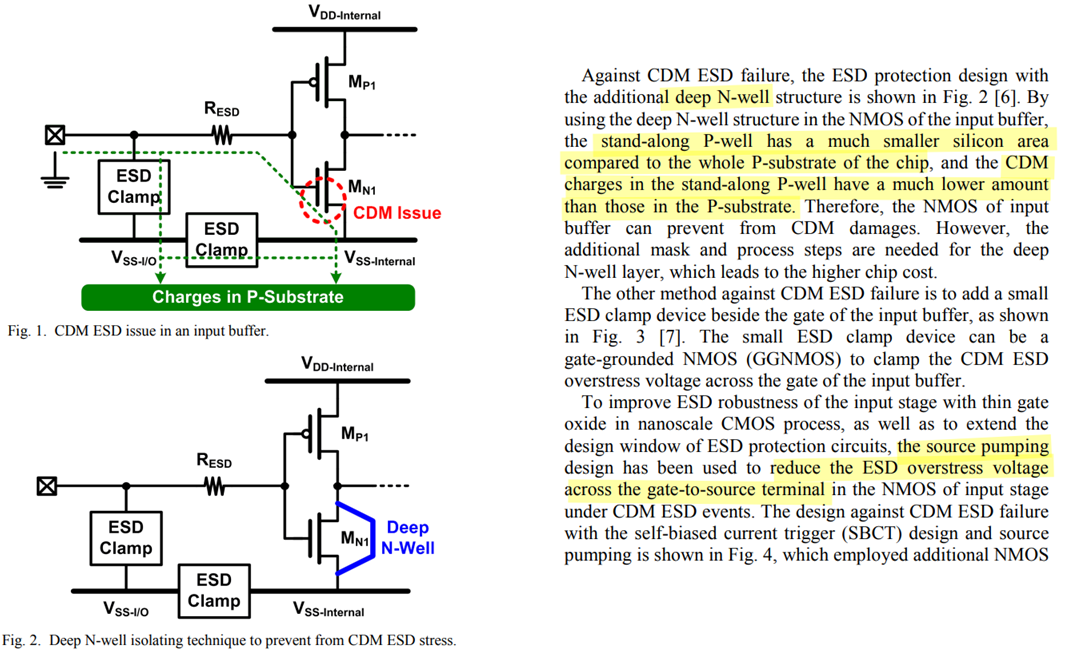
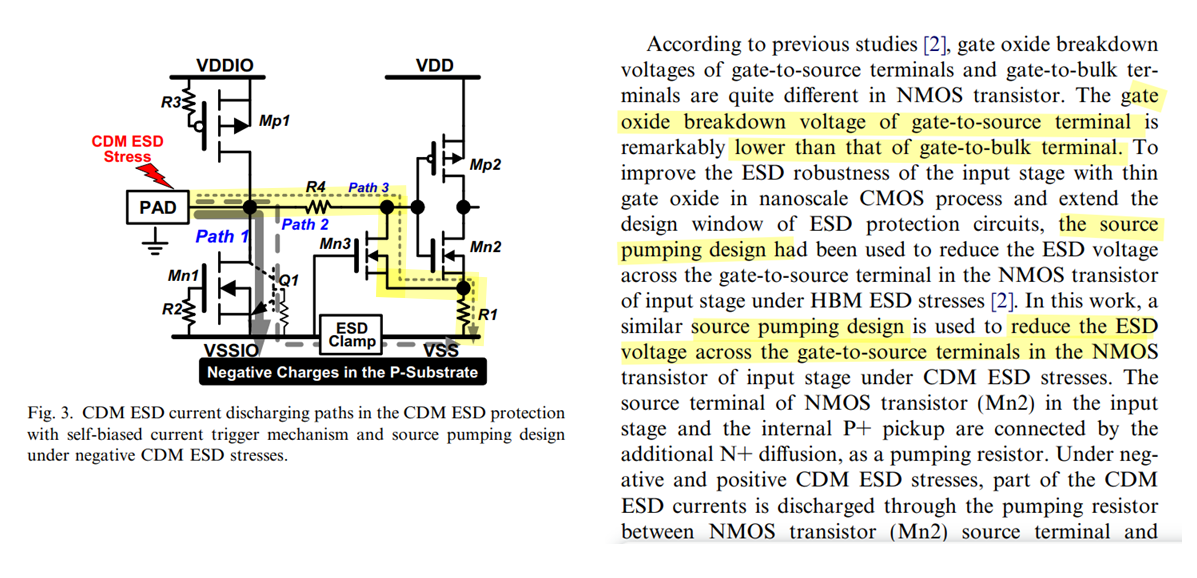
CDM ESD issue due to the coupled current when I/O
circuit is stressed by CDM ESD
negative CDM ESD event
positive CDM ESD event
CDM Failure Mechanisms
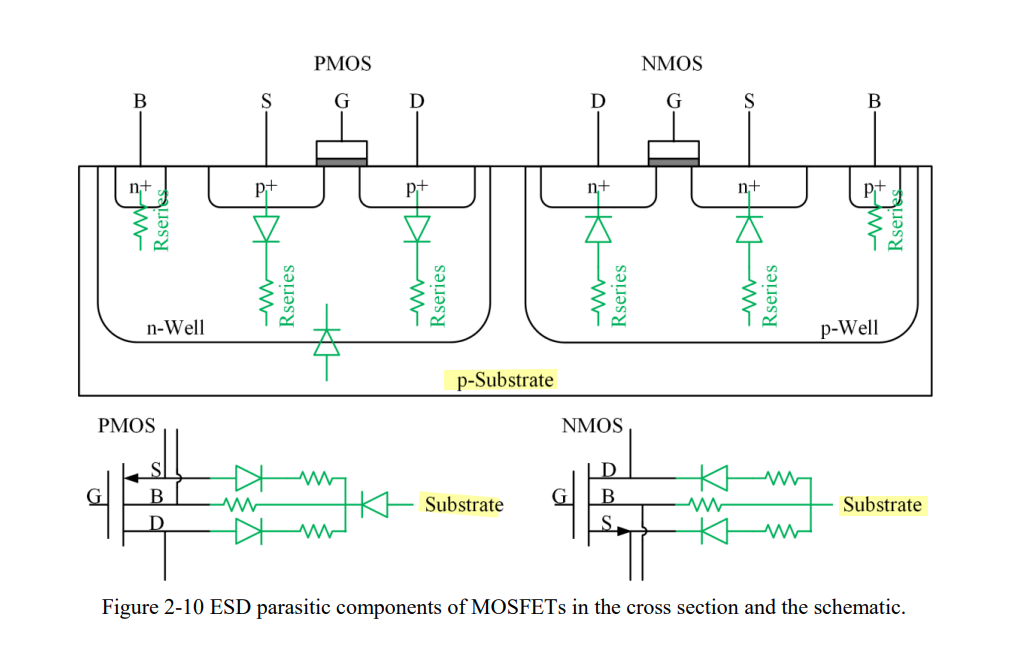
reverse S/D junctions
capacitively coupled through the gate
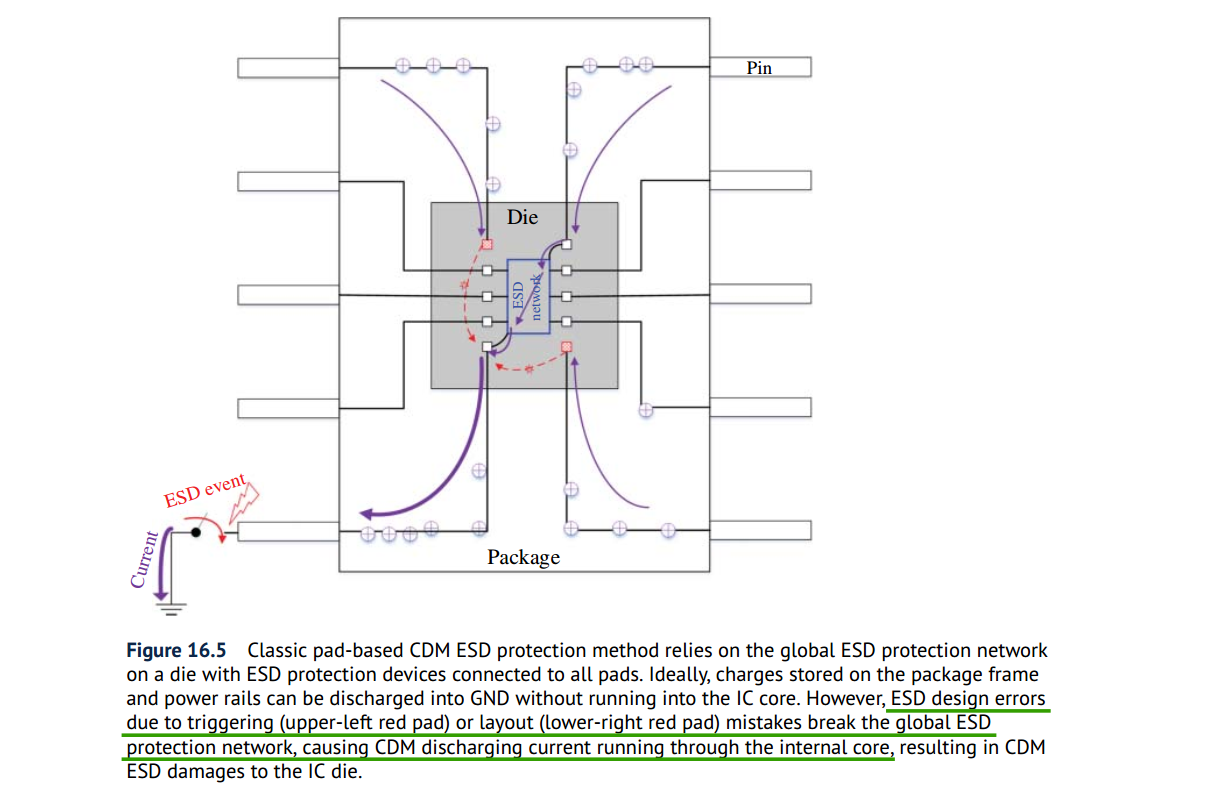
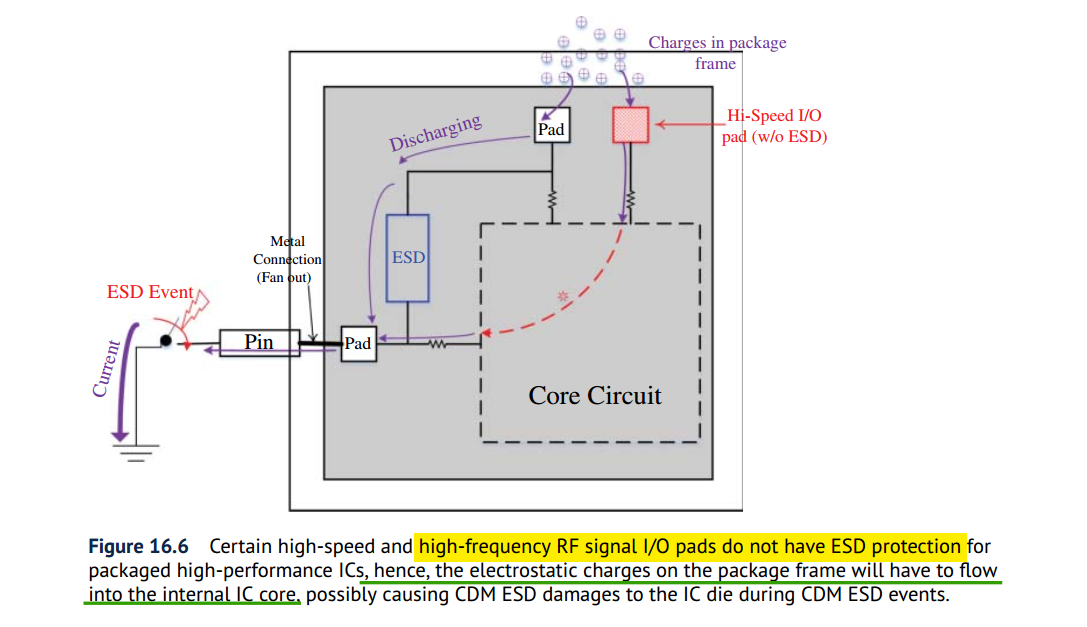
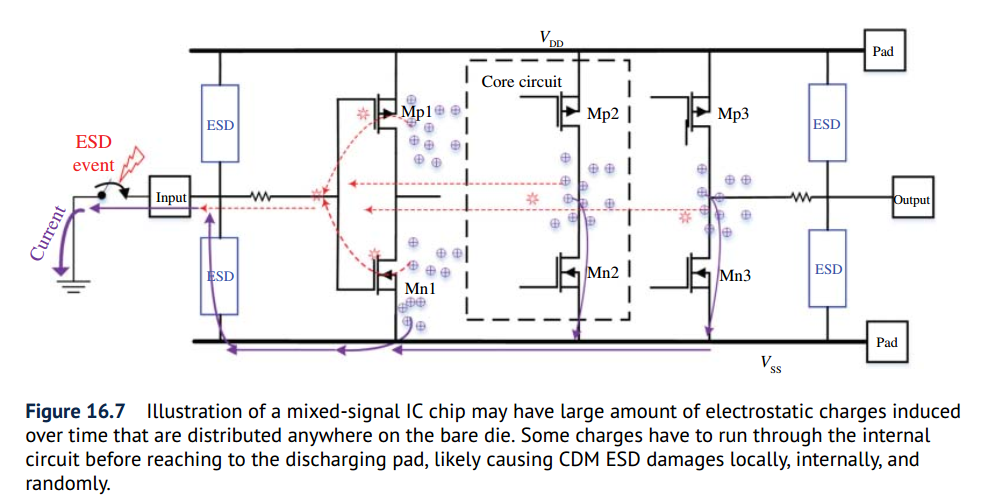
For a bare Si die, the charges induced by whatever procedures, are
stored inside the IC die randomly, unpredictably and anywhere, e.g., in
the substrate, along the metal
rails or locally to
transistors
?? suppose that charged package and substrate are same electric
potential
Misconception in CDM ESD
Protection
Two players will affect the internal CDM discharging routing:
the amount of electrostatic charge stored inside the IC
more importantly, their internal distribution within a chip
Wang, Han, Feilong Zhang, Cheng Li, Mengfu Di and Albert Z. H. Wang.
“Chip-Level CDM Circuit Modeling and Simulation for ESD Protection
Design in 28nm CMOS.” 2018 14th IEEE International Conference on
Solid-State and Integrated Circuit Technology (ICSICT) (2018) [pdf]
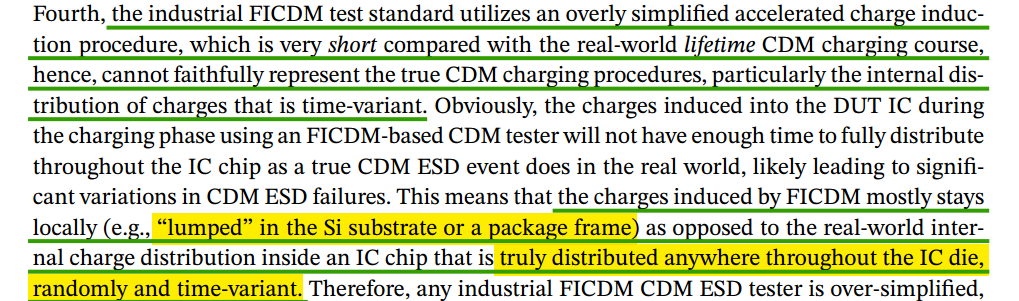
It is generally believed that the induced electrostatic charges are
stored on the package frame and/or on the
supply buses in a lumped way
induced electrostatic charges are randomly distributed throughout a
bare die of mixed-signal IC, anywhere and
everywhere
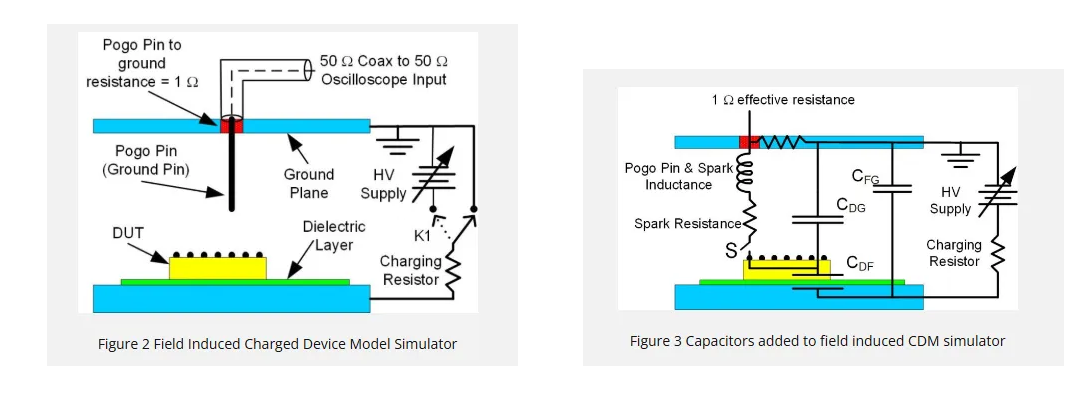
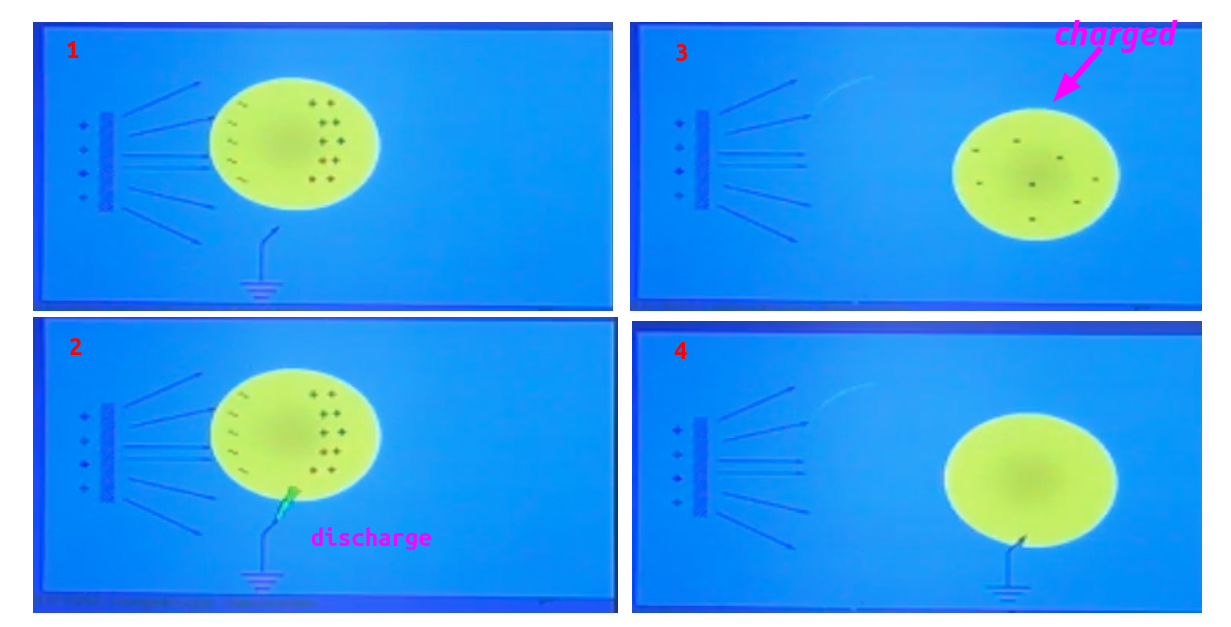
Confusion about the test procedure is
understandable because the actual process is opposite from what is
expected
field induction does not place any charge on the device
the "discharge" when the pogo pin first touches the DUT is when
the DUT is actually charged
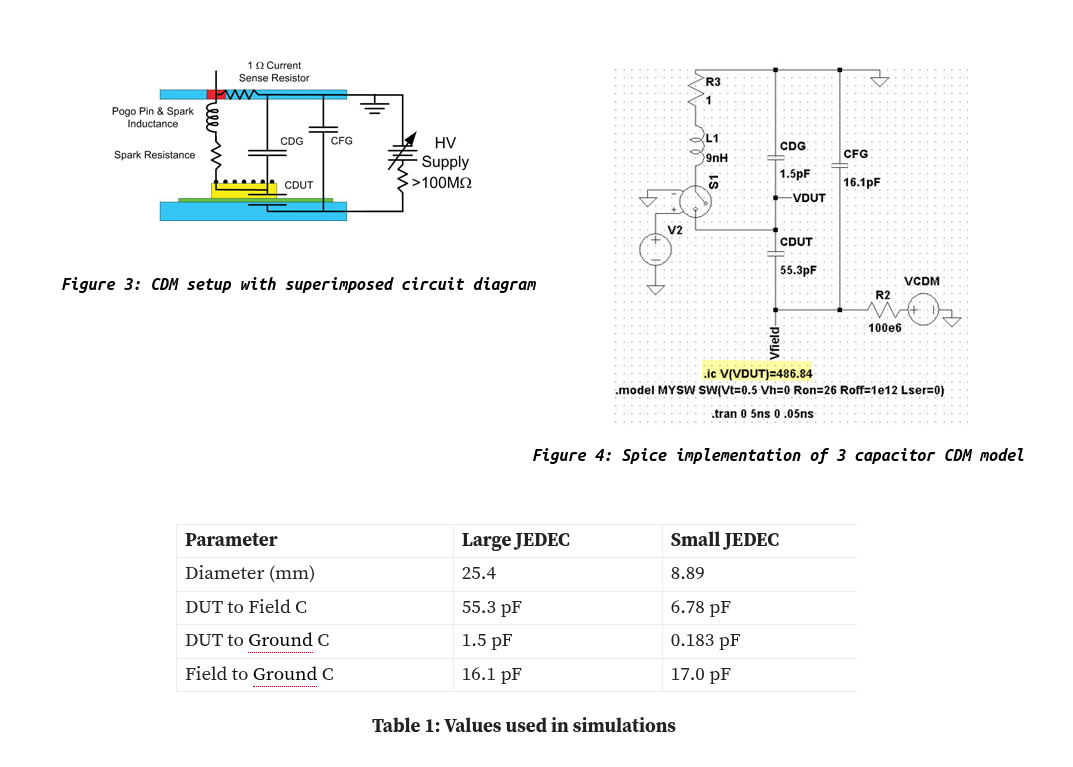
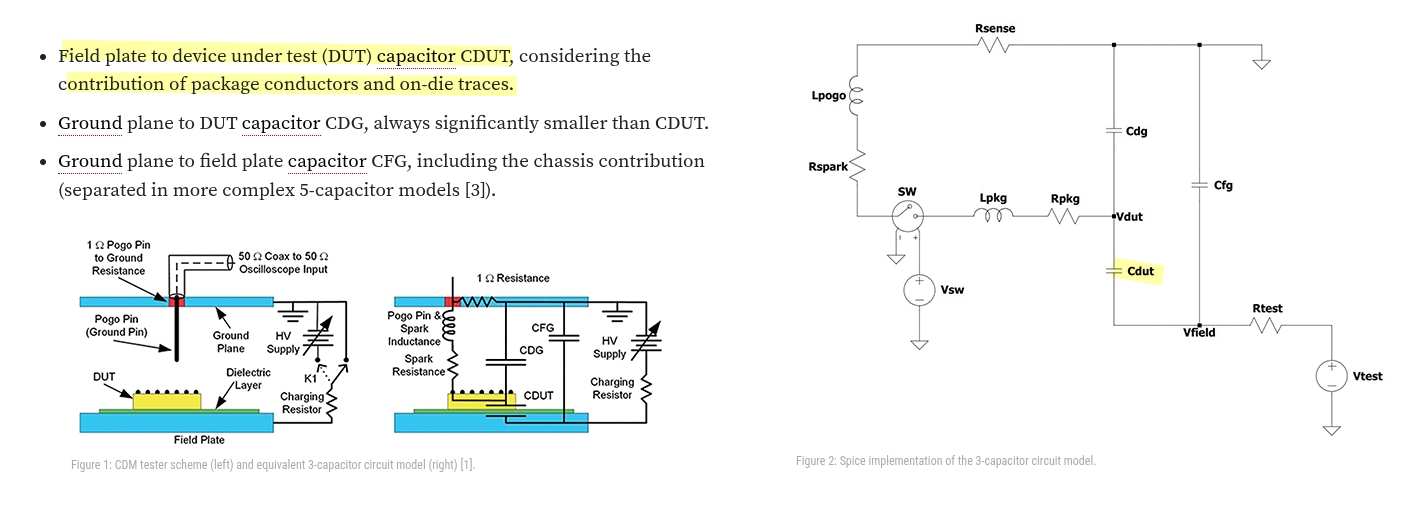
\(C_{DF}\) is the capacitance of the
DUT to the field plate
\(C_{DG}\) is the capacitance of the
DUT to the ground plane
\(C_{FG}\) is the capacitance of the
field plate to the ground plane
\(C_{DF}\gg C_{DG}\) — the
separation of the DUT from the field plate is always much less than the
separation of the DUT from the ground plane
Assuming no initial charge on the DUT, with
the switch S open the DC voltage between the DUT and the Field Plate is
\[
V_{DF} = \frac{C_{DG}}{C_{DG} + C_{DF}}\cdot V_{HV} \approx 0
\]
DUT potential will therefore closely track
the power supply voltage
The potential of the DUT relative to the ground plane can
therefore be controlled without actually putting any net charge on
the DUT
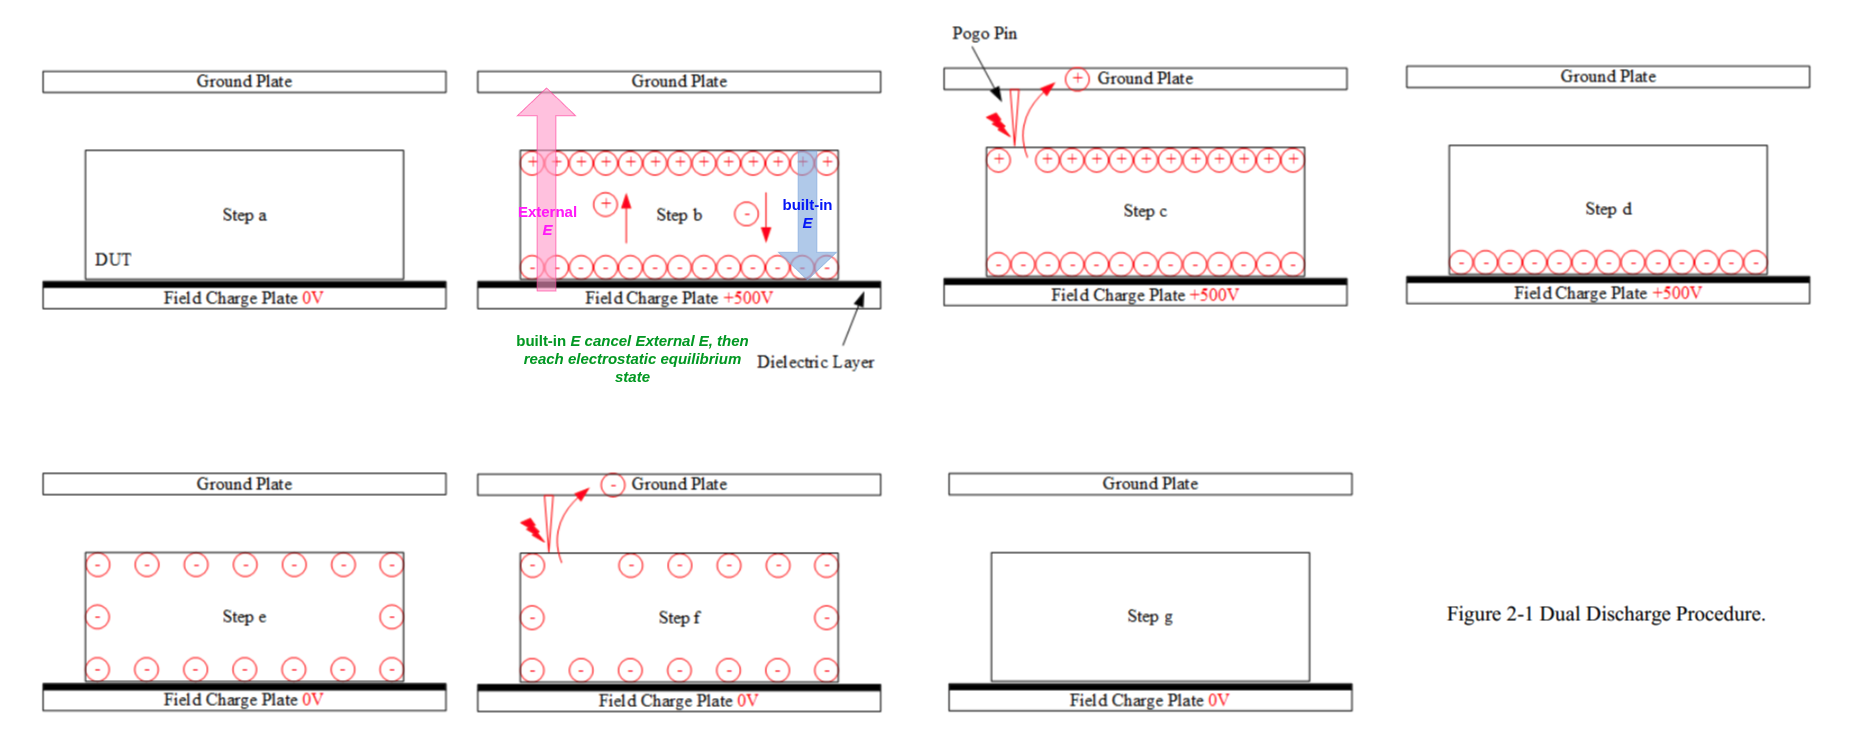
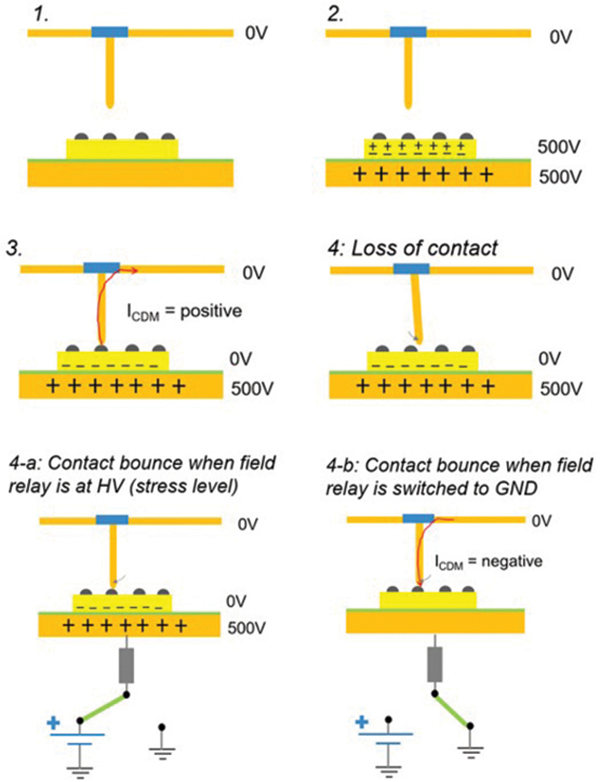
CDM Test Sequence
With the field plate at zero volts an uncharged
DUT is placed on the field plate in the dead bug position and the
ground plane is positioned with the pogo pin above the pin to be
tested
The field plate is raised to a high potential, for example +500
V. The high value resistor ensures that the field
plate changes potential relatively slowly. The slow change in potential
ensures that the DUT is not damaged before the CDM event.
The potential of the DUT will closely track the field plate, reaching
in excess of 450 V, although there will be no net charge on
the DUT
Capacitive coupling elevates the potential of the integrated circuit
to a voltage close to that of the field plate
After the voltage has stabilized the separation between the field
plate and the ground plane is reduced until an arc forms between the
pogo pin and the DUT pin and eventually the two pins touch.
This is equivalent to closing the switch S in Figure
3
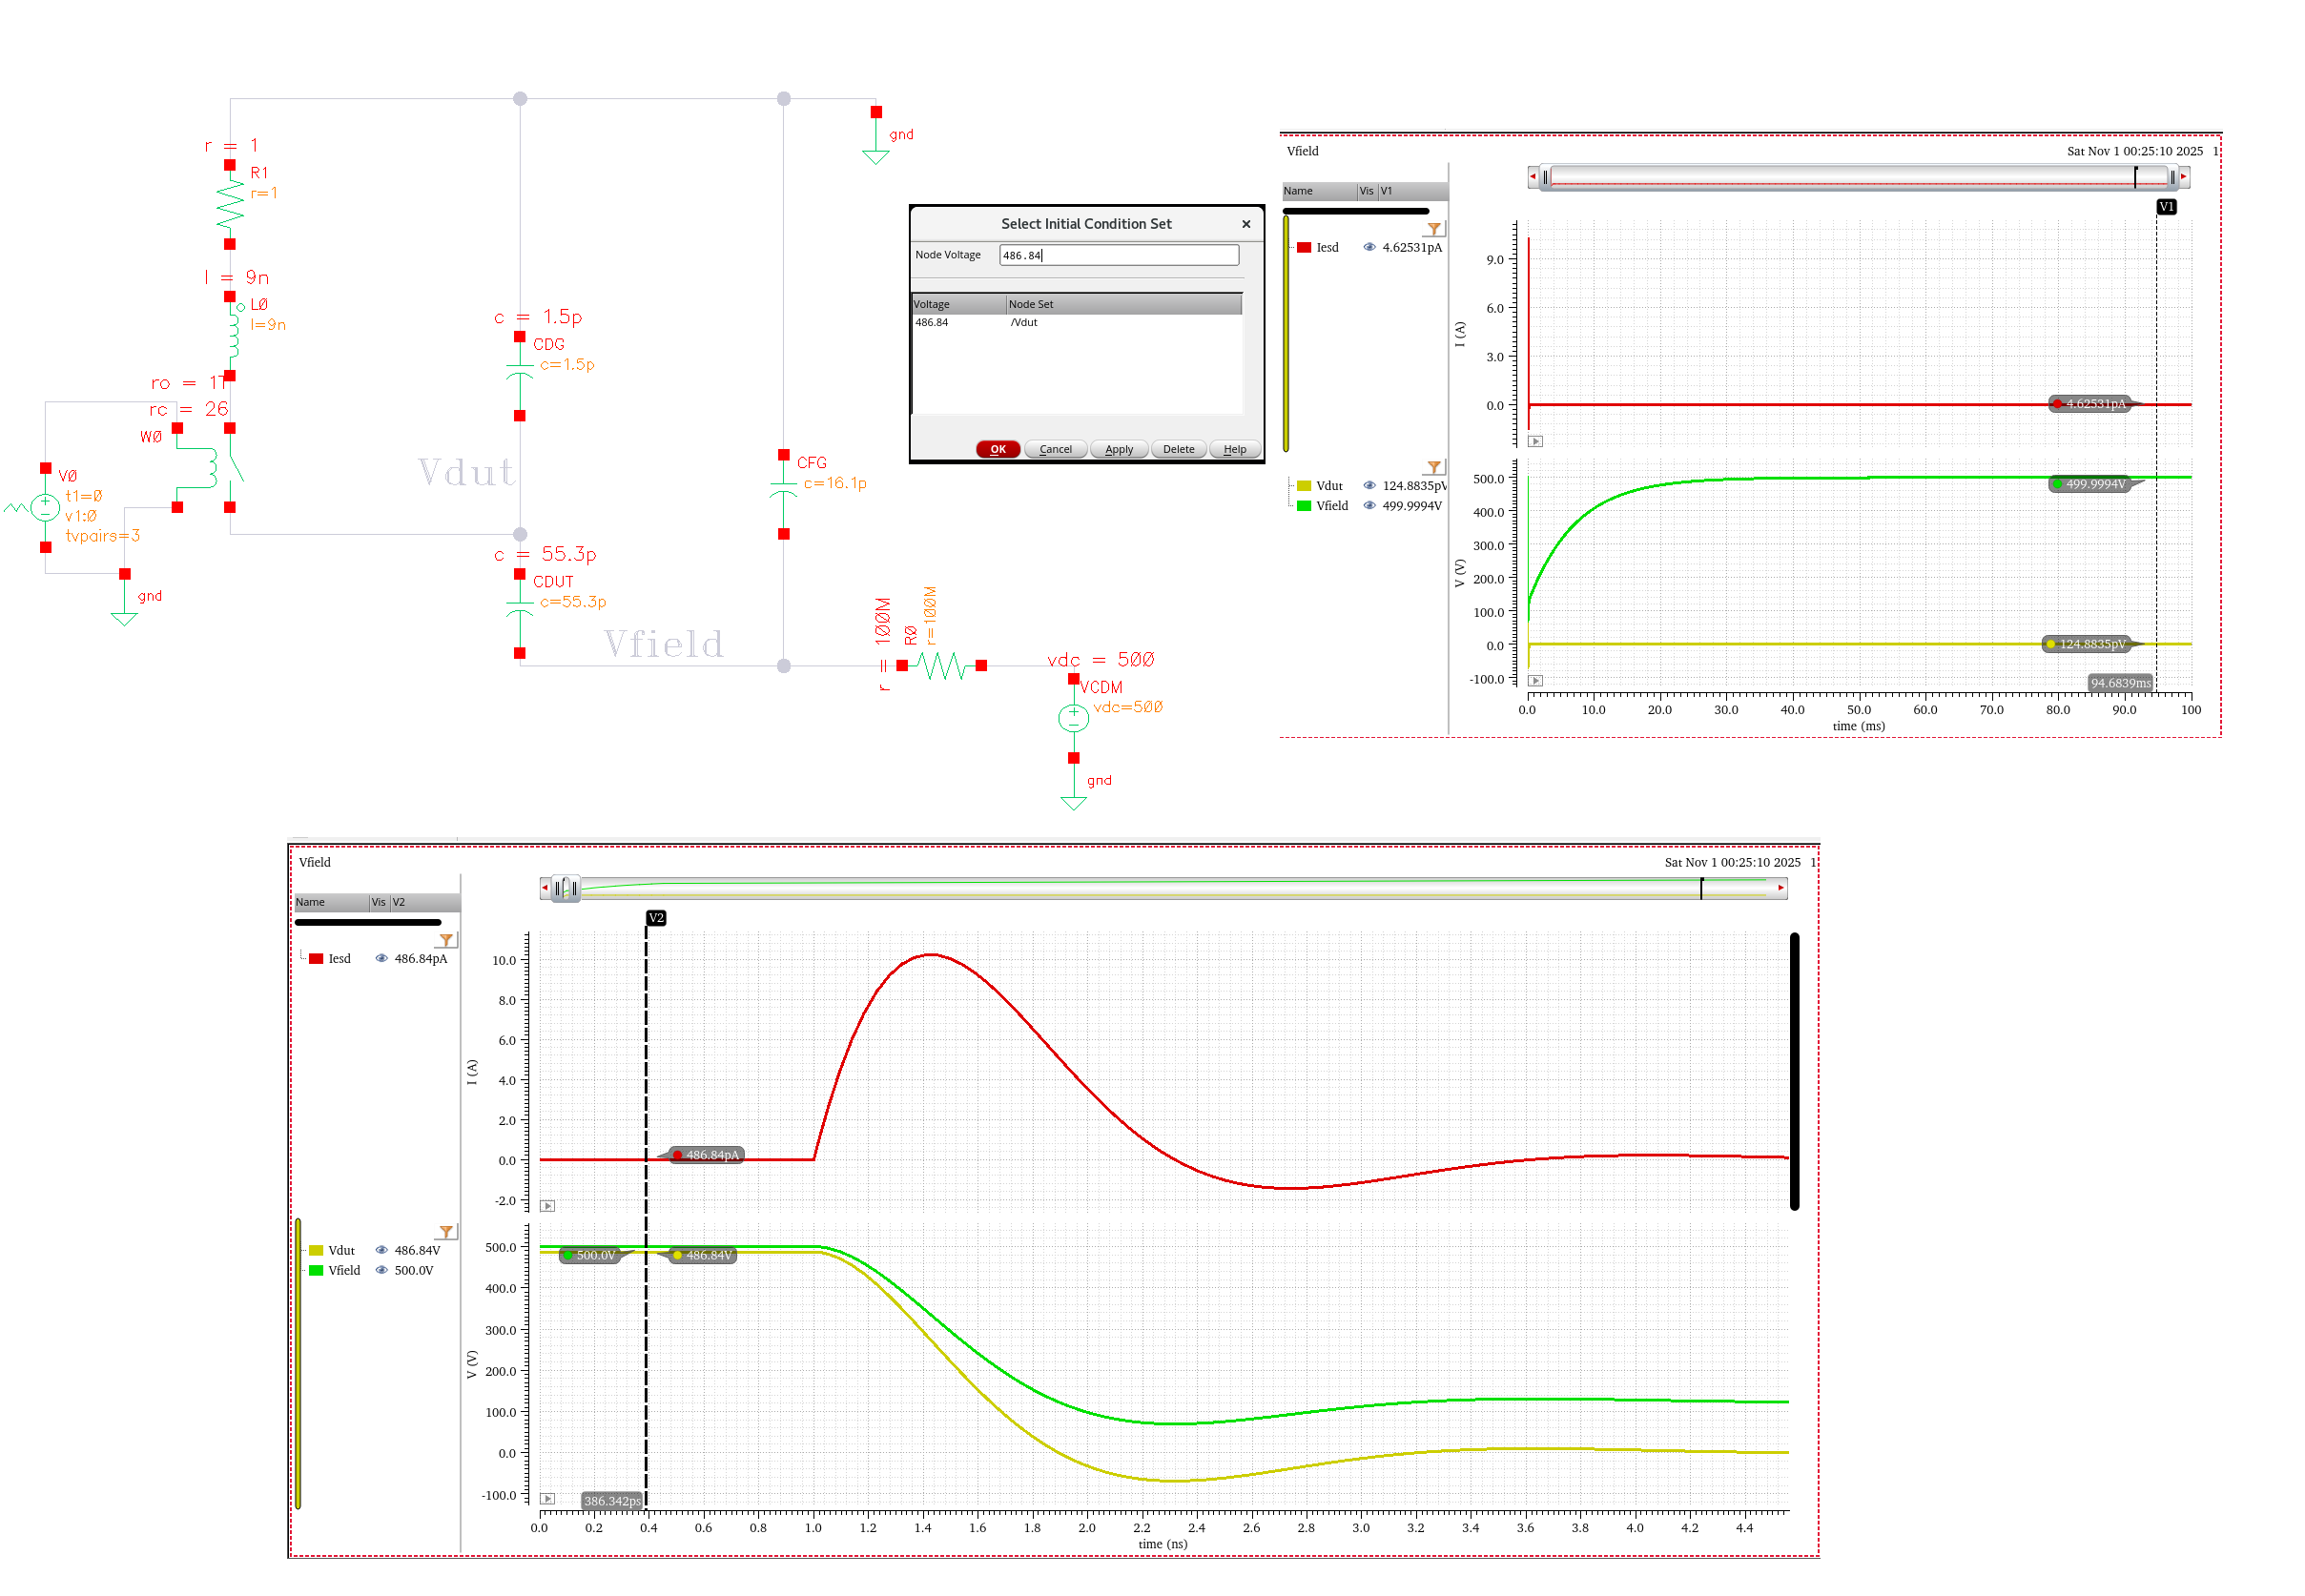
Closing S in the circuit diagram produces a very
rapid grounding of the DUT and a redistribution of charge between the
three capacitors
At this point the DUT is charged and the
potential between the field plate and the ground plane has fallen as the
capacitor \(C_{FG}\) provides charge to
the DUT
During this redistribution of charge, which usually lasts under 2
ns, the high voltage power supply and the high value resistor can be
ignored because of their slow response time
After the initial redistribution of charge the field plate will
slowly return to the voltage on the high voltage power supply,
while the DUT remains at zero potential, but in a charged
state
With the pogo pin still touching the DUT pin the HV power supply
voltage is set to zero. The field plate will slowly return to zero volts
and the charge on the DUT will slowly bleed off through the
pogo pin.
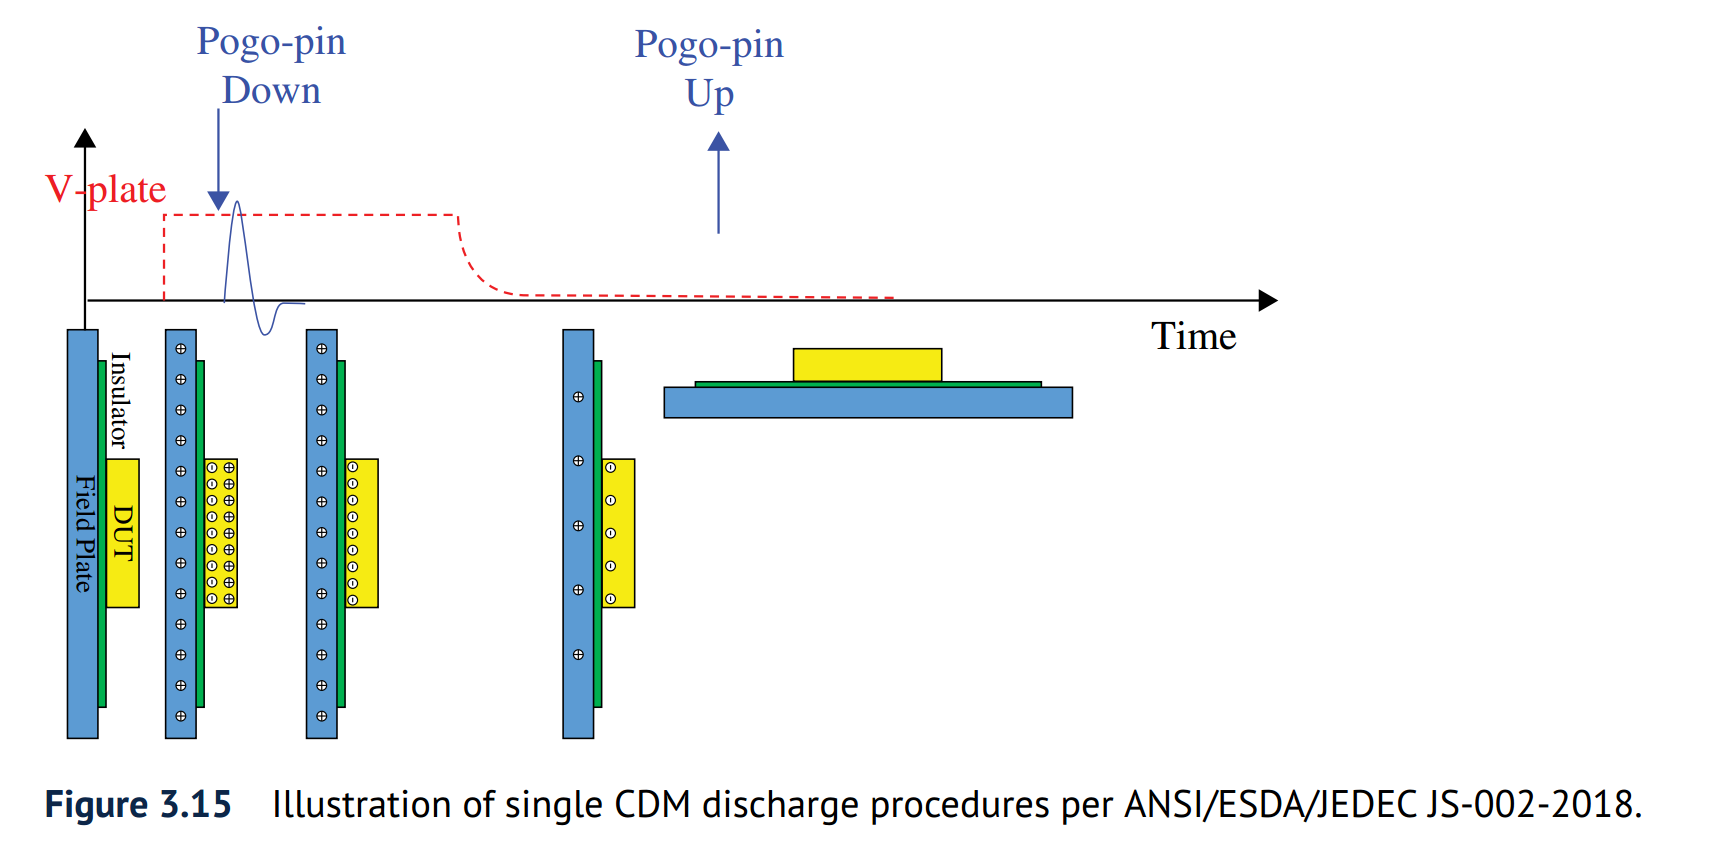
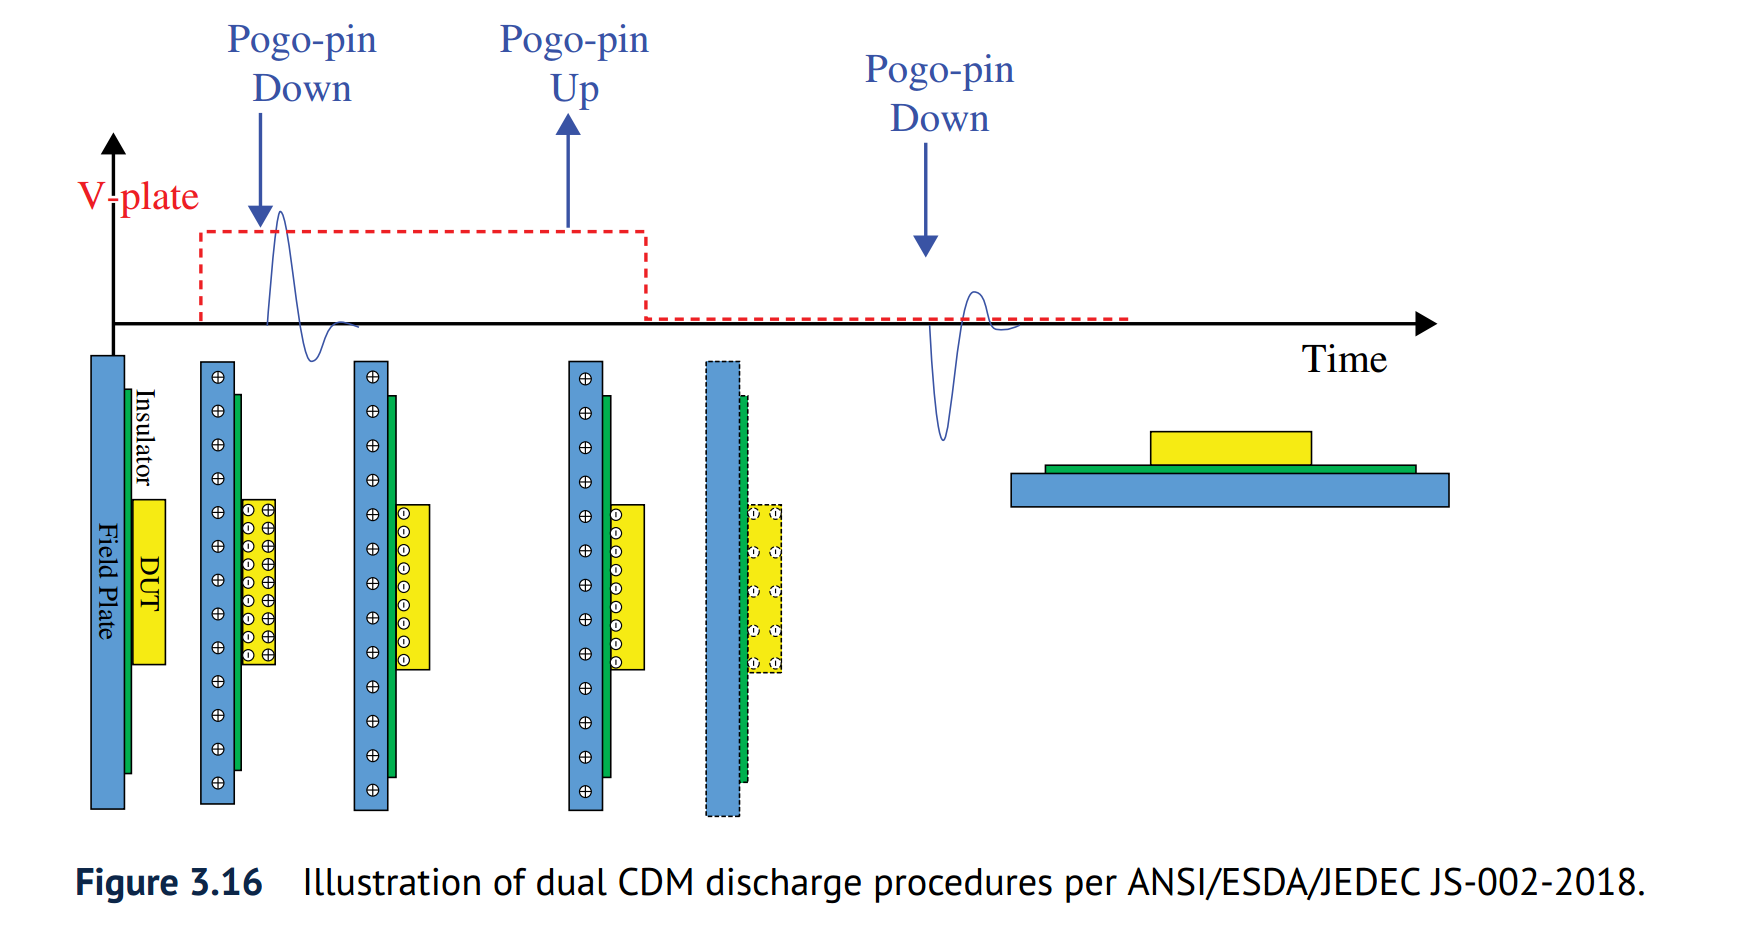
single & dual discharge
method
single discharge procedure:
single positive orsingle negative
CDM ESD pulse is applied to DUT for individual CDM
discharge
the single discharge procedure involves only
one CDM discharge to stress the DUT device
dual discharge procedure:
single positive andsingle
negative CDM ESD pulses are applied to produce one pair of
alternating polarity CDM discharges to zap the DUT
The value of CFG is also based on a parallel plate capacitor model
with a peripheral capacitance term minus a capacitance
representing a shielding of the Field Plate to ground plane capacitance
due to the size of the device under test
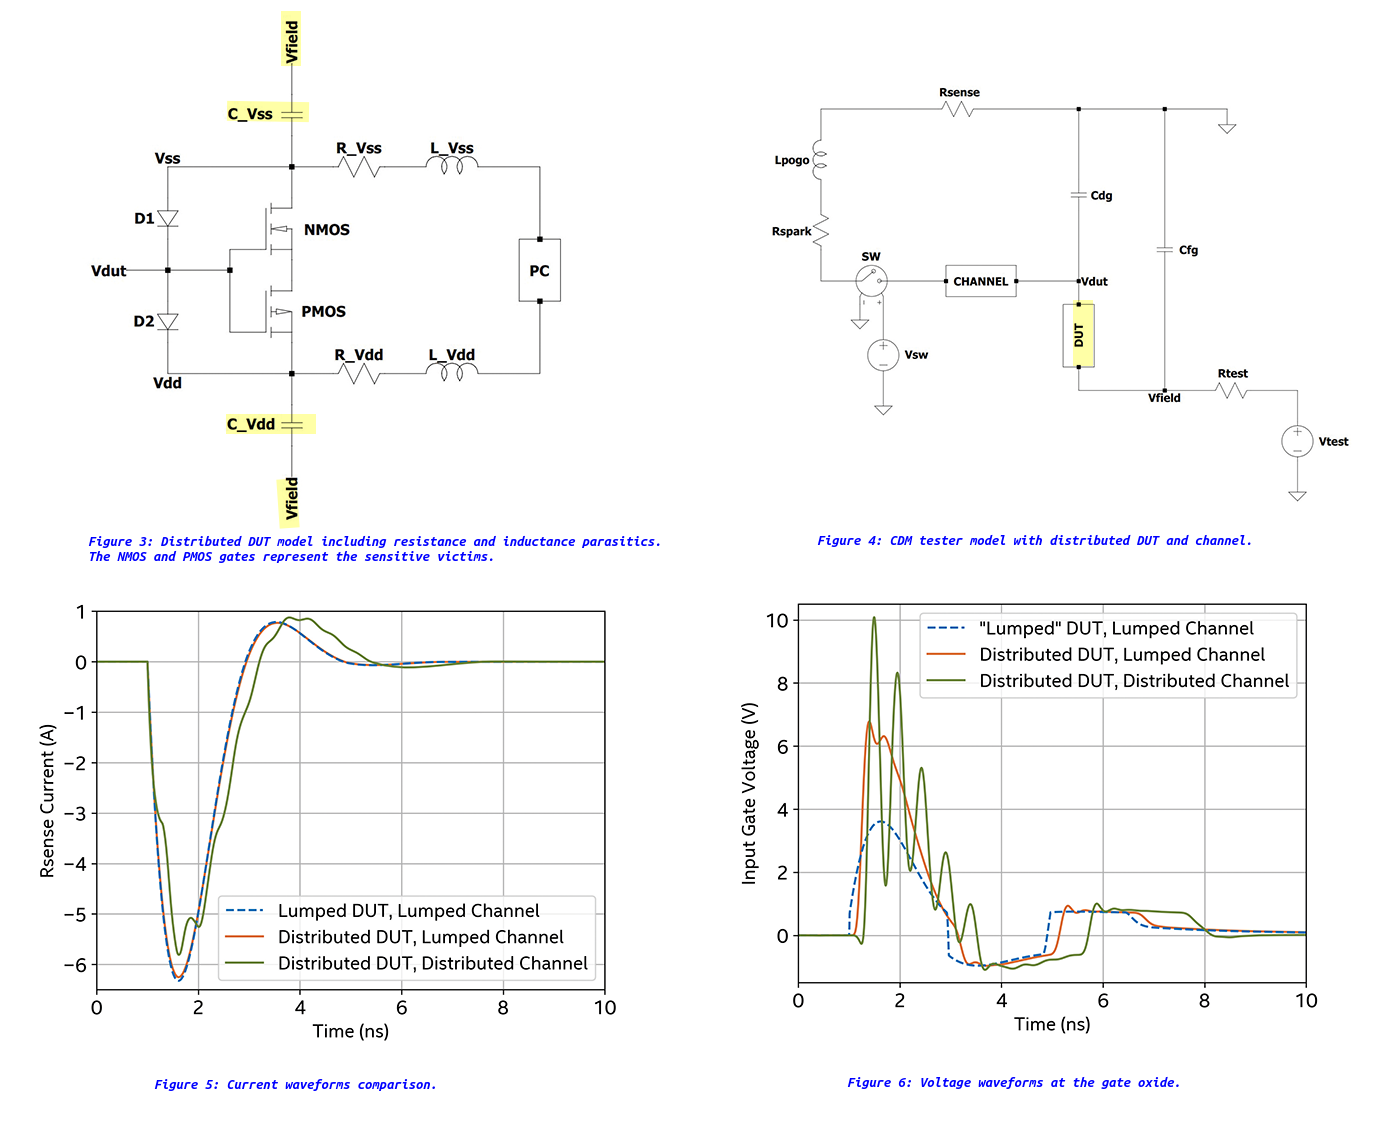
To assess the design solutions, a distributed DUT
model, as presented in Figure 3, can be plugged into the
CDM tester model, replacing the lumped DUT capacitor
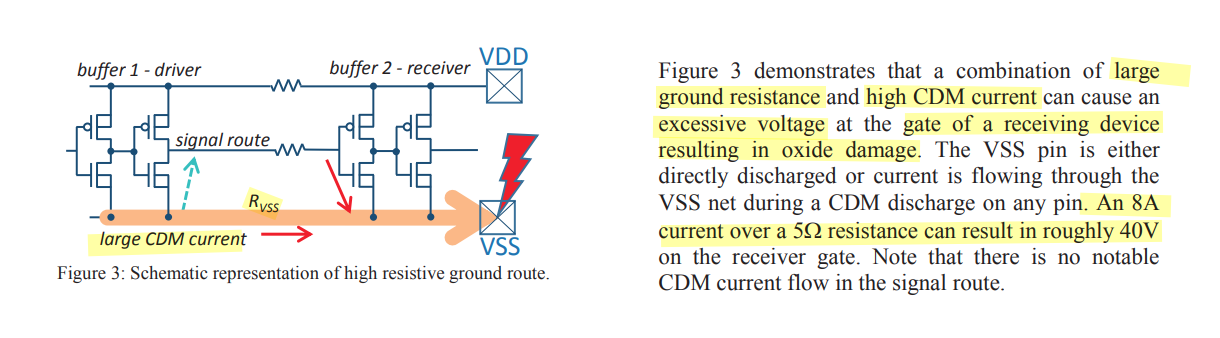
The maximum voltage difference between Vdut and Vss (Vdd) should not
exceed the breakdown voltage of the gates.

On-die parasitics of Vss and Vdd nets
strongly influence the actual voltage waveform at the input gate
oxide. In particular, oscillations and spikes in the voltage
waveform are sensed by the gate oxide and can lead to damage
Lin, Chun-Yu and Ming-Dou Ker. “CDM ESD protection design with
initial-on concept in nanoscale CMOS process.” 2010 17th IEEE
International Symposium on the Physical and Failure Analysis of
Integrated Circuits (2010): 1-4. [https://sci-hub.jp/10.1109/IPFA.2010.5532223]
Jian-Hsing Lee et al., "The study of sensitive circuit and
layout for CDM improvement," 2009 16th IEEE International Symposium
on the Physical and Failure Analysis of Integrated Circuits,
Suzhou, China, 2009 [link]
Thanks to the device scaling the area is actually reasonable.
However, the leakage becomes the main bottleneck.
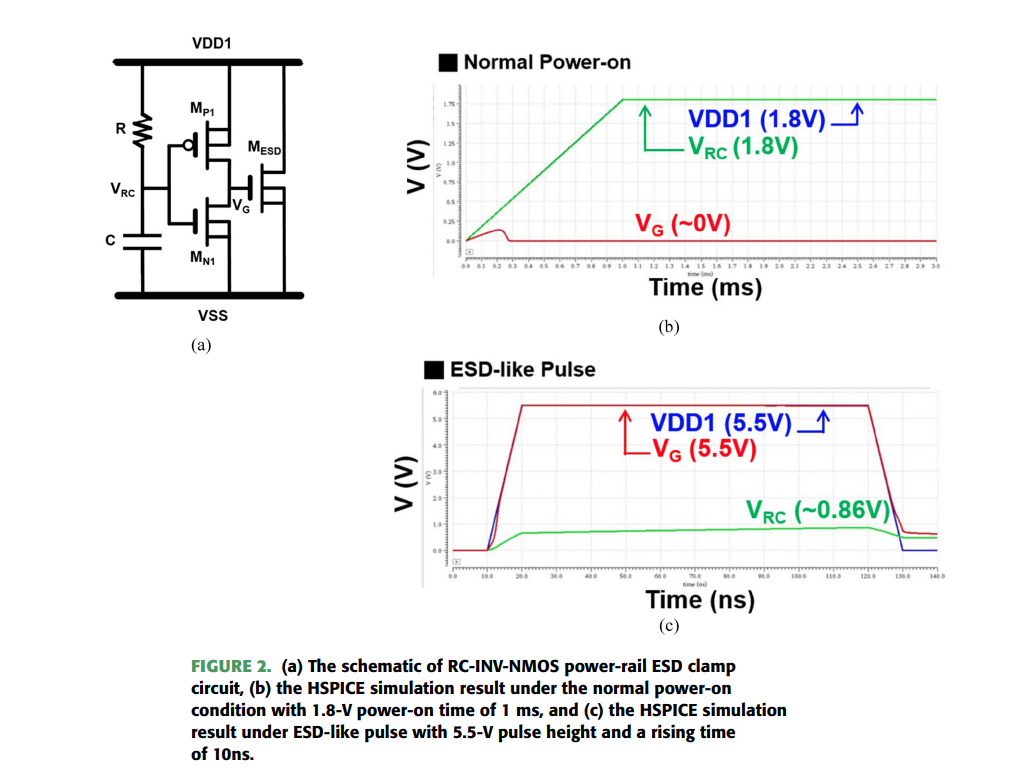
Y. -C. Huang and M. -D. Ker, "Investigation of CDM ESD Protection
Capability Among Power-Rail ESD Clamp Circuits in CMOS ICs With
Decoupling Capacitors," in IEEE Journal of the Electron Devices
Society, vol. 11, pp. 84-94, 2023 [pdf]
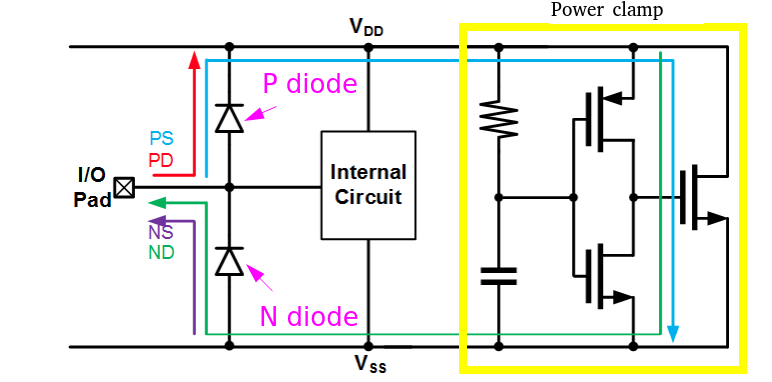
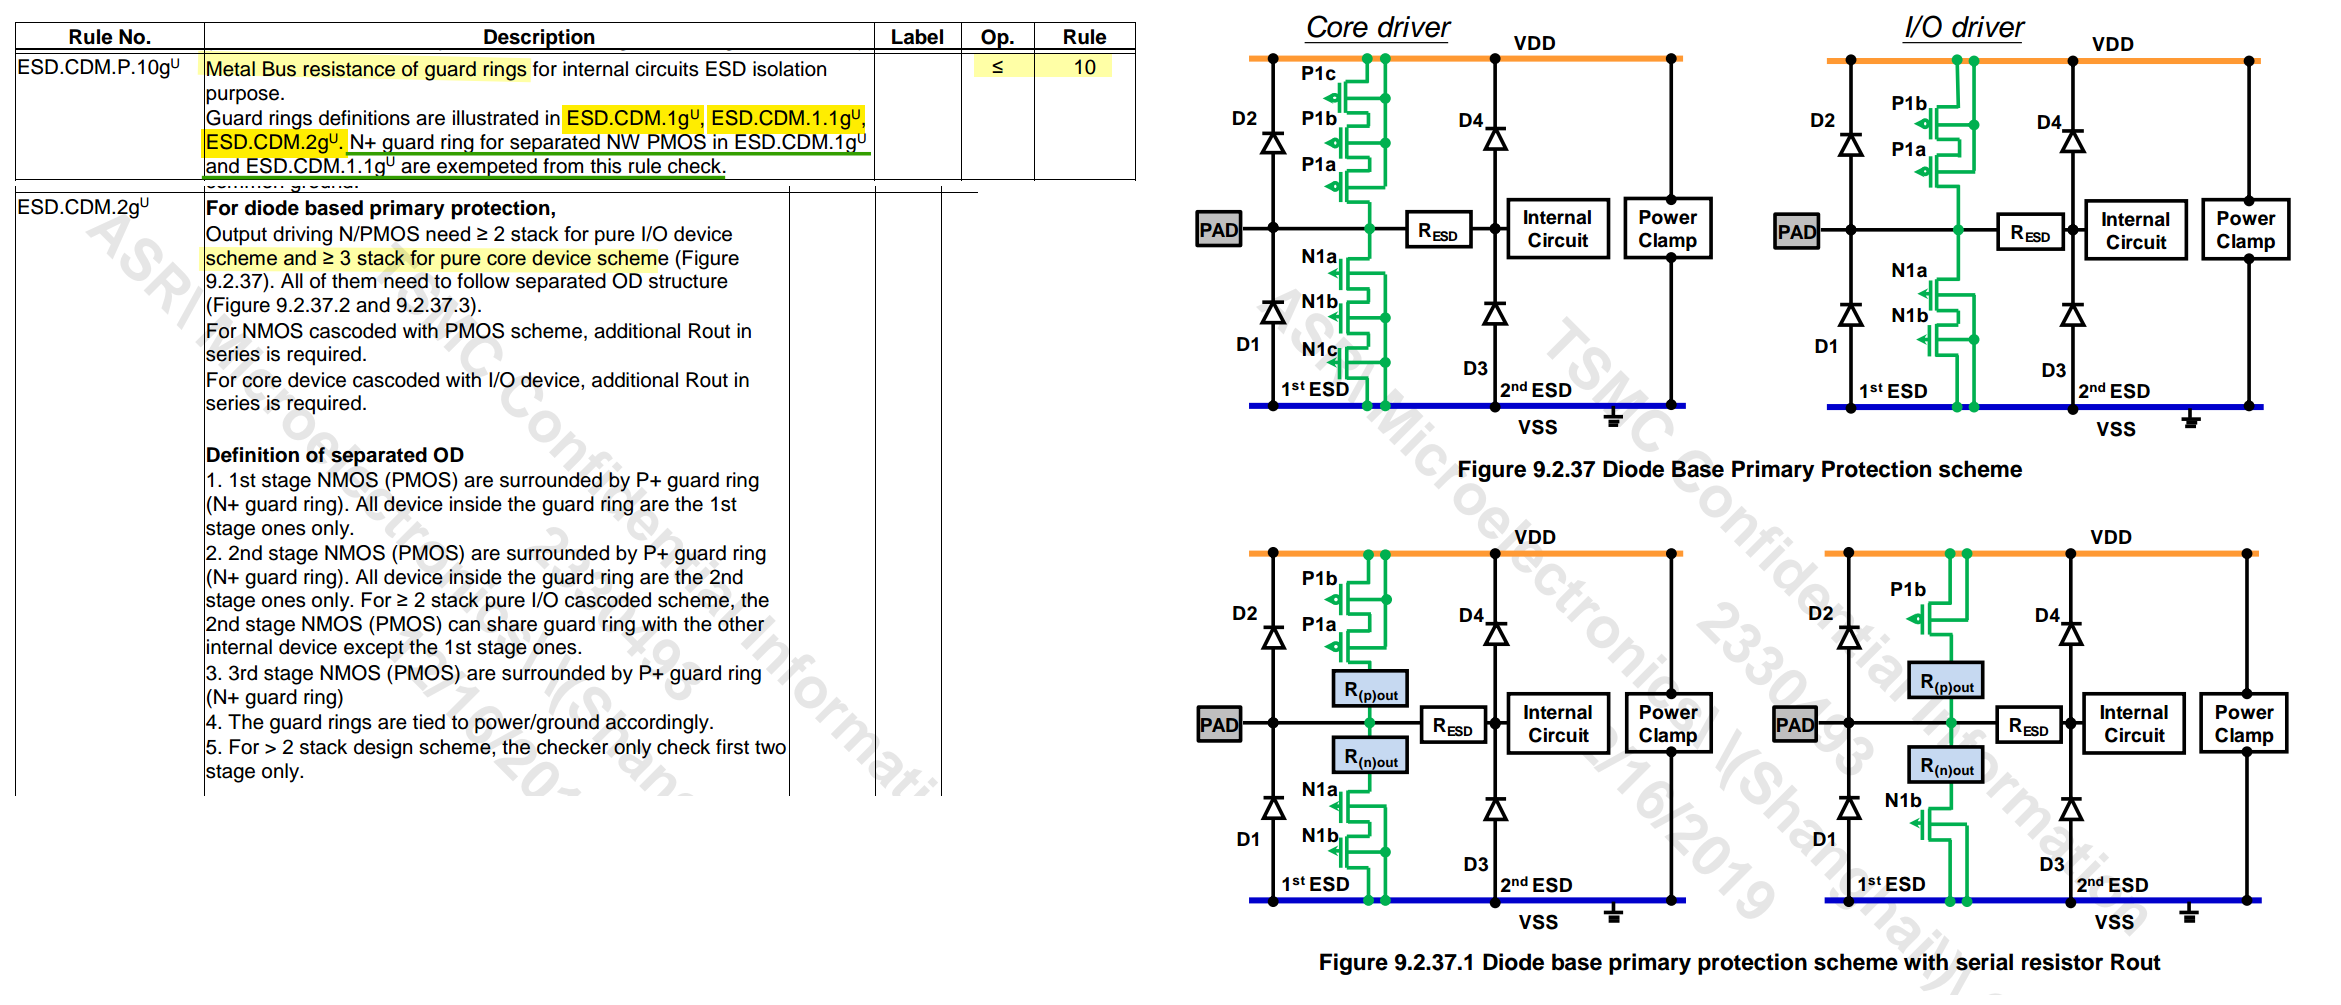
Dual Stacked Diodes
PS: I/O to GND positively
NS: I/O to GND negatively
PD: I/O to VDD positively
ND: I/O to VDD negatively
Dual diode should be used with power clamp for
PS and ND path
PMOS power clamp
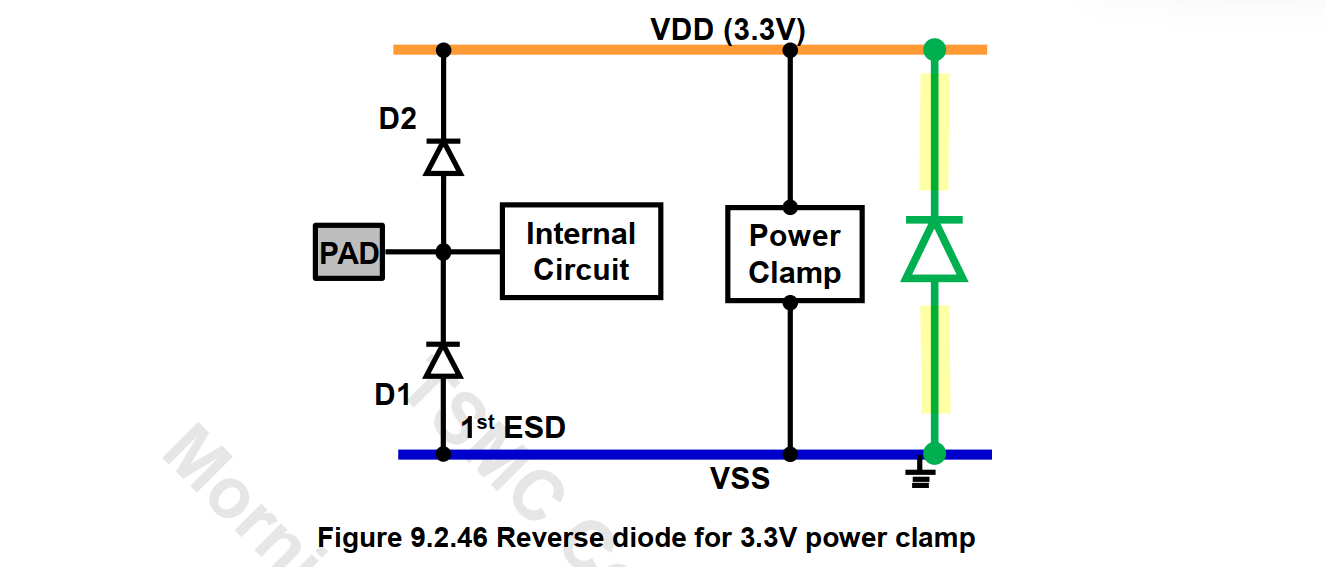
Reverse diode for
1.8V/3.3V power clamp
The resistance between HIA Diode and power/ground bump is constricted
in PERC check
Frank Feng. New Approach For Full Chip Electrical Reliability
Verification [pdf]
Calibre PERC Catalog Test-Cases & Common Examples Version 2.0
K. -H. Meng, M. Khazhinsky and J. C. Smith, "Effective ESD Design
Through PERC Programming," 2023 45th Annual EOS/ESD Symposium
(EOS/ESD), Riverside, CA, USA, 2023
Dina Medhat. Programmable Electrical Rule Checking (PERC) [pdf]
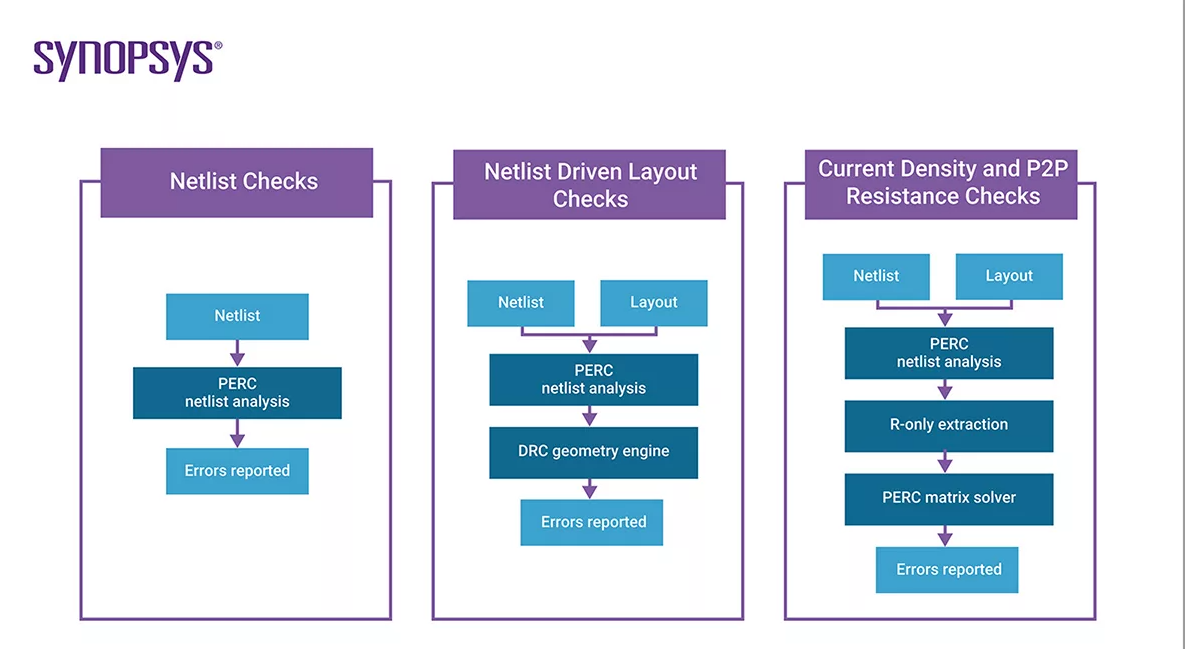
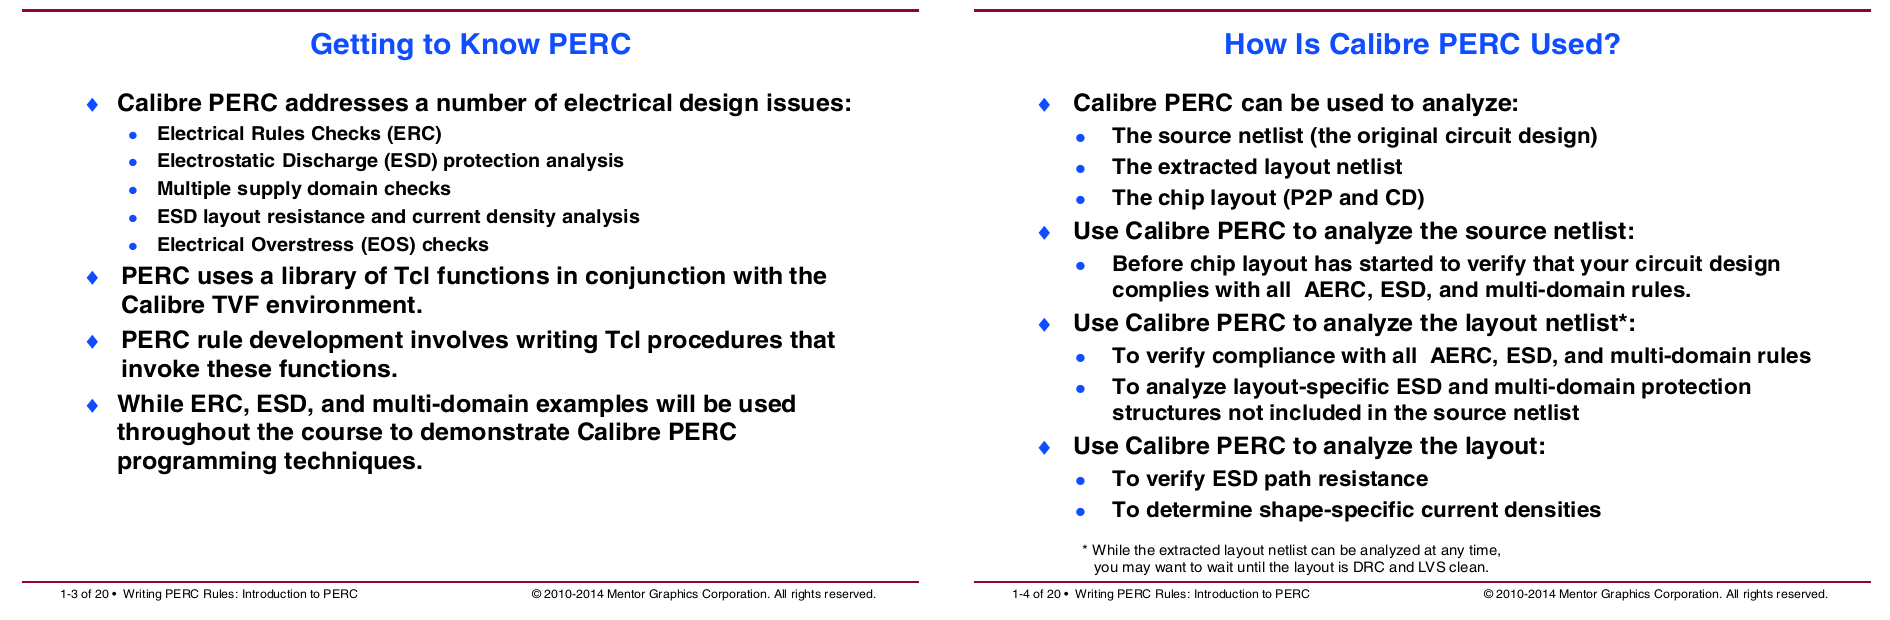
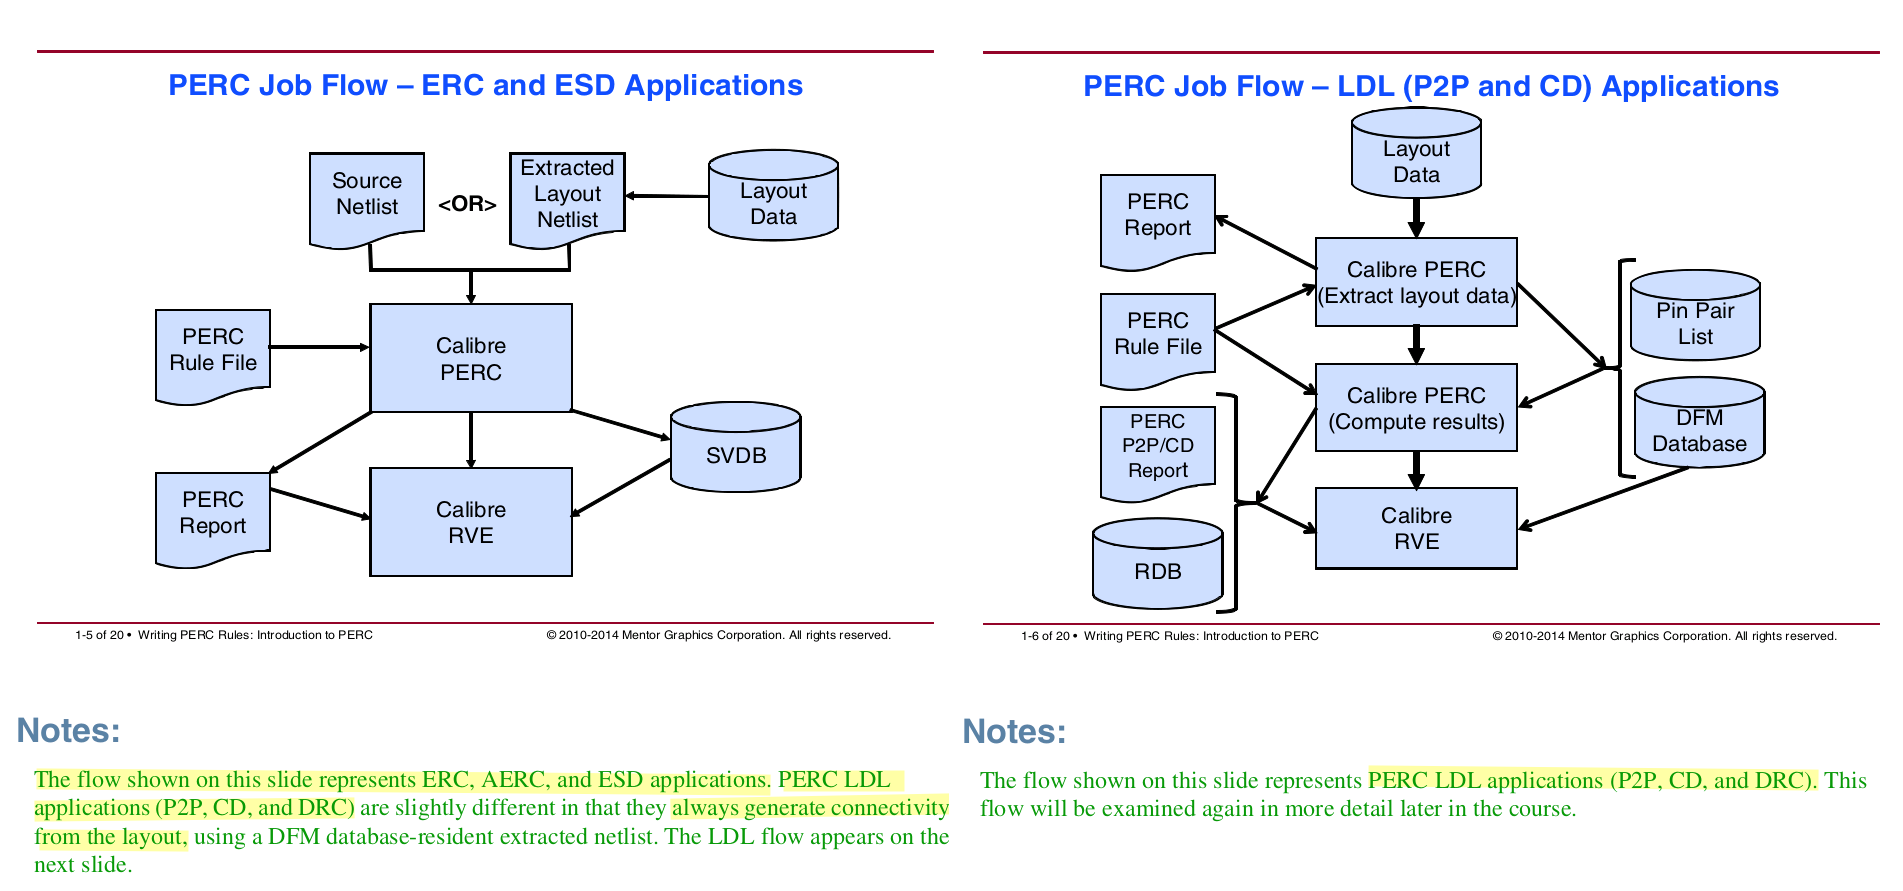
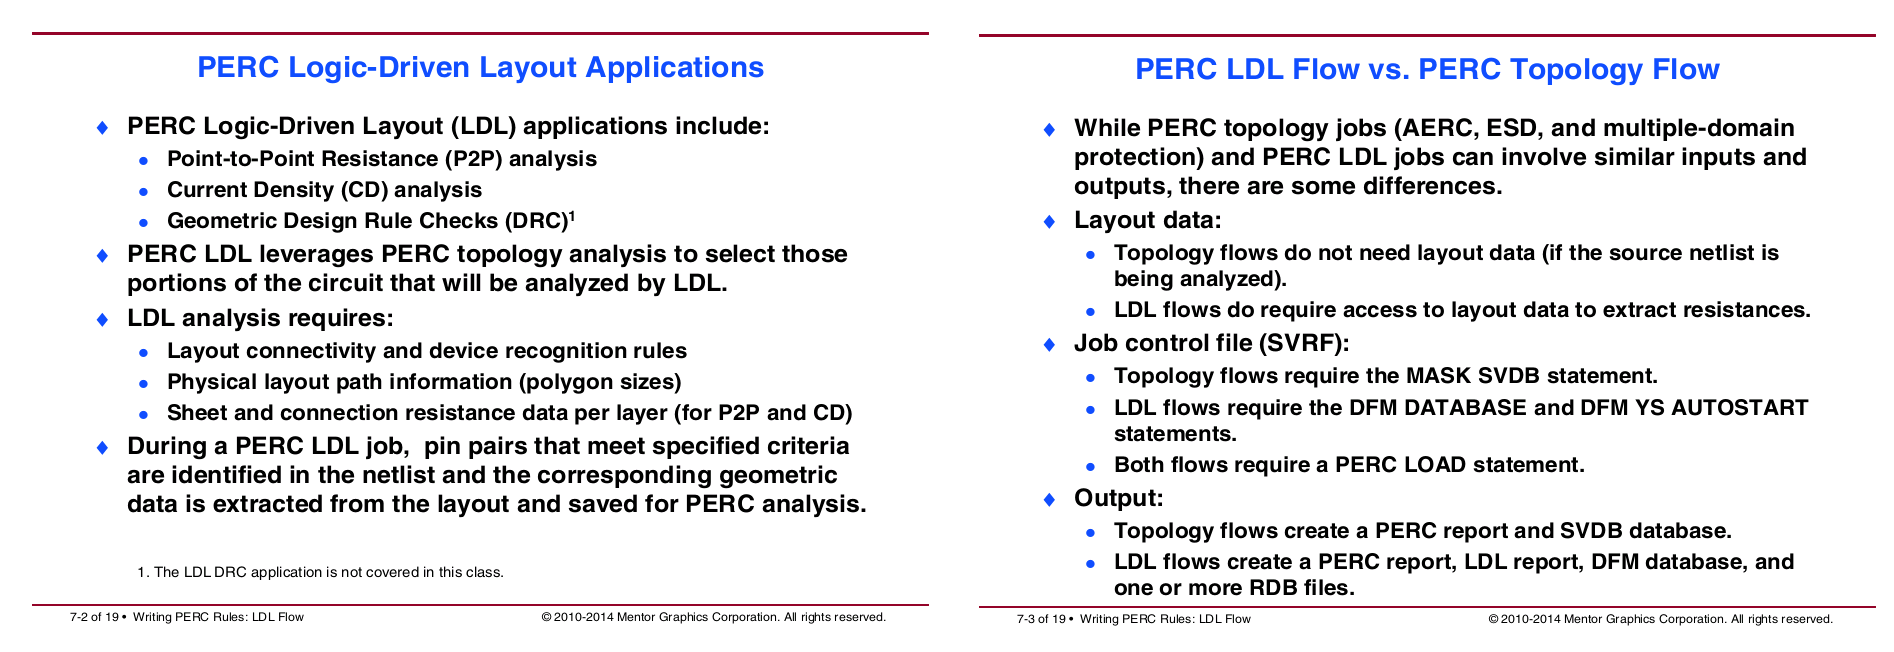
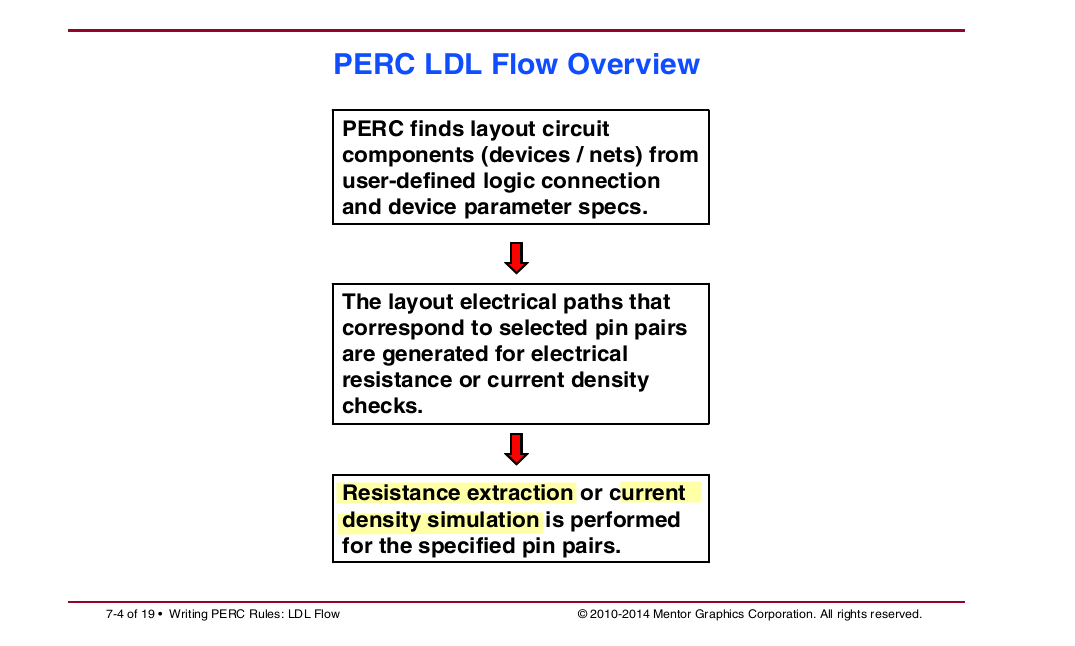
Programmable Electrical Rules Checking (PERC) is a method for
checking reliability issues of integrated circuit (IC) designs that
cannot be checked with design rule checking (DRC) or layout versus
schematic (LVS).
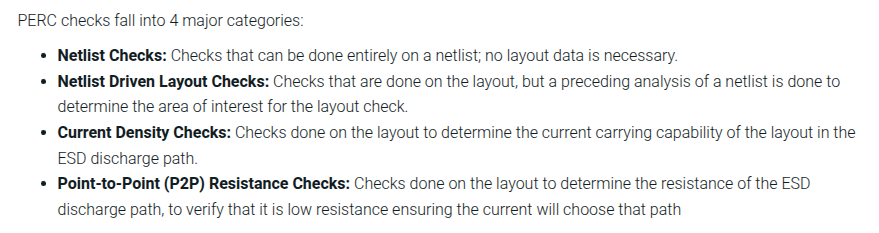
Topology (Circuit Connection and Device Size)
Check ESD protection scheme
LDL (Logic-Driven-Layout DRC)
Check Latch-up rules
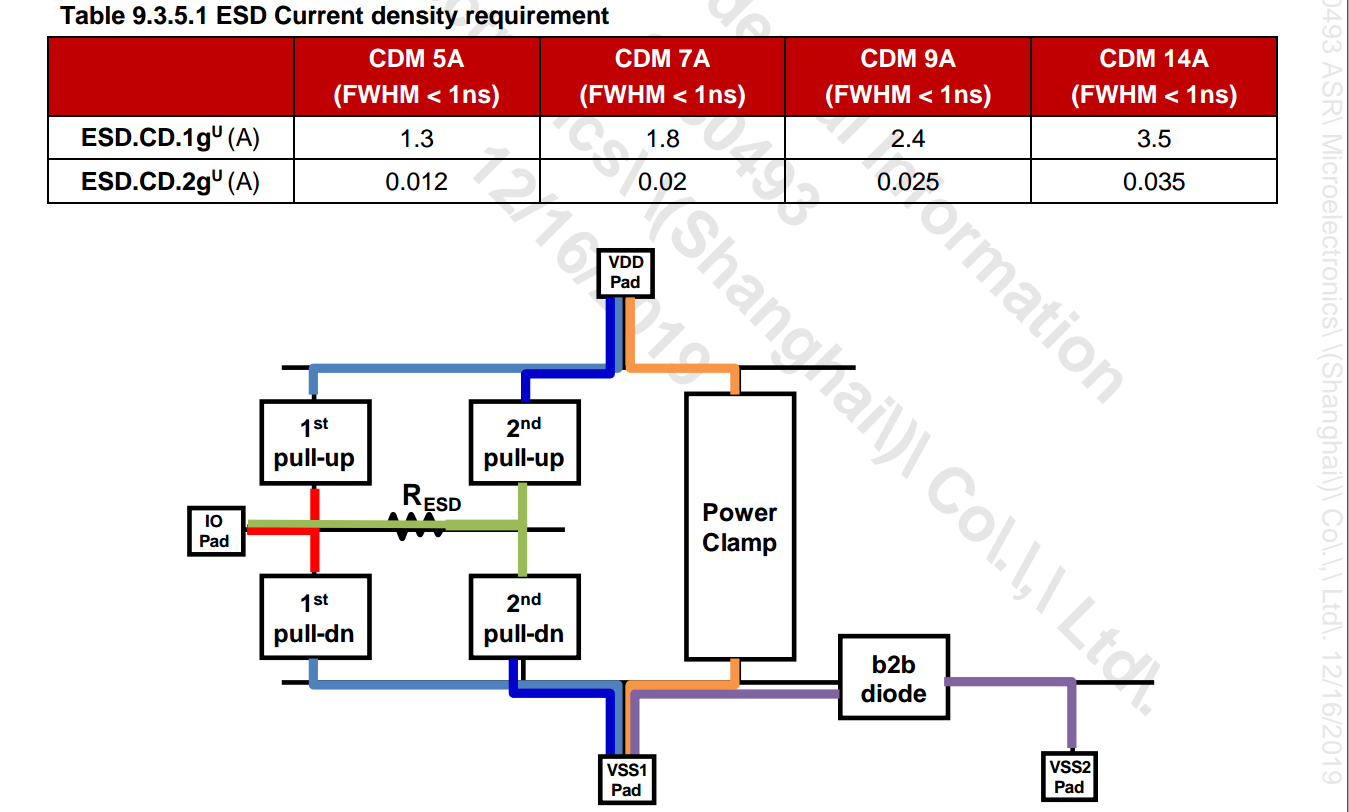
CD (Current Density)
Check primary, secondary ESD discharge path
P2P (Point-to-Point Resistance)
Check I/O to power-clamp path
pad_info
1 2 3 4 5 6 7 8 9 10 11
// Define PAD Voltage // VARIABLE "pad-text-name" pad-voltage VARIABLE "DVDD" 0.75 VARIABLE "DVSS" 0.75
// Define PAD Text // LAYOUT TEXT "pad-text-name" x-coor y-coor pin-text-layer
LAYOUT TEXT "DVDD" x0-coor y0-coor pin-text-layer LAYOUT TEXT "DVDD" x1-coor y1-coor pin-text-layer LAYOUT TEXT "DVSS" x2-coor y2-coor pin-text-layer
above <x0-coor y0-coor> and <x1-coor y1-coor> are shorted
together, in this way the two bump can share power clamp
in TSMC
Topology (Circuit Connection and Device Size)
Check ESD protection scheme
LDL (Logic-Driven-Layout DRC)
Check Latch-up rules
CD (Current Density)
Check primary, secondary ESD discharge path
P2P (Point-to-Point Resistance)
Check I/O to power-clamp path
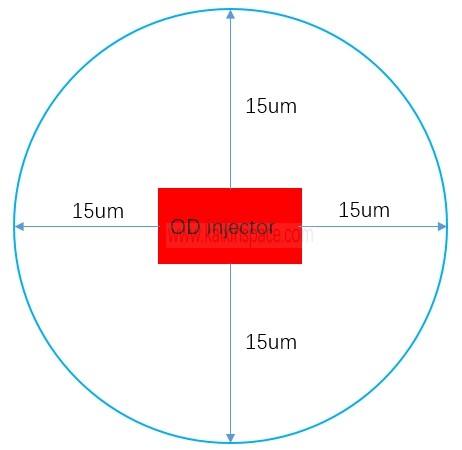
TOPO check Total OD area of NACT or PACT and
Total perimeter of NACT or PACT
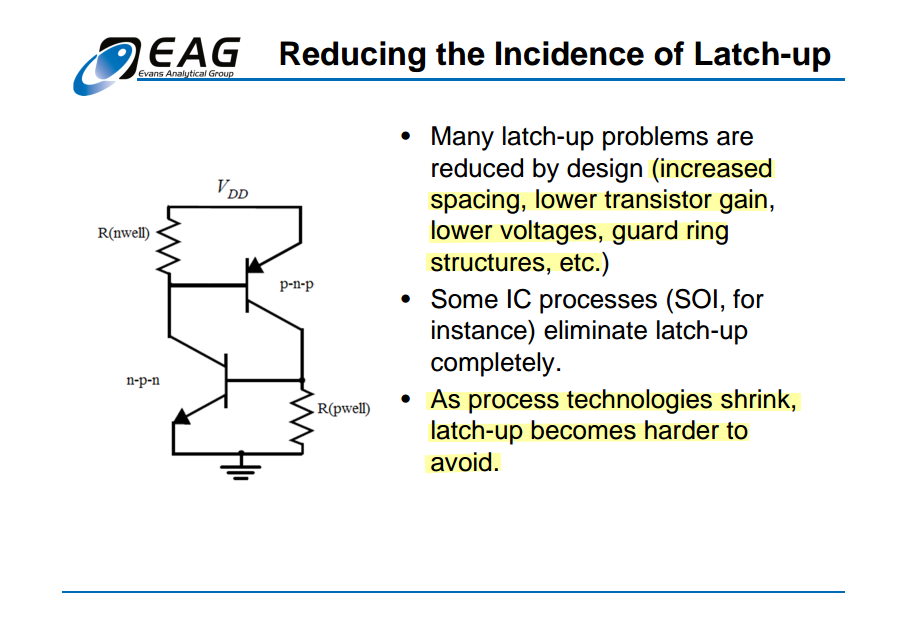
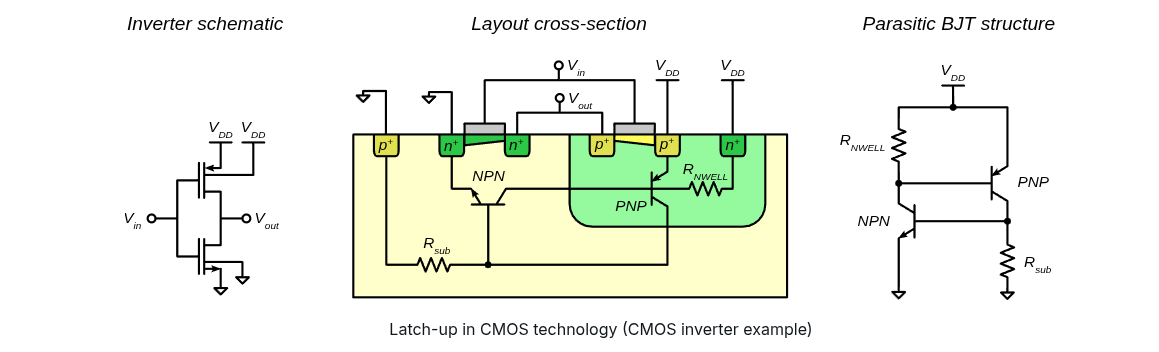
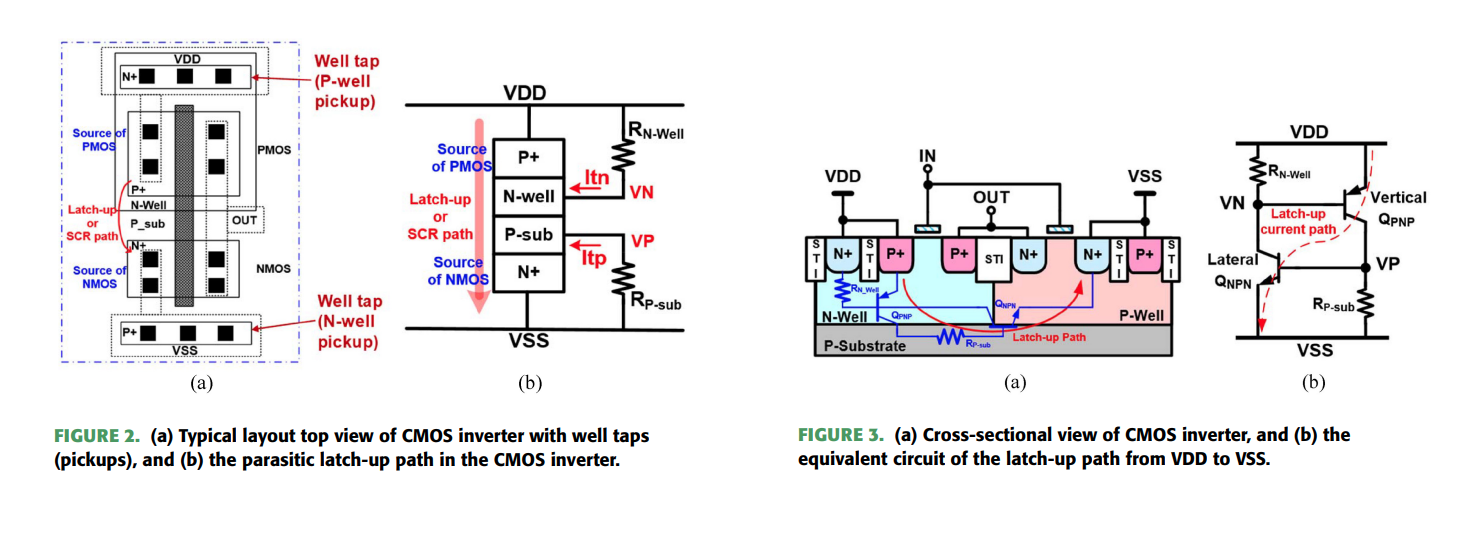
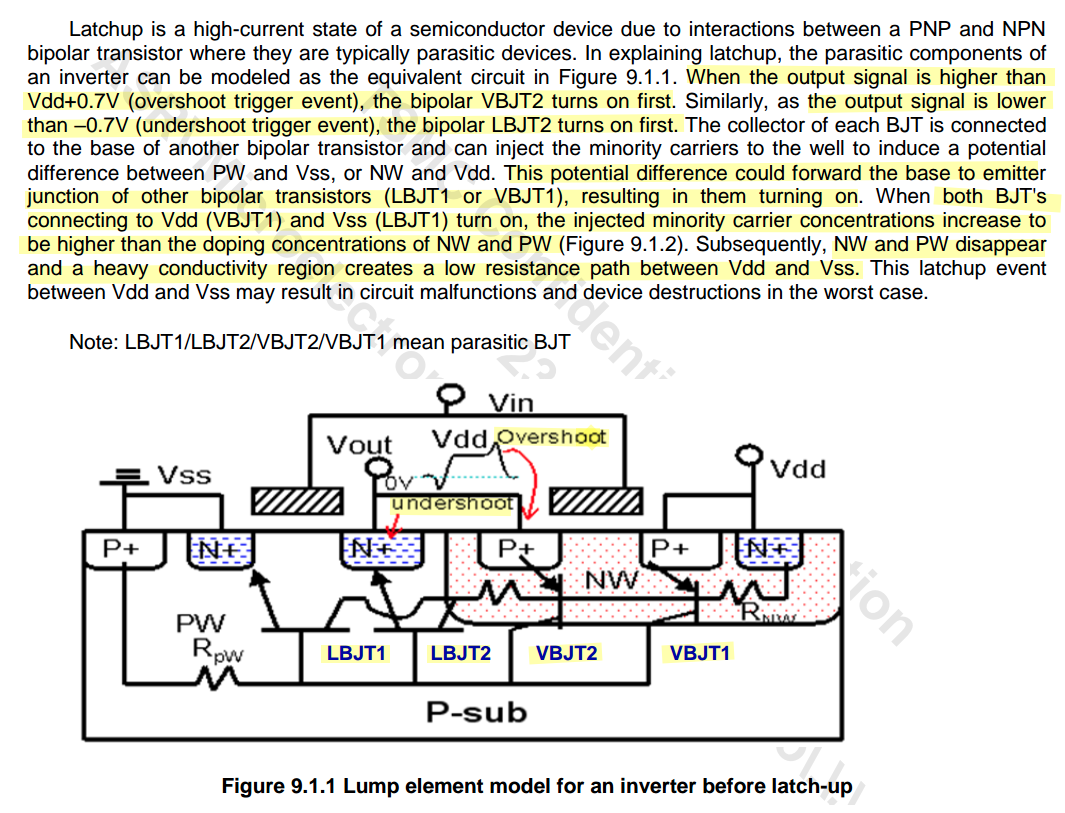
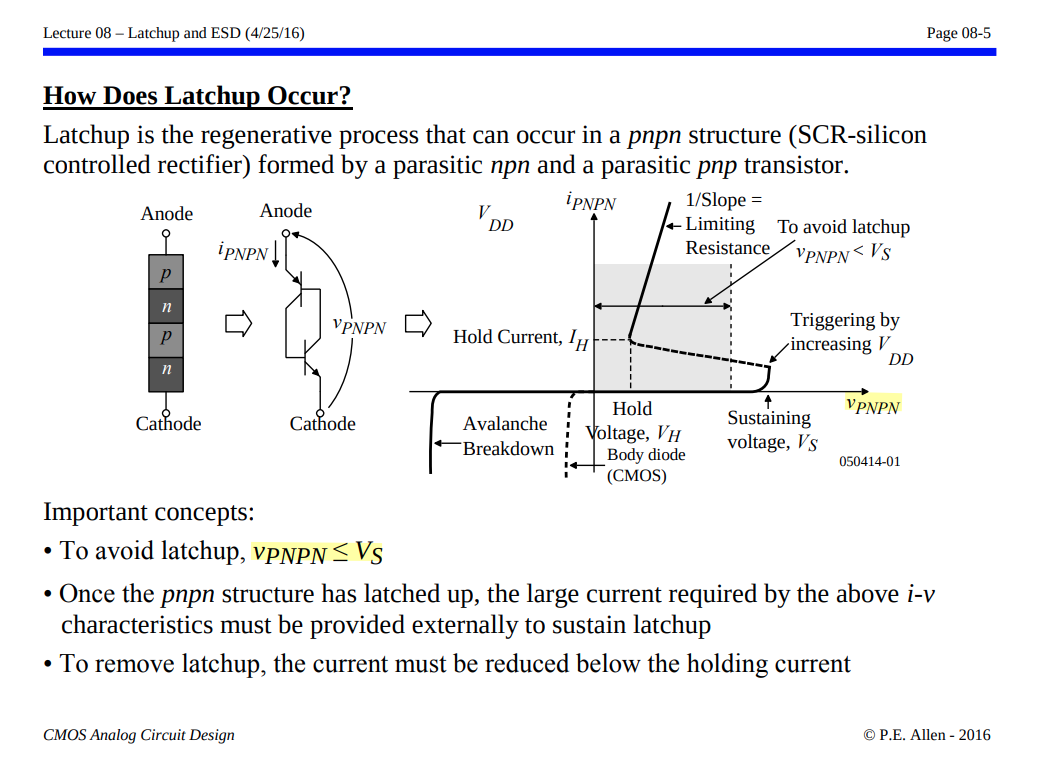
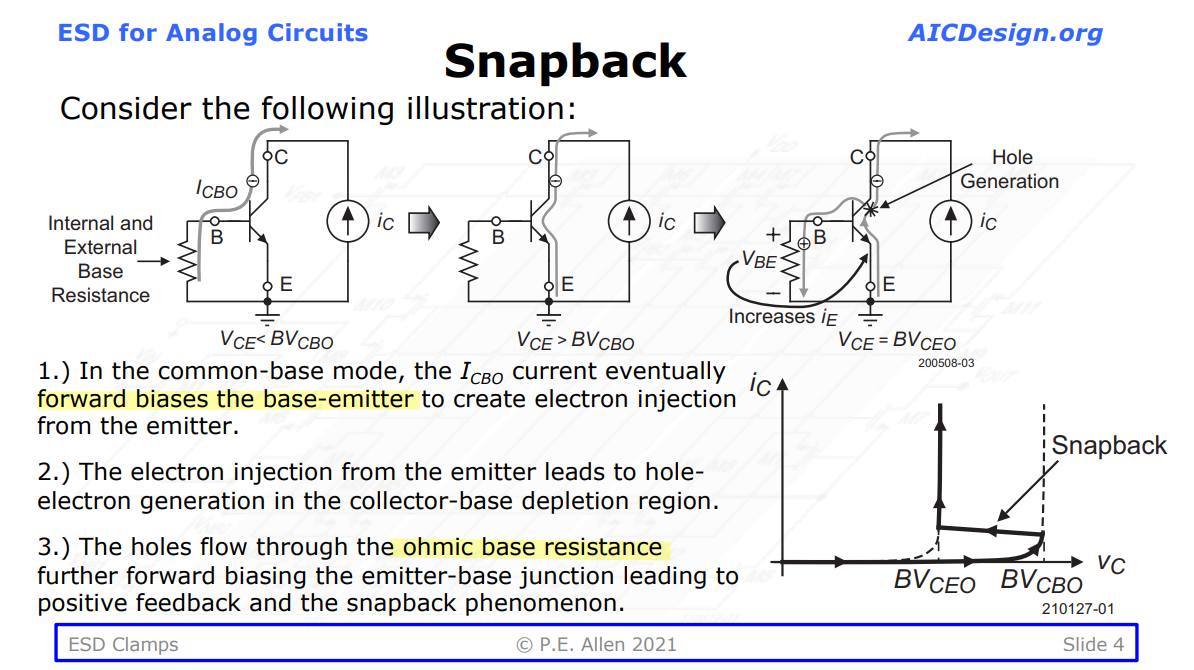
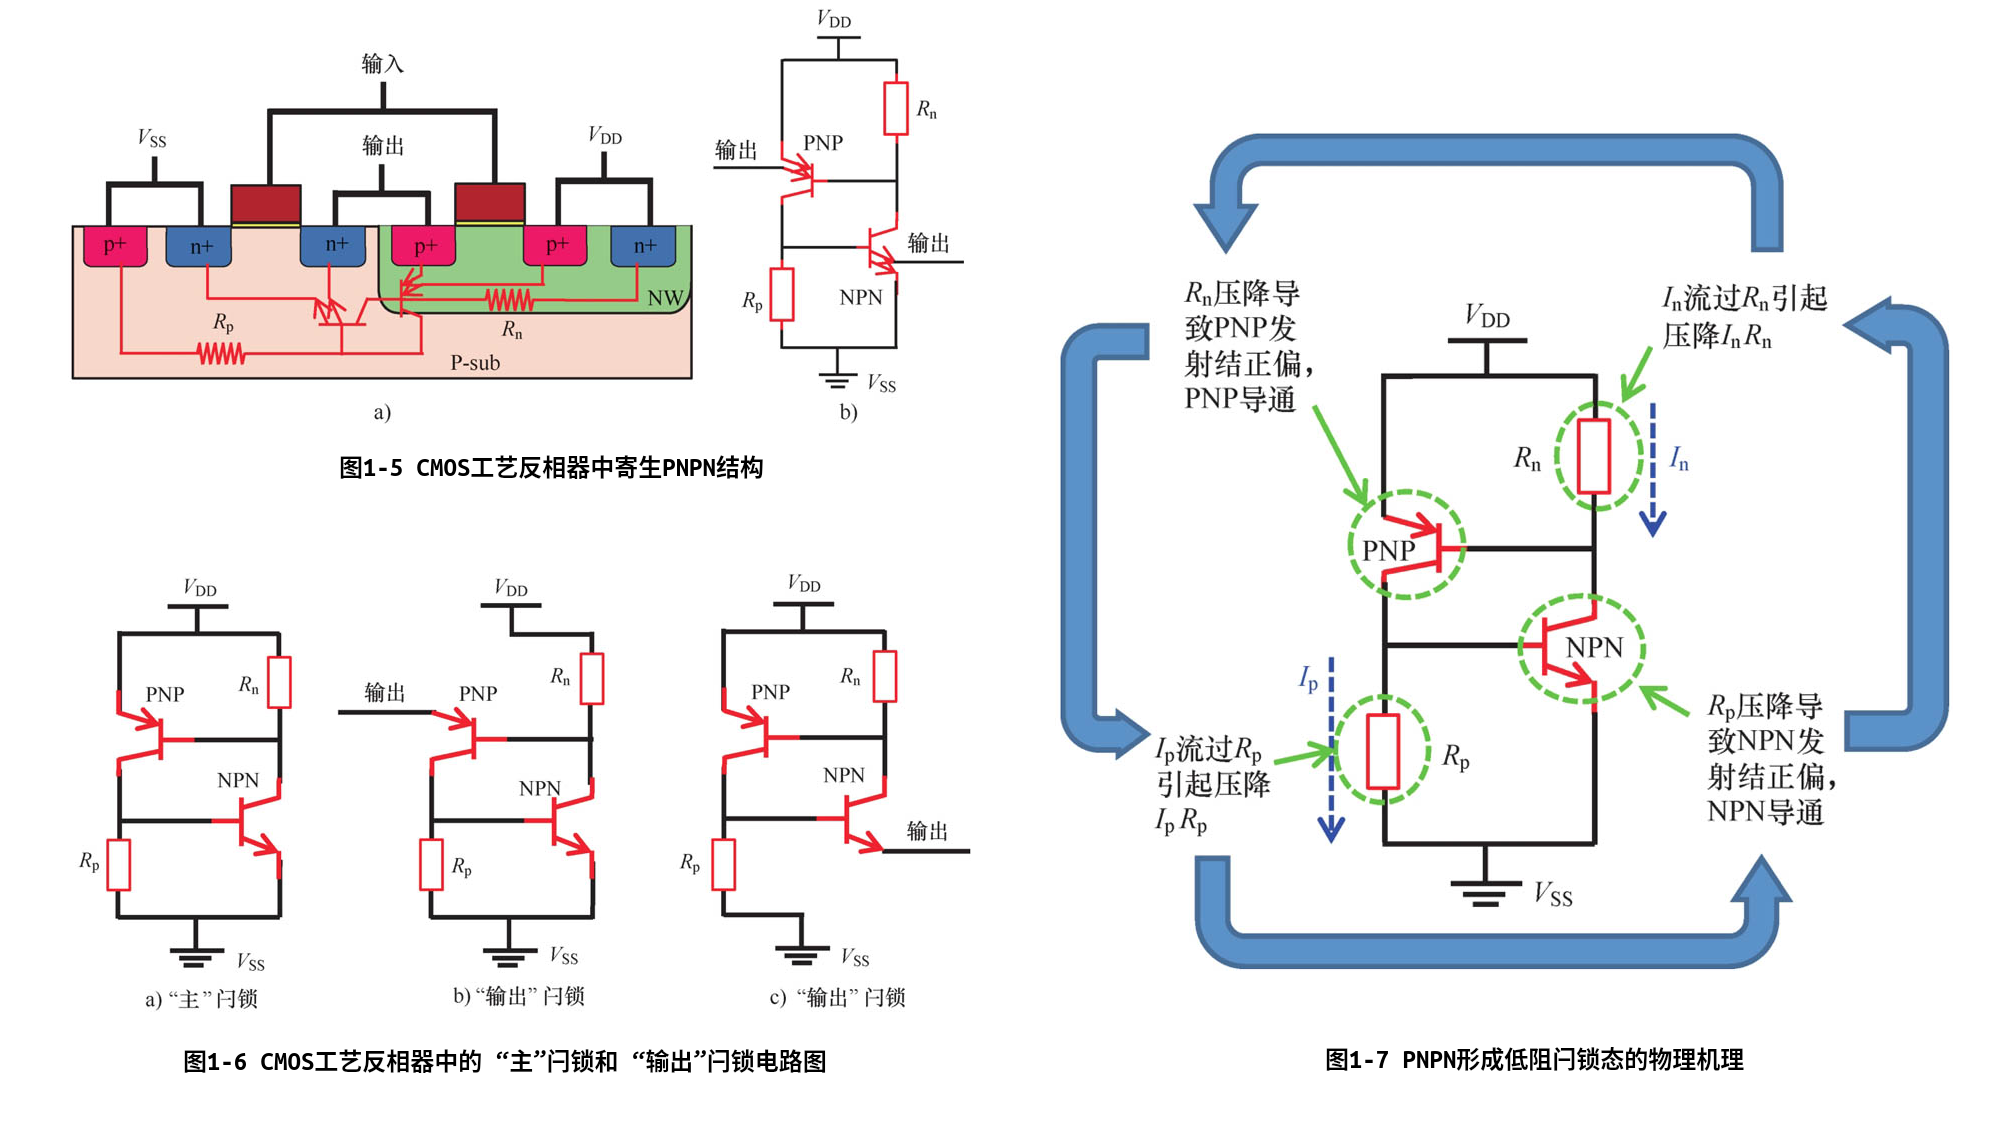
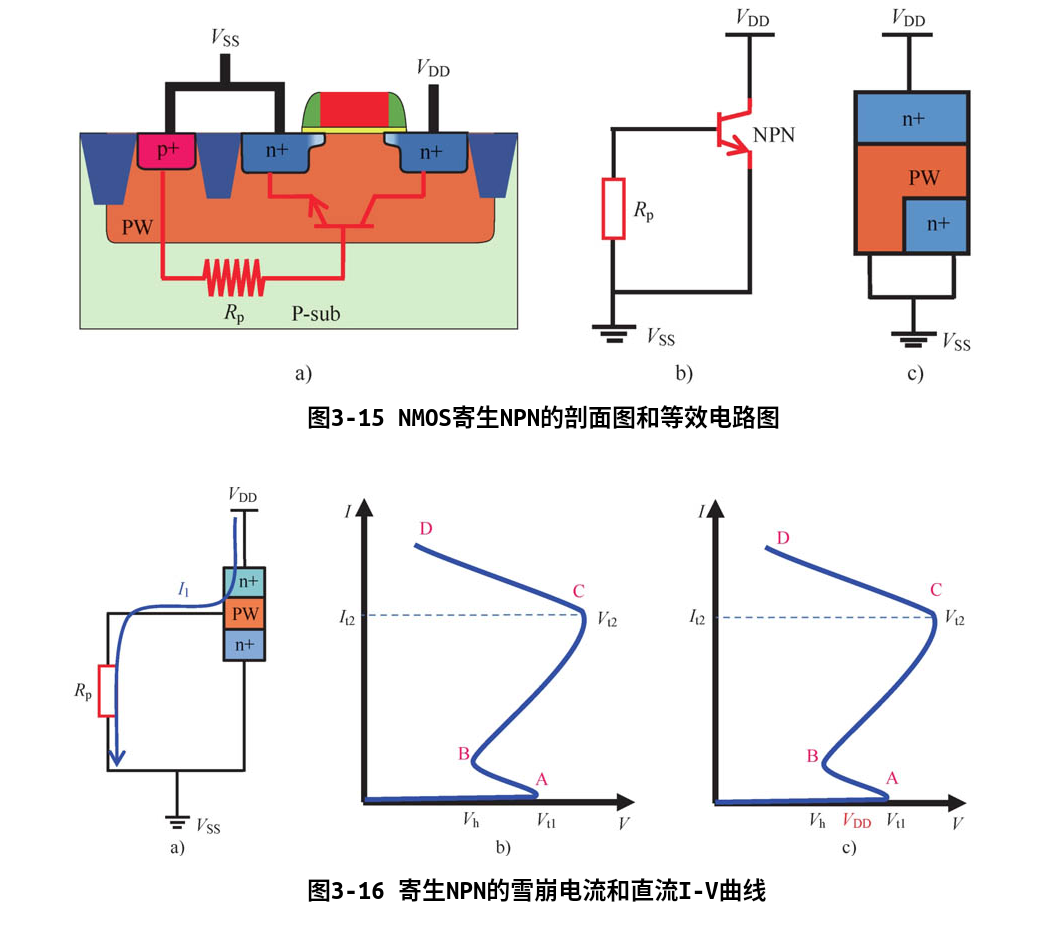
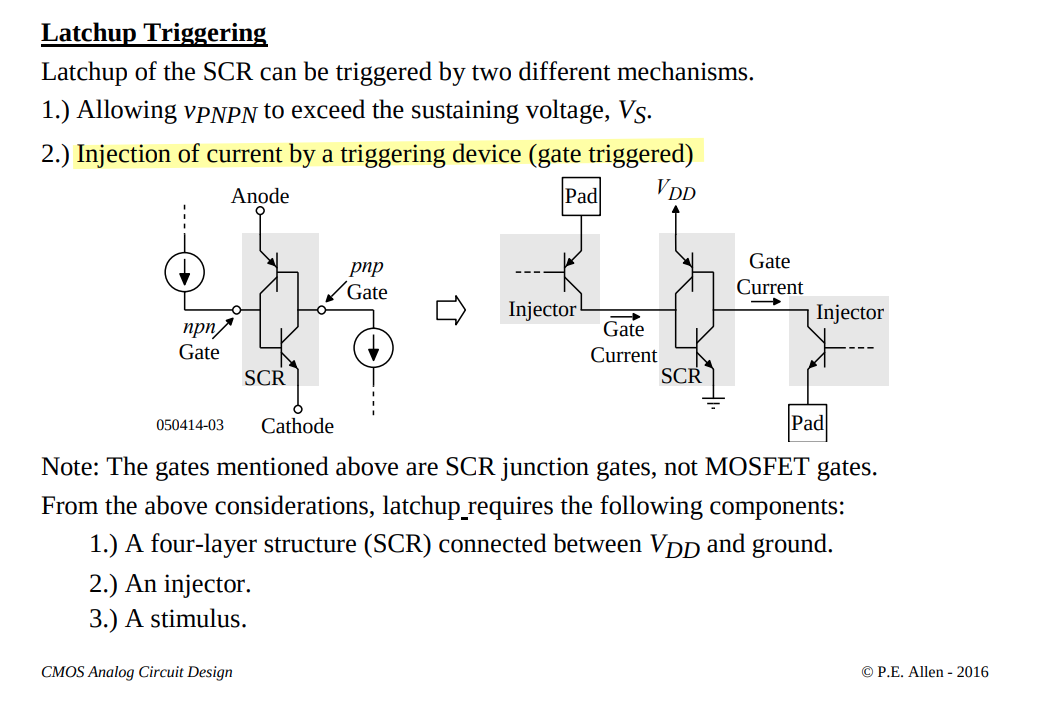
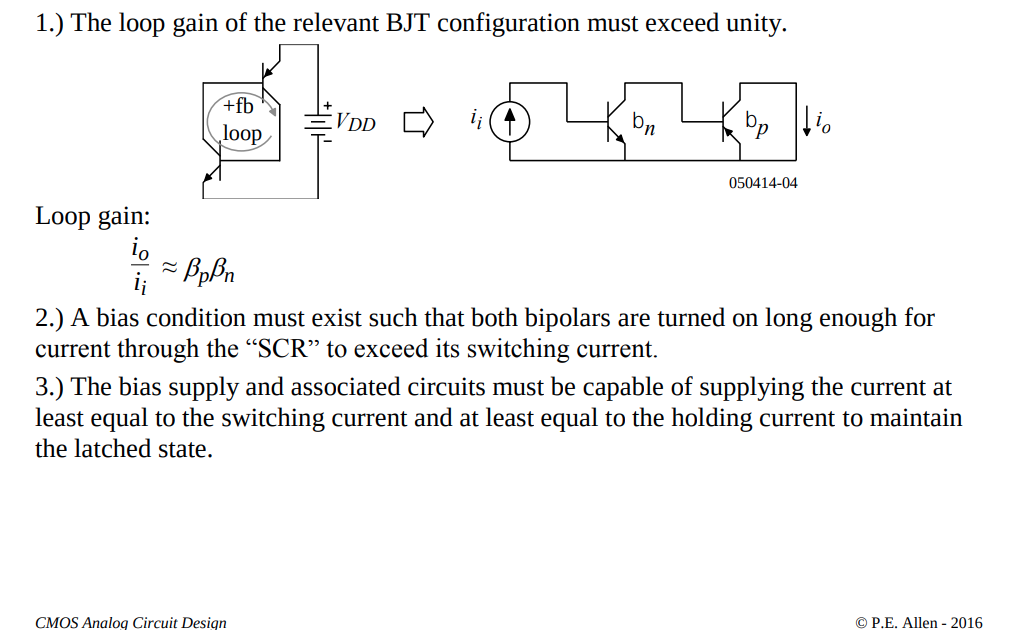
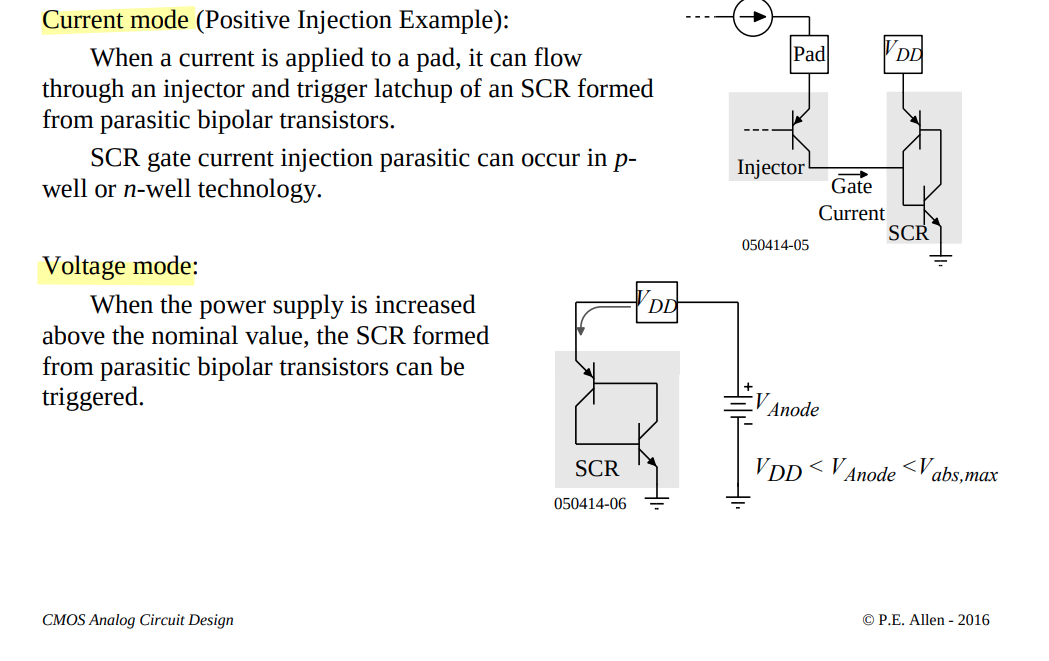
This can happen when a parasitic thyristor,
which is essentially a pair of interconnected
transistors, is triggered into a latched state, leading to
sustained current flow and potential device failure.
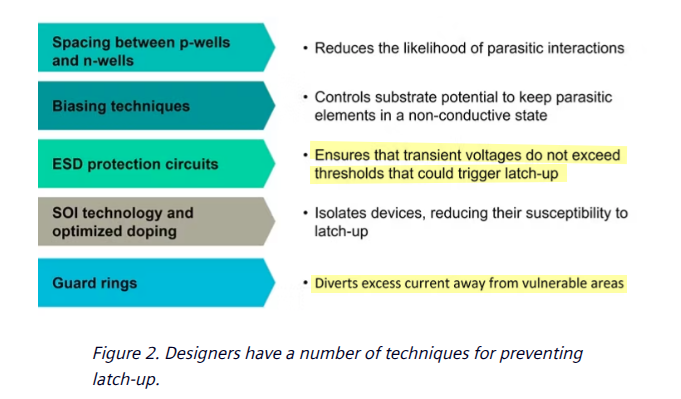
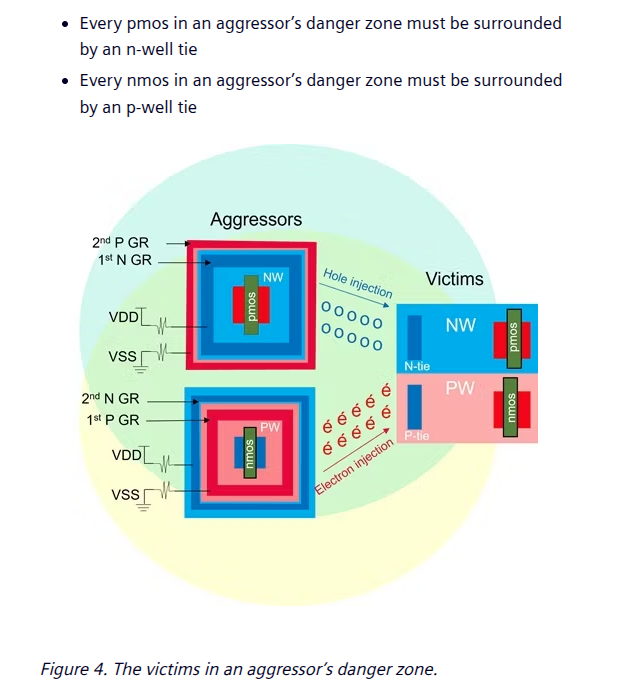
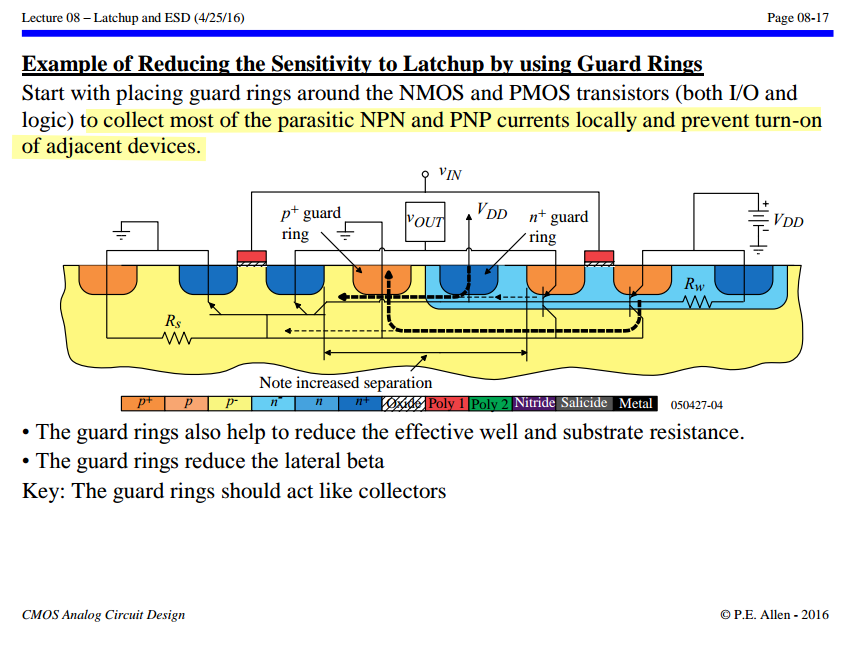
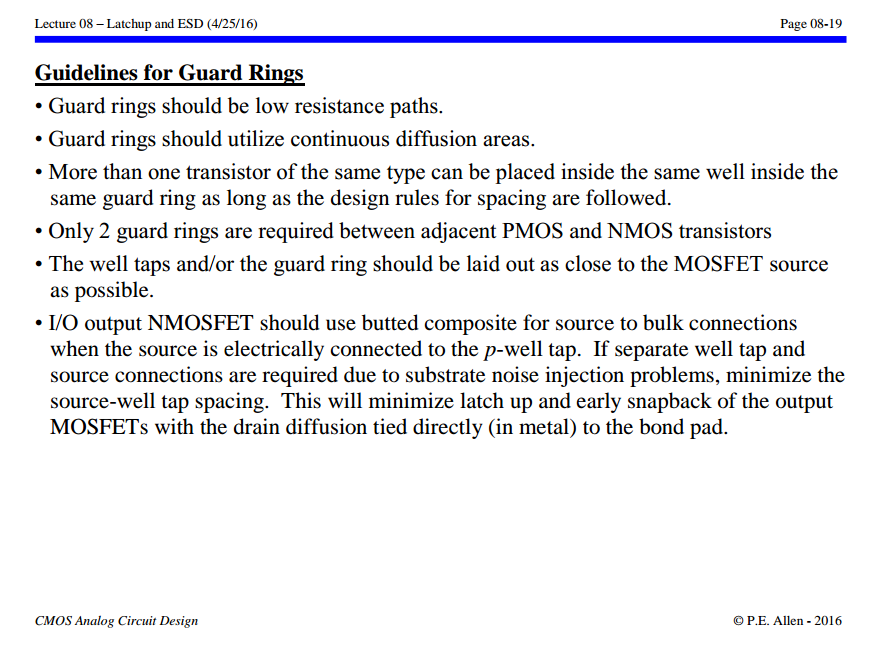
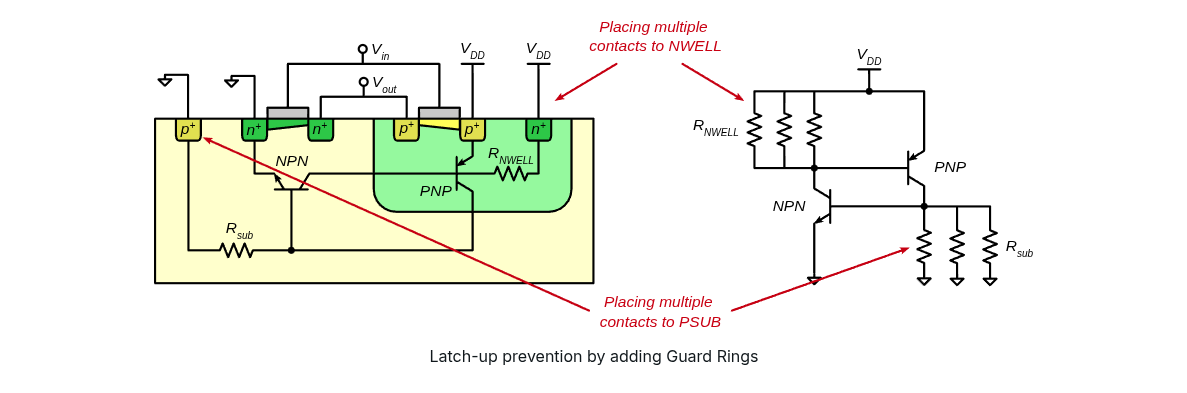
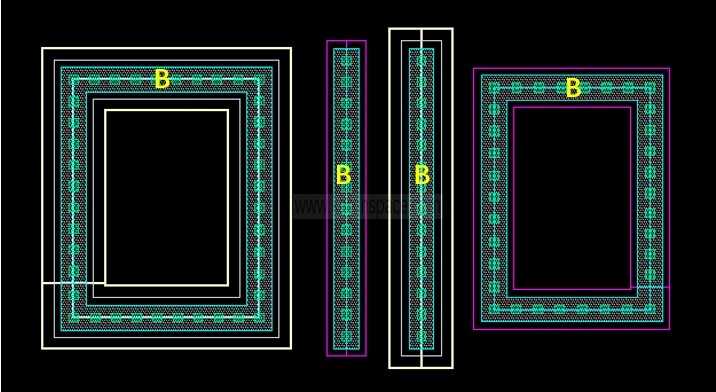
One important technique is the use of guard
rings, the heavily doped regions surrounding sensitive
components on the IC to divert excess current away from
vulnerable areas, thereby reducing the likelihood of latch-up
occurrence
These guard rings not only function as barriers against parasitic
thyristor (SCR) formation but also serve to isolate
different regions of the IC, minimizing unwanted electrical
interactions and maintaining pathway integrity
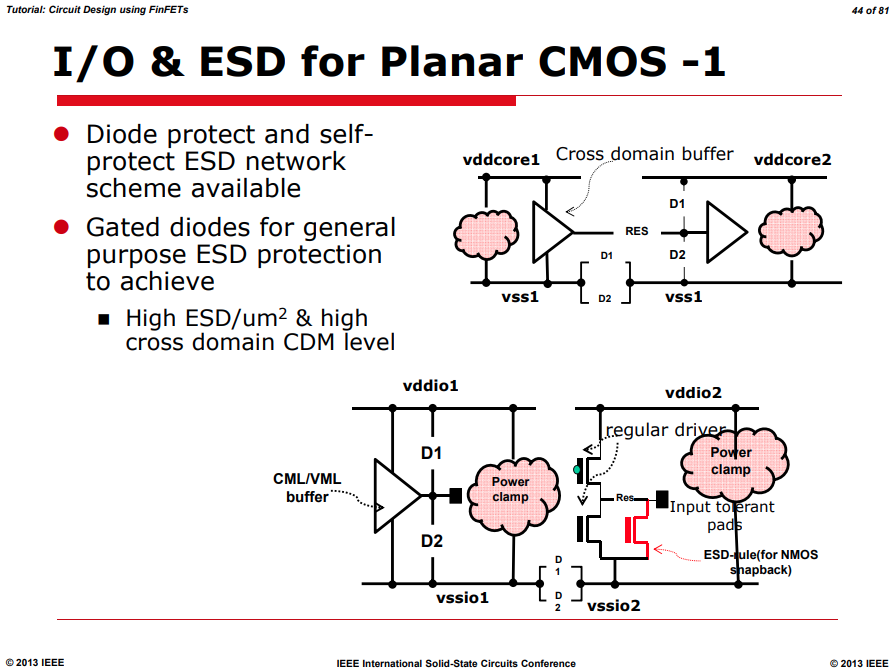
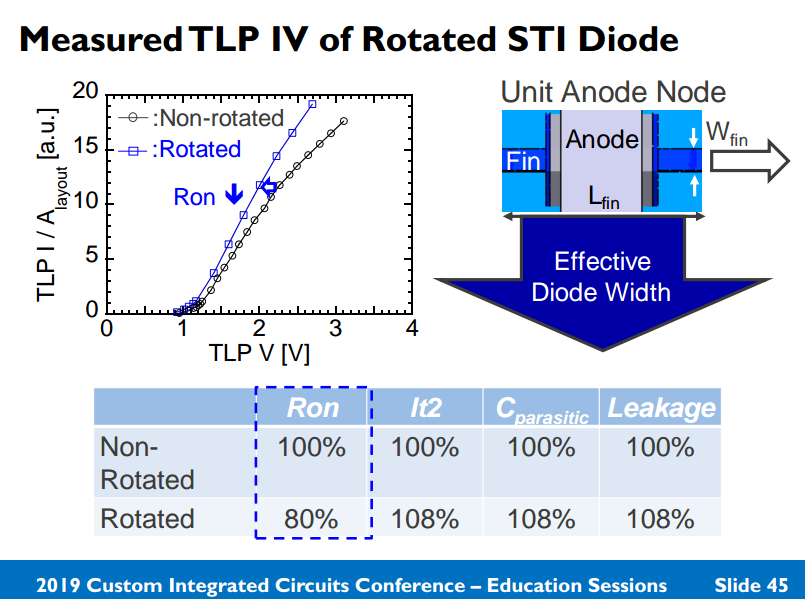
A diode can operate in both forward and reverse modes for ESD
protection.
\(R_{ON}\) for a forward-biased
diode is lower than that for a
reverse-biased diode
One major disadvantage of a forward diode-string for ESD protection
is that the leakage current (Ileak) may be enlarged due to the
Darlington effect in the diode-string
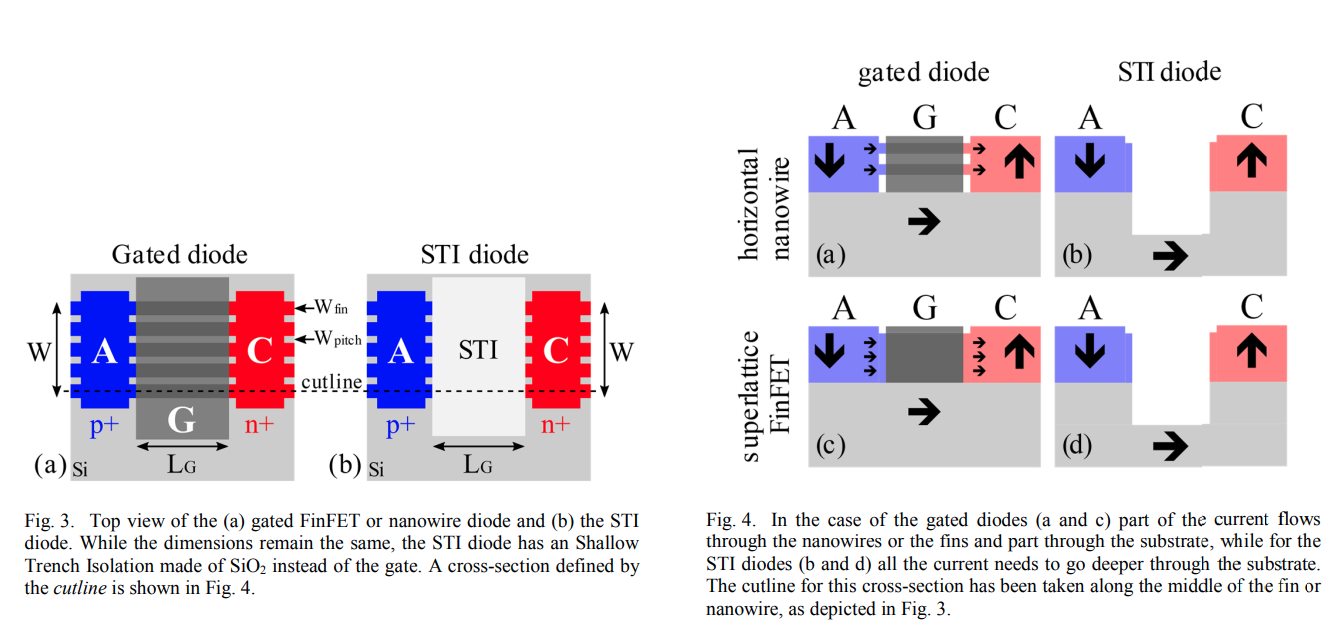
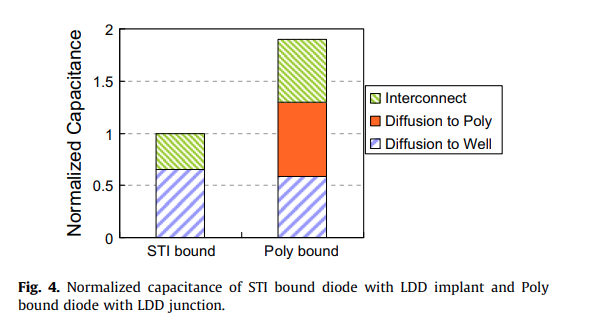
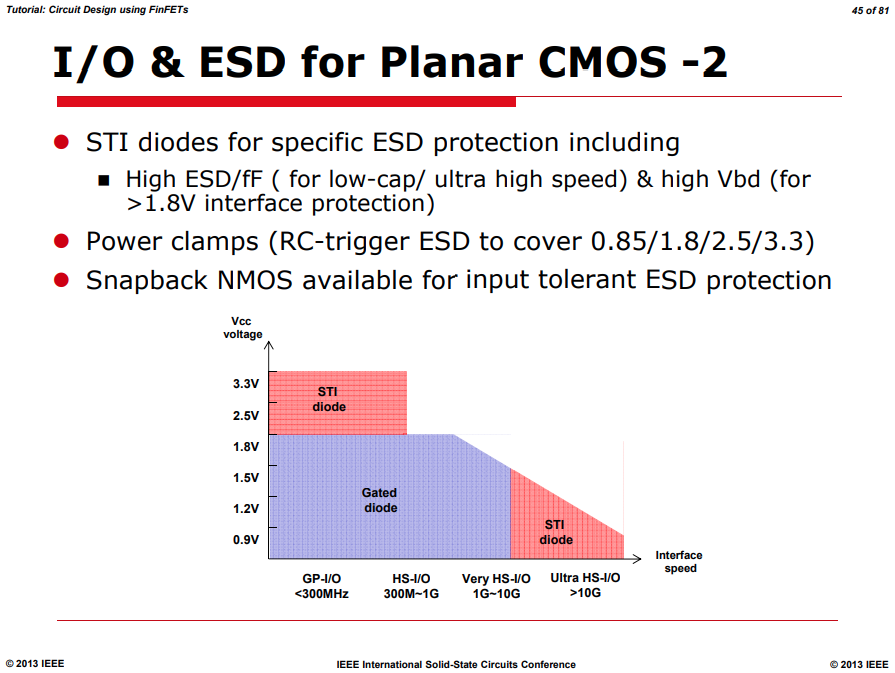
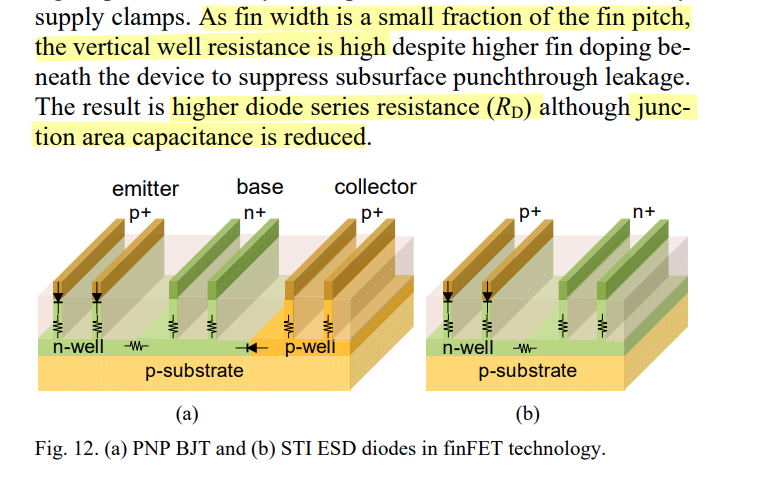
Gated diode & STI diode
"gated diode" aka. "poly bound" diode
STI bound diodes typically have lower
capacitance
M. Simicic, G. Hellings, S. -H. Chen, N. Horiguchi and D. Linten,
"ESD diodes with Si/SiGe superlattice I/O finFET architecture in a
vertically stacked horizontal nanowire technology," 2018 48th European
Solid-State Device Research Conference (ESSDERC), Dresden, Germany,
2018
US9653448B2. Electrostatic Discharge (ESD) Diode in FinFET
Technology
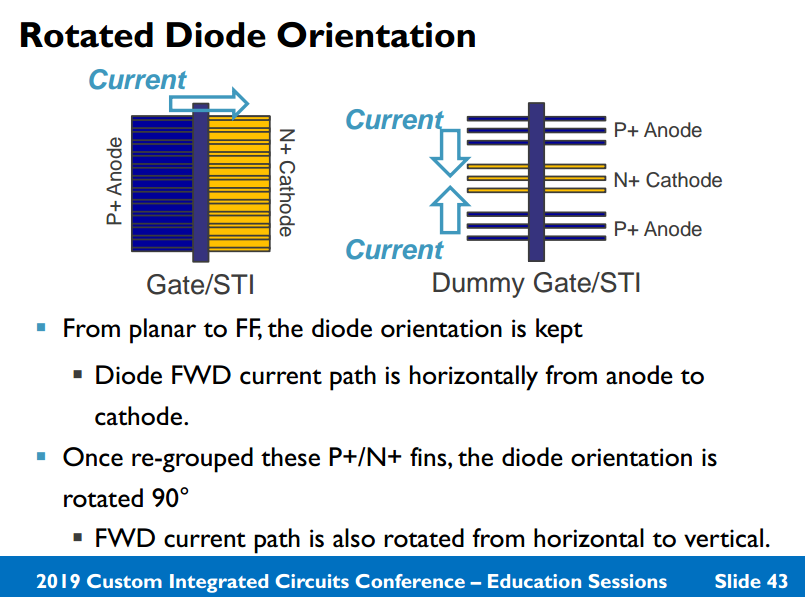
?? Rotated STI Diode
Loke, Alvin & Yang, (2018). Analog/mixed-signal design challenges
in 7-nm CMOS and beyond. 10.1109/CICC.2018.8357060.
Shih-Hung Chen. CICC 2019: Designing Diode Based ESD Protection in
Advanced State of the Art Technologies
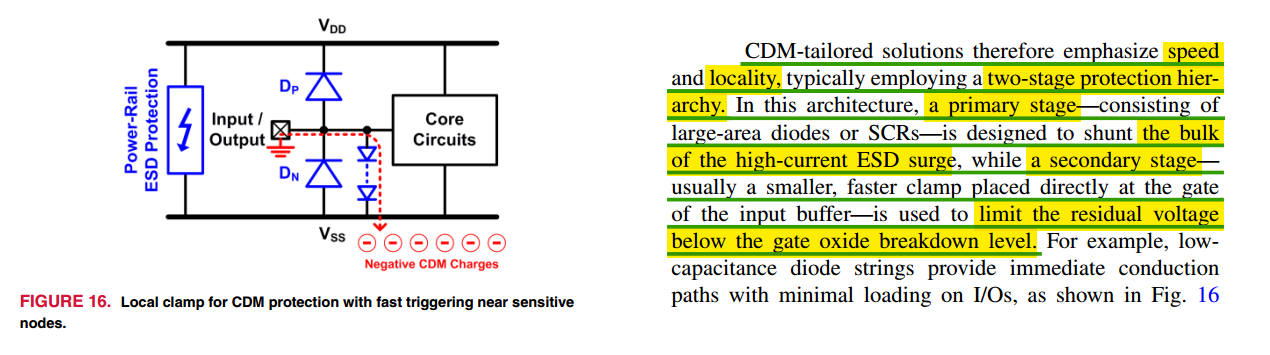
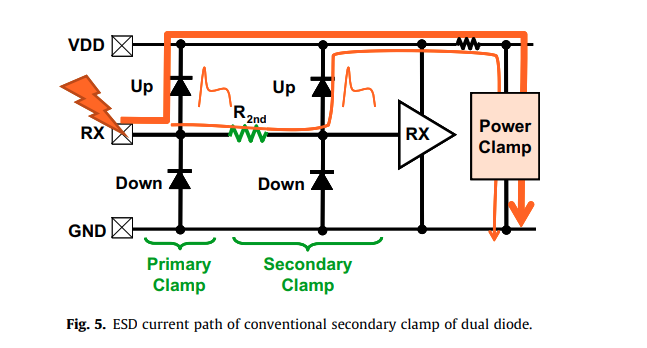
Two-Stage ESD Protection
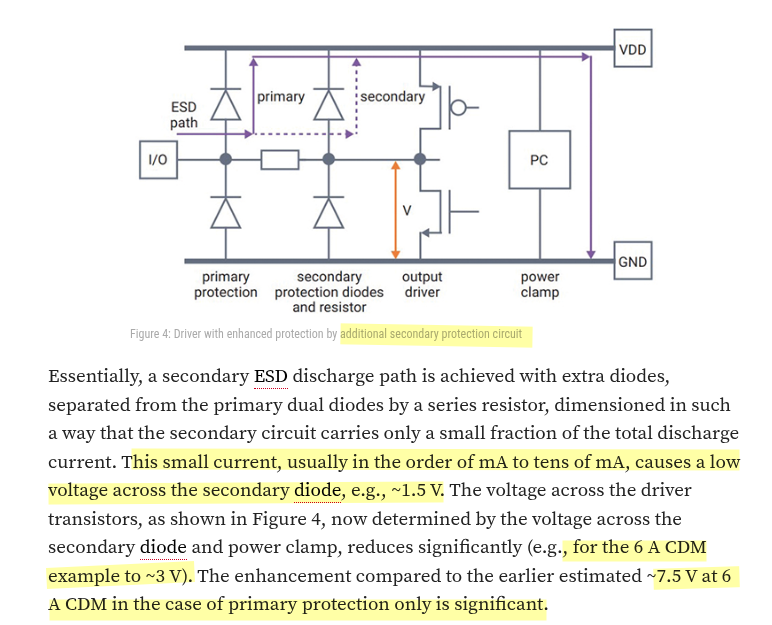
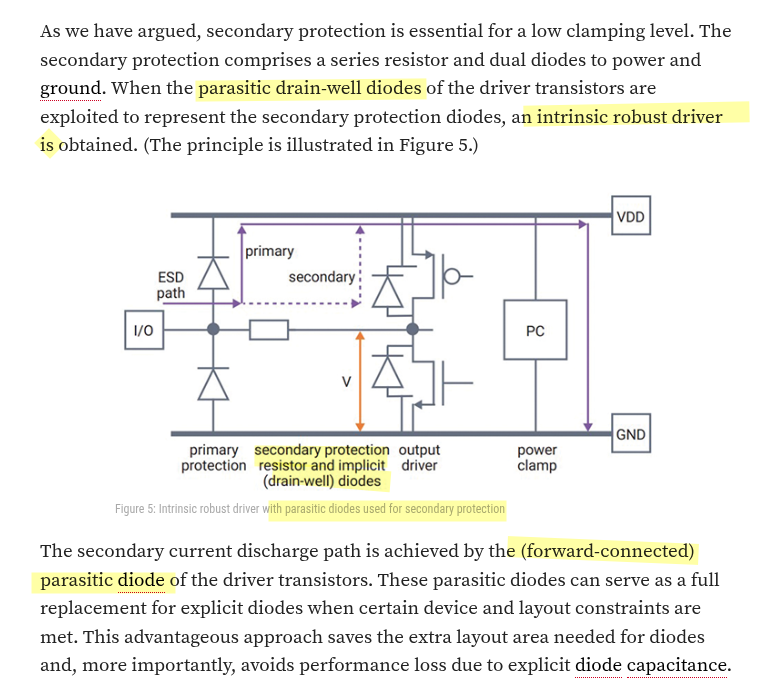
two-stage primary–secondary ESD protection
a primary ESD protection structure (ESD1), a secondary ESD protection
unit (ESD2), and an isolation resistor (\(R\))
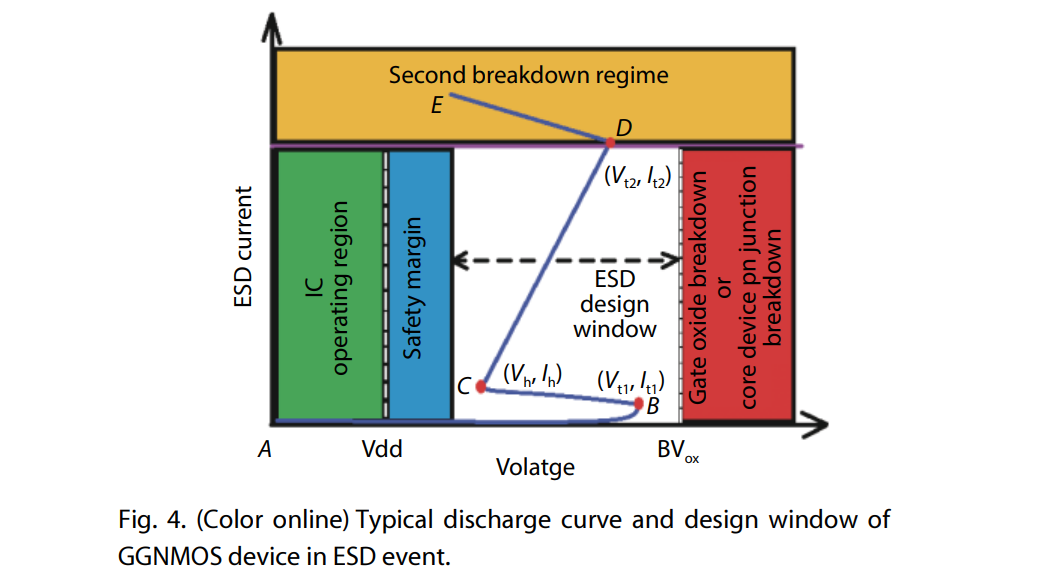
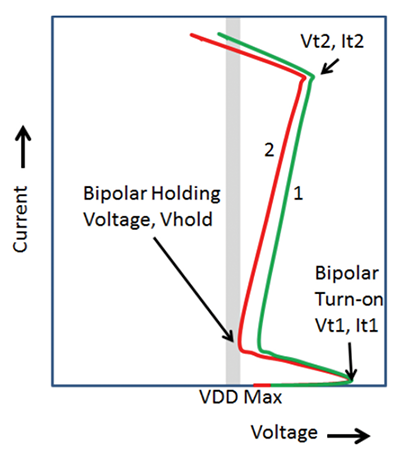
The desired specs for ESD2 is low \(V_\text{t1}\) and short
\(t_1\), while that for
ESD1 include low \(R_{ON}\), low \(V_\text{h}\) and high
\(I_\text{t2}\)
The primary ESD1 structure is typically optimized for high ESD
protection level, which however may feature a high ESD \(V_\text{t1}\), not suitable for low-voltage
(LV) ICs
The secondary ESD2 unit serves as a trigger-assisting device that
features a lower ESD \(V_\text{t1}\)
and fast ESD triggering, which is typically weak in handling large ESD
discharge currents
The isolation \(R\) has another
role, which is to prevent an ESD pulse from getting into IC core (i.e.,
stressing the input device) directly, hence avoid possible CMOS gate
breakdown
\(R\) involves a design trade-off
too: large enough for fast voltage build up, but not too large to avoid
adverse impact on signal propagation
The two-stage ESD protection method is re-gaining attention for
CDM ESD protection because it can handle large ESD
surges without overheating, while preventing CMOS gate
breakdown due to the isolation R (i.e., no direct zapping on the input
gate)
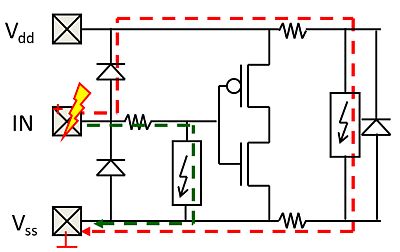
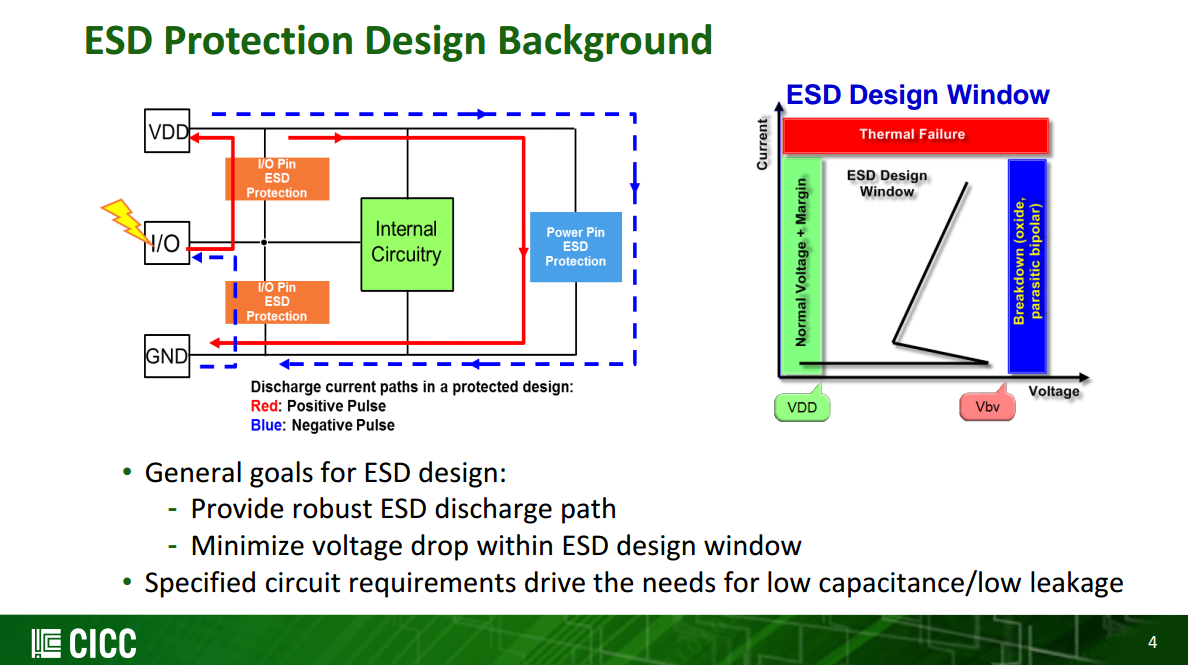
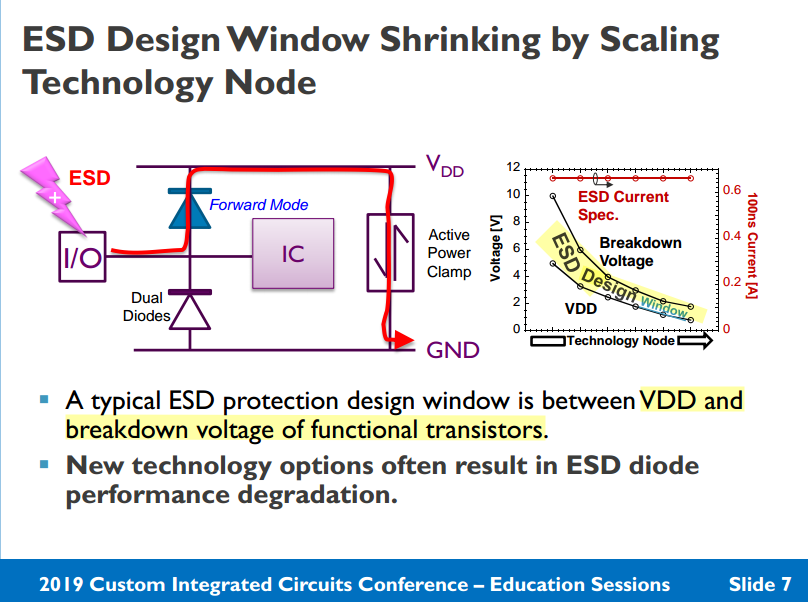
Adding a (small) clamp behind the isolation resistance can extend
the ESD design window, e.g. enabling dual diode protection for thin
oxide transistors.
ESD current through this clamp will build-up voltage across the
isolation resistance, while protecting the circuit.
The higher voltage at the IN pad will then trigger the primary
protection (red current path)
Adding a (small) clamp behind the isolation resistance can extend the
ESD design window, e.g. enabling dual diode protection
for thin oxide transistors
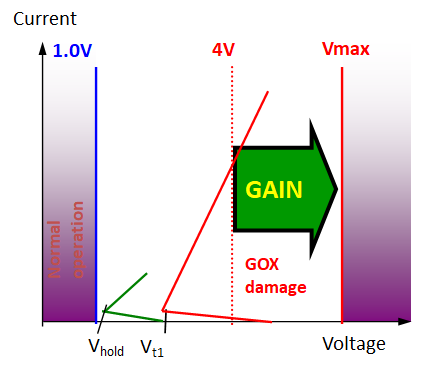
Extended ESD design window example. The failure voltage of a thin
gate oxide in advanced CMOS is about 4V. The primary ESD solution (red
IV curve) introduces too much voltage. Thanks to an isolation resistance
between primary and secondary local clamp device (green IV curve)
additional margin is created.
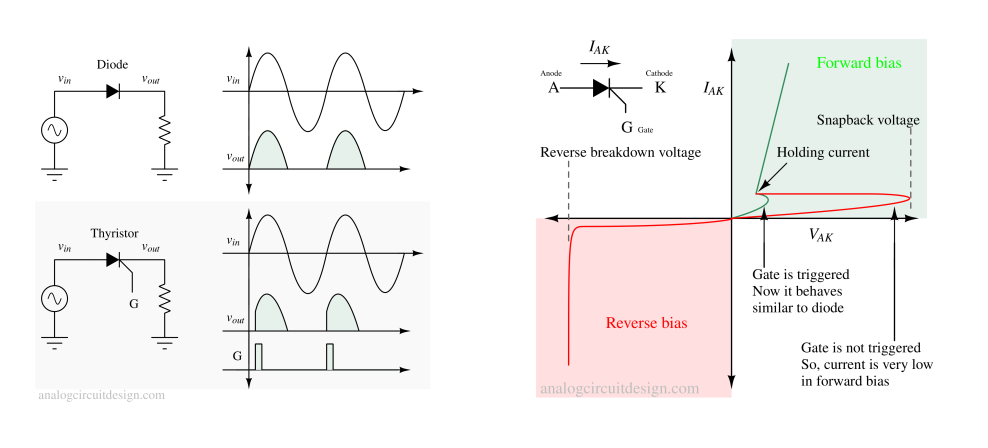
A thyristor (also known as a
Silicon Controlled Rectifier or
SCR) is a three-terminal semiconductor device used as
an electronic switch or rectifier
To turn the thyristor on, a positive voltage pulse is applied to the
gate (G) terminal. This voltage pulse needs to be of sufficient
magnitude to trigger the device. When the gate is triggered, it allows a
small current to flow into the base of the P-N-P transistor
within the thyristor structure
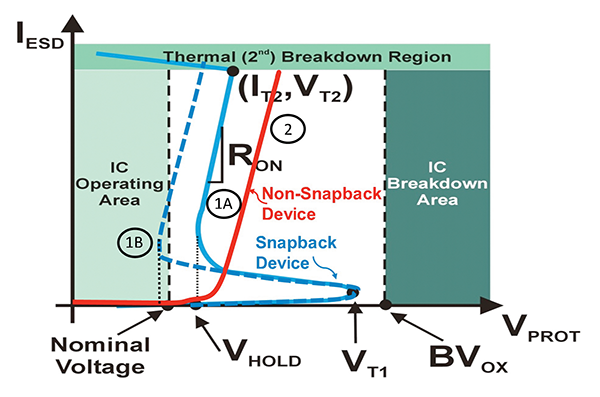
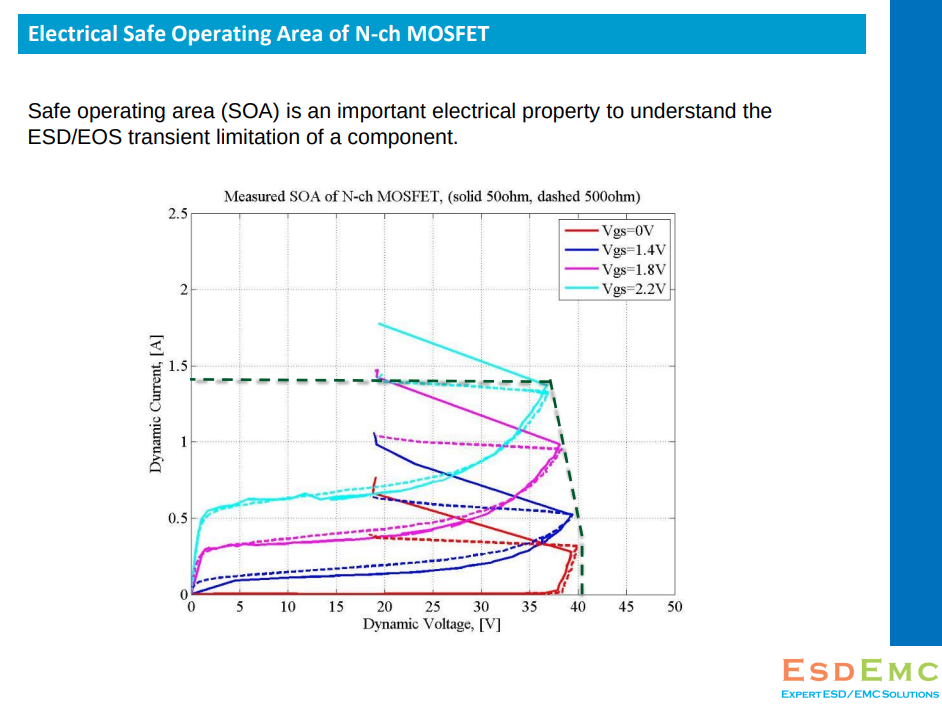
ESD tests simulate real world events (HBM, MM,
CDM)
TLP does not simulate any real-world event
ESD tests record failure level
(Qualification)
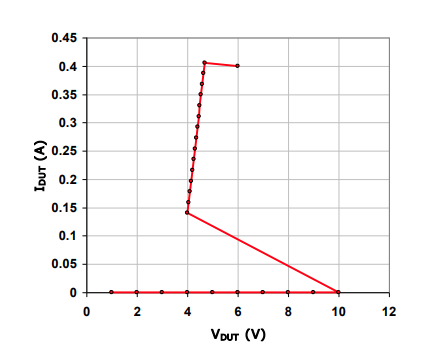
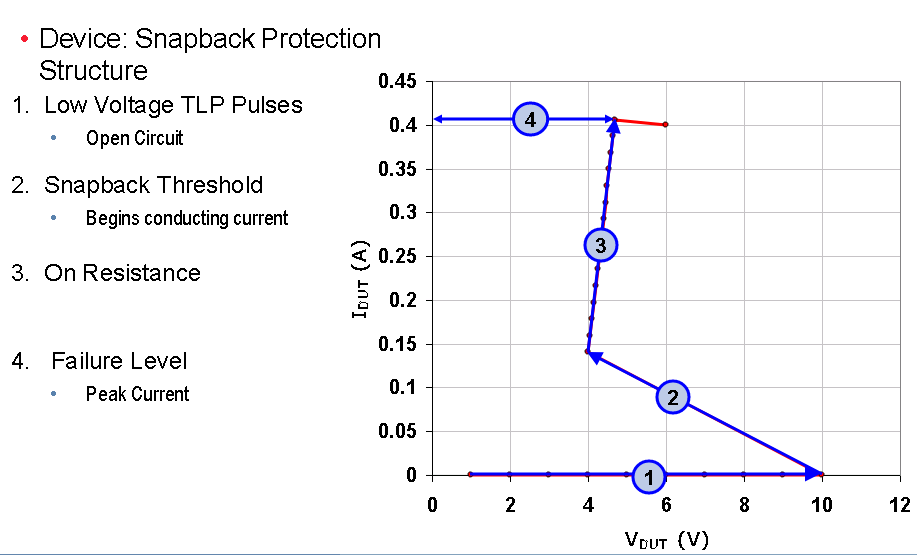
TLP tests record failure level and device behavior
(Characterization)
TLP is not a qualification test, but a characterization method, which
describes the resistance of a device for a given stimulus, aka.
Device Characterization
Unlike ESD waveforms, TLP does not mimic any real world event
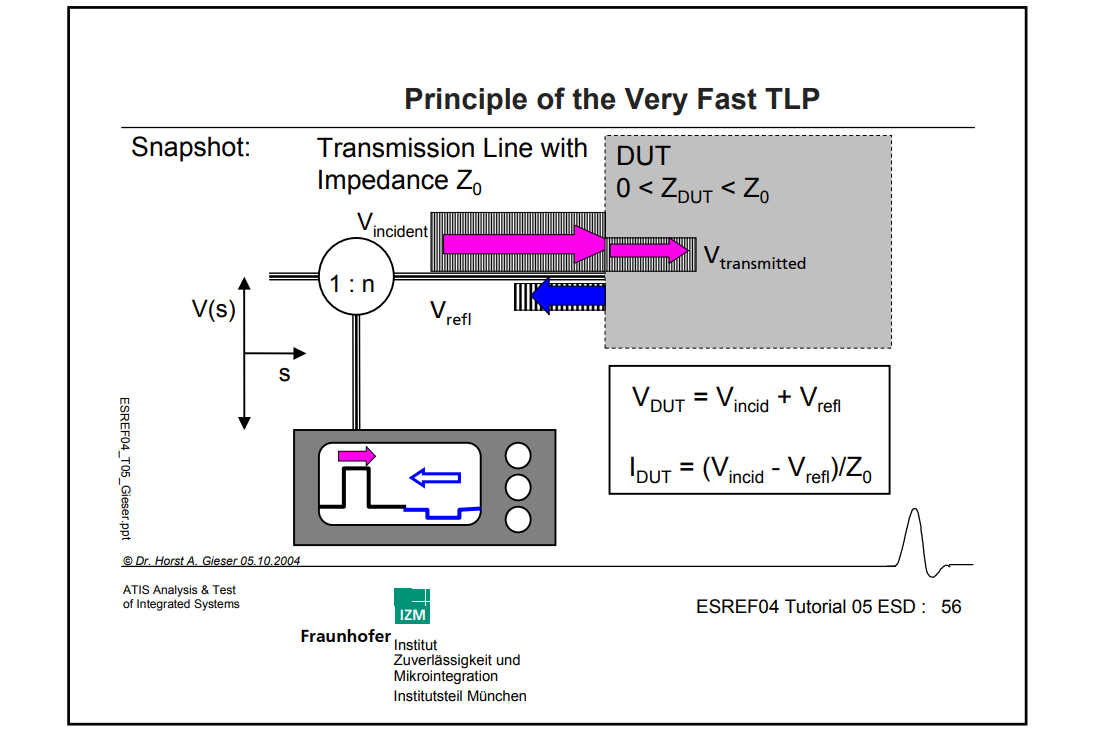
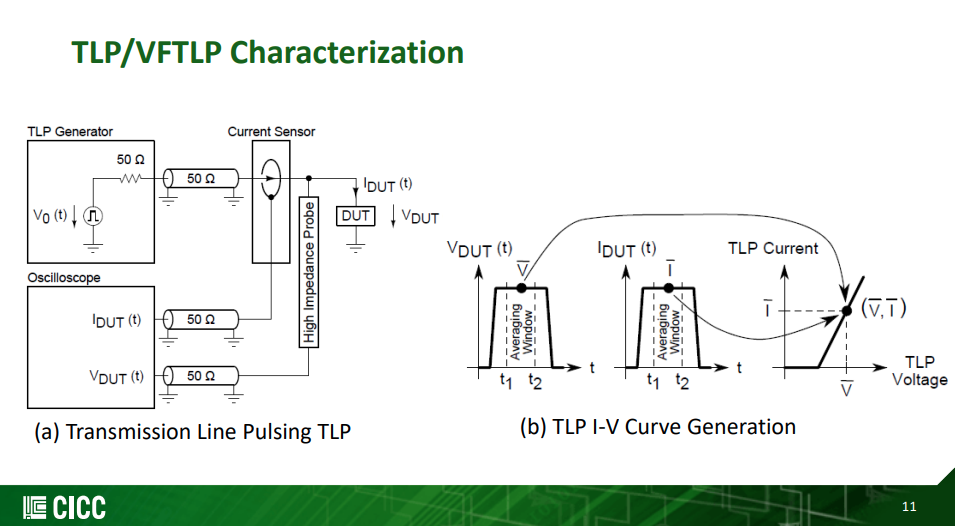
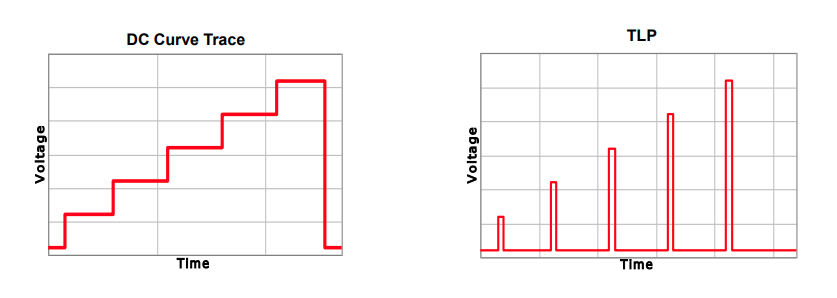
TLP and Curve Tracing
Curve Tracing is DC; TLP is a short pulse
Shorter pulse - Reduced duty cycle, less heating, which means higher
voltage before failure
Controlled Impedance - Allows device behavior to be observed
Both measure resistance of device with increasing voltage
Device Characterization with
TLP
Turn-on time
Snapback voltage
Performance changes with rise time
VF-TLP and CDM differences
Question:
How well will VF-TLP results predict CDM testing performance?
Answer:
VF-TLP can be a guide to CDM failure levels, and provide a lot of
understanding of a circuit's operation during CDM stressing, but simple
correlations between VF-TLP failure current level and CDM withstand
voltage levels are difficult to establish.
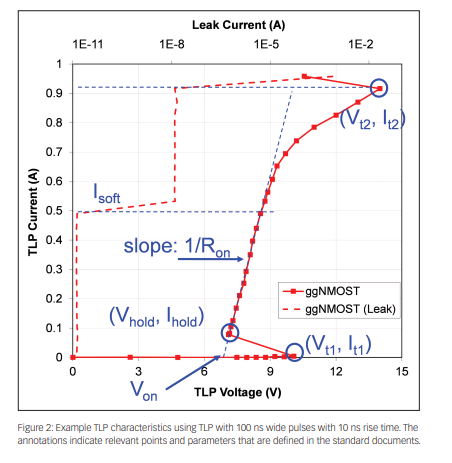
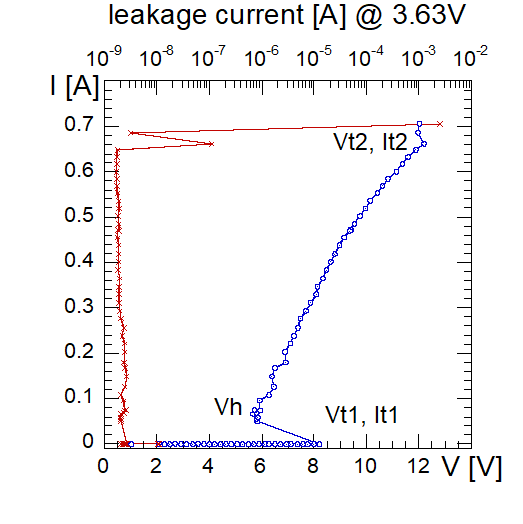
I.V and Leakage Evolution
Plots
DC leakage current data combined with the I-V data provides
electrical indications of where damage begins, and how rapidly it can
evolve from soft to hard failures
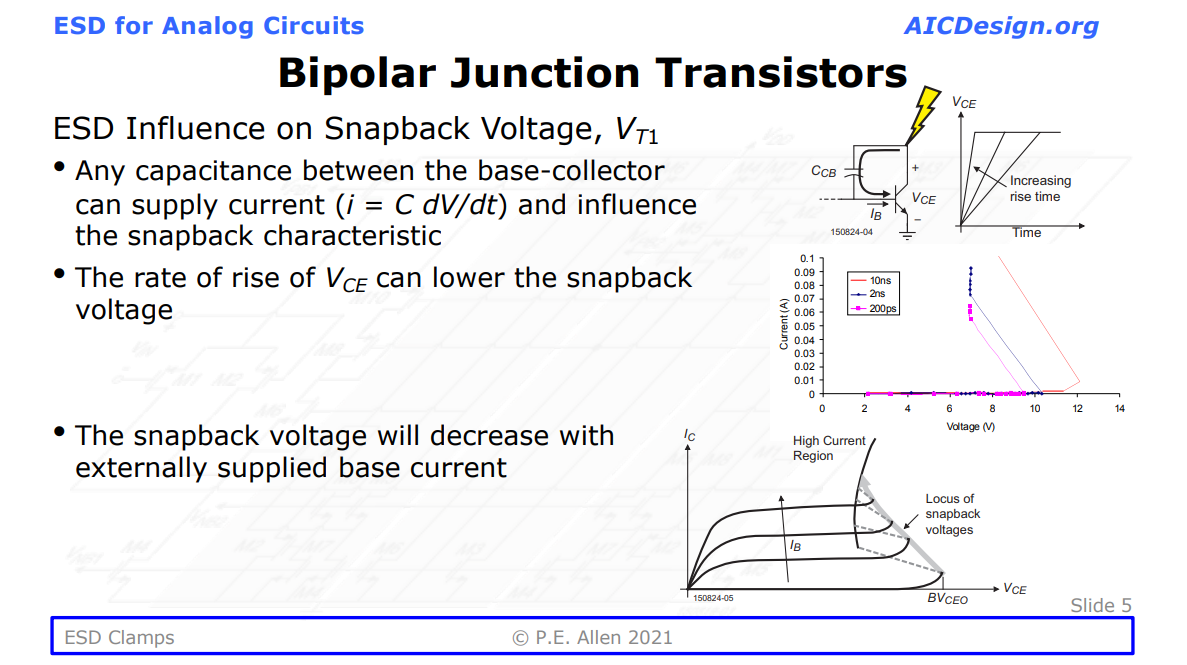
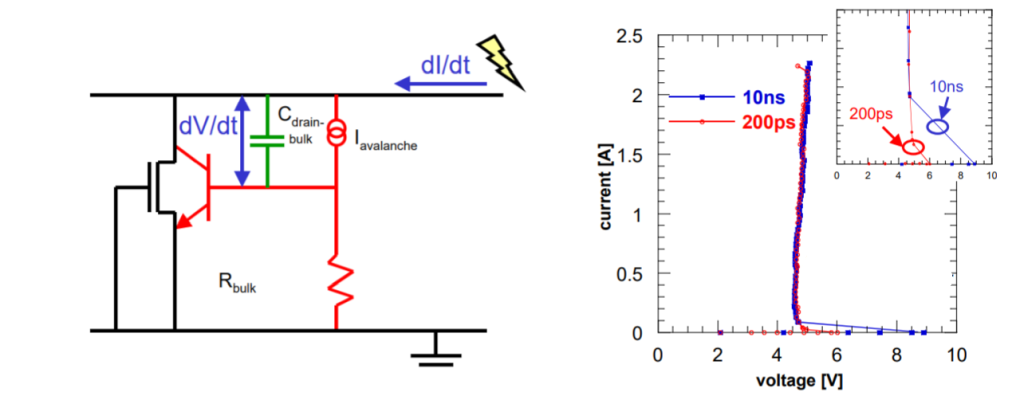
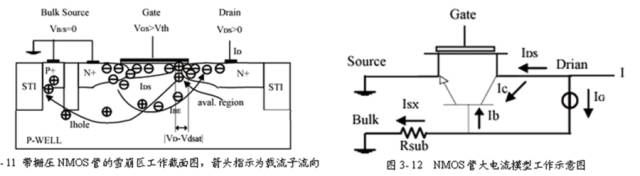
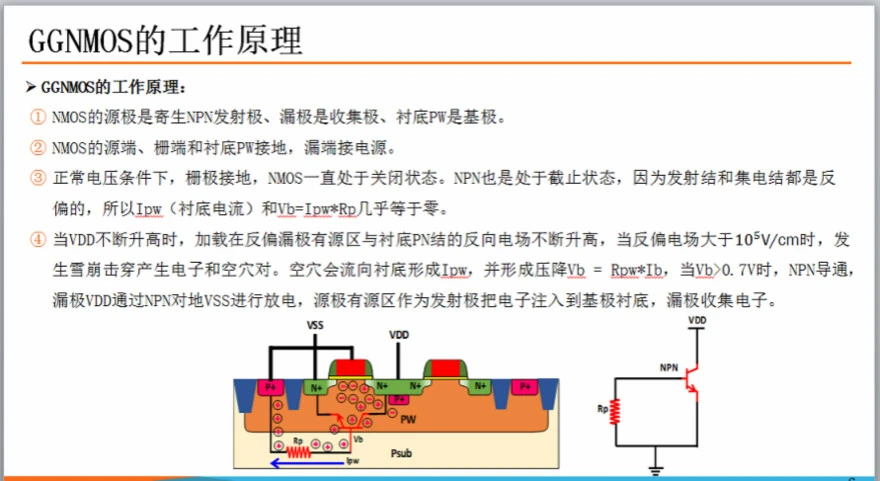
Influence of the pulse rise time on ggNMOS. (left side) A fast ESD
pulse can couple the bulk of the NMOS to a higher potential for a short
period, reducing the trigger voltage. (right side) A clear Vt1 reduction
is visible, while the remaining part of the IV curve remains the
same.
Ming-Dou Ker, Chung-Yu Wu, Tao Cheng and Hun-Hsien Chang,
"Capacitor-couple ESD protection circuit for deep-submicron low-voltage
CMOS ASIC," in IEEE Transactions on Very Large Scale Integration
(VLSI) Systems, vol. 4, no. 3, pp. 307-321, Sept. 1996 [https://ir.lib.nycu.edu.tw/bitstream/11536/1053/1/A1996VE01800002.pdf]
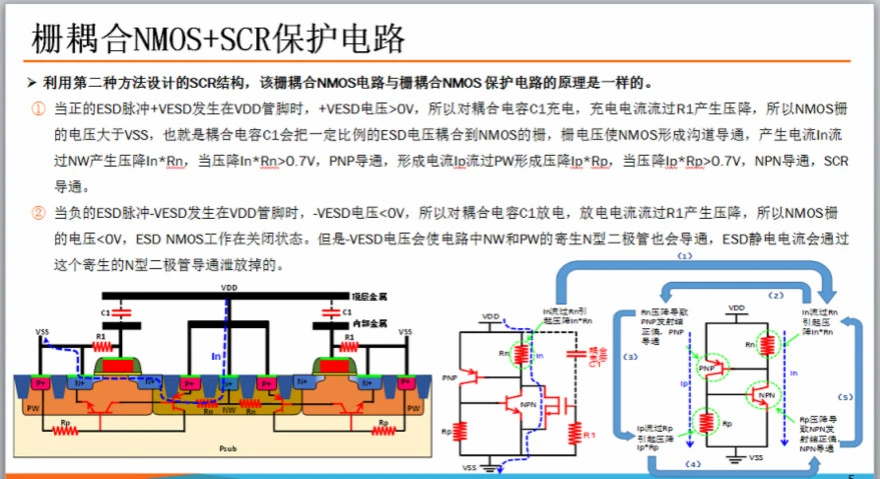
Gate-coupled NMOS (gcNMOS) was proposed to
effectively reduce the \(V_\text{t1}\)
Guang Chen, Haigang Feng and A. Wang, "A systematic study of ESD
protection structures for RF ICs," IEEE Radio Frequency Integrated
Circuits (RFIC) Symposium, 2003, Philadelphia, PA, USA, 2003 [https://sci-hub.se/10.1109/RFIC.2003.1213959]
ANSI/ESDA/JEDEC JS-002-2022: ESDA/JEDEC Joint Standard For
Electrostatic Discharge Sensitivity Testing Charged Device Model (CDM)
Device Level
ESDA/JEDEC JTR002-01-22: For the User Guide of
ANSI/ESDA/JEDEC JS-002 Charged Device Model Testing of Integrated
Circuits
JESD22-C101E: Field-Induced Charged-Device Model Test Method
for Electrostatic Discharge-Withstand Thresholds of Microelectronic
Components
C. -Y. Lin and M. -D. Ker, "ESD Protection Design: Fundamentals and
Advanced Strategies," in IEEE Open Journal of the Solid-State Circuits
Society, vol. 6, pp. 61-76, 2026 [pdf]
M. Di, H. Wang, F. Zhang, C. Li, Z. Pan and A. Wang, "Does CDM ESD
Protection Really Work?," 2019 IEEE Workshop on Microelectronics and
Electron Devices (WMED), Boise, ID, USA, 2019 [https://sci-hub.se/10.1109/WMED.2019.8714145]
M. Di, C. Li, Z. Pan and A. Wang, "Pad-Based CDM ESD Protection
Methods Are Faulty," in IEEE Journal of the Electron Devices
Society, vol. 8, pp. 1297-1304, 2020 [pdf]
S. Kim et al., "Technology Scaling of ESD Devices in State of the Art
FinFET Technologies," 2020 IEEE Custom Integrated Circuits Conference
(CICC), 2020, pp. 1-6, doi: 10.1109/CICC48029.2020.9075899.
Yuanzhong Zhou, D. Connerney, R. Carroll and T. Luk, "Modeling MOS
snapback for circuit-level ESD simulation using BSIM3 and VBIC models,"
Sixth international symposium on quality electronic design (isqed'05),
2005, pp. 476-481, doi: 10.1109/ISQED.2005.81.
M. -D. Ker and Z. -H. Jiang, "Overview on Latch-Up Prevention in CMOS
Integrated Circuits by Circuit Solutions," in IEEE Journal of the
Electron Devices Society, vol. 11, pp. 141-152, 2023 [https://ieeexplore.ieee.org/stamp/stamp.jsp?arnumber=9998049]
Y. Li, M. Miao and R. Gauthier, "ESD Protection Design Overview in
Advanced SOI and Bulk FinFET Technologies," 2020 IEEE Custom
Integrated Circuits Conference (CICC), Boston, MA, USA, 2020
S. Kim et al., "Technology Scaling of ESD Devices in State
of the Art FinFET Technologies," 2020 IEEE Custom Integrated
Circuits Conference (CICC), Boston, MA, USA, 2020
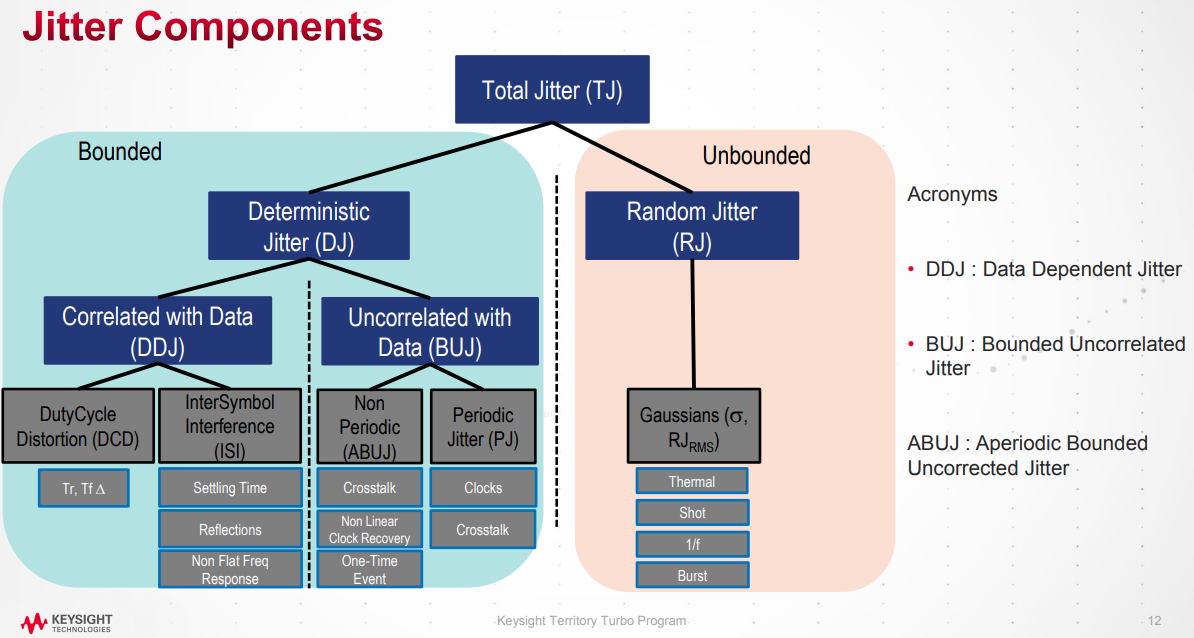
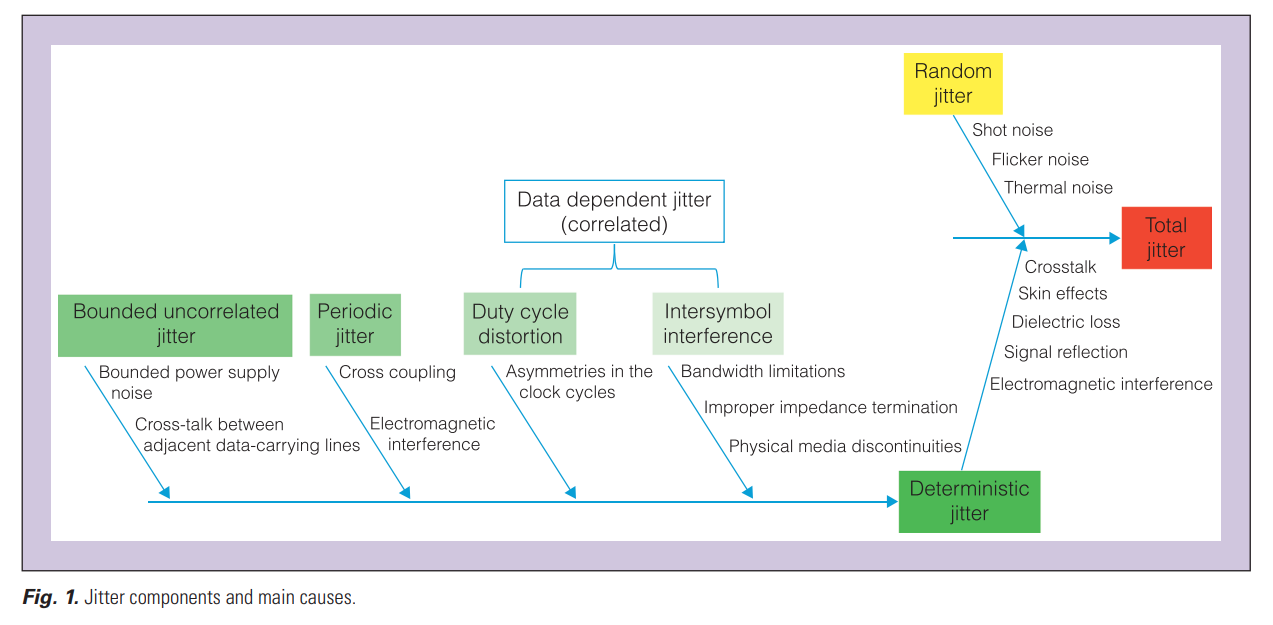
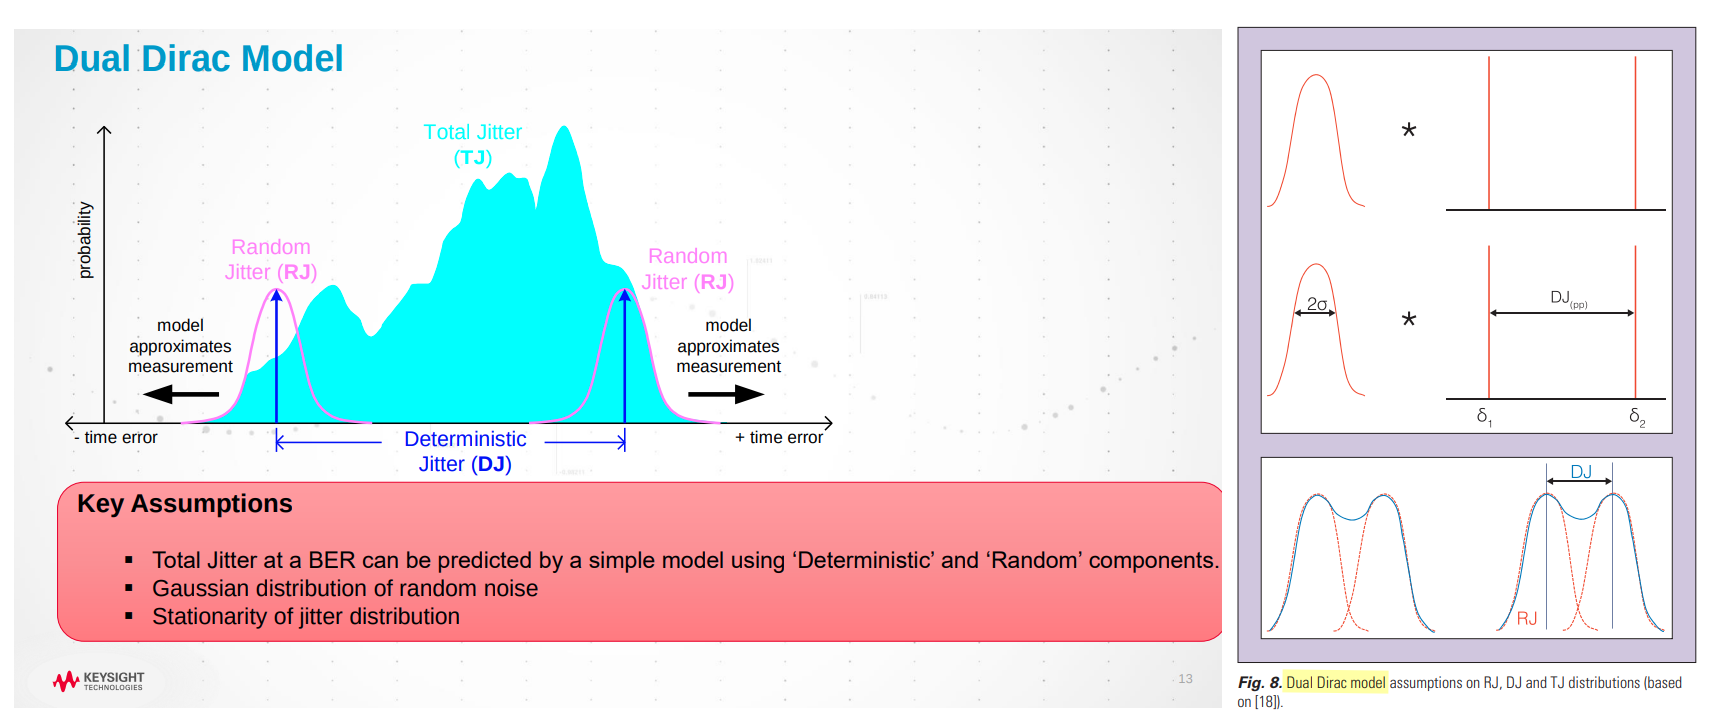
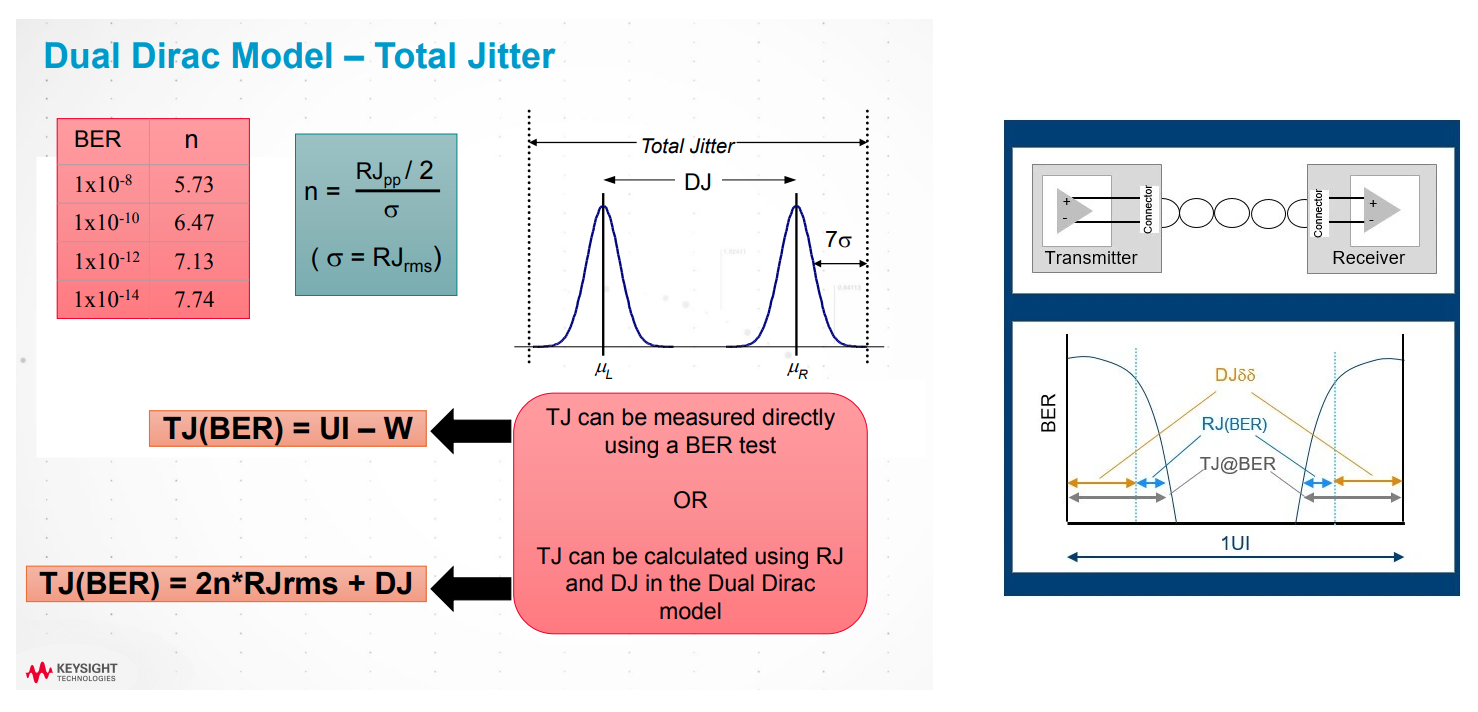
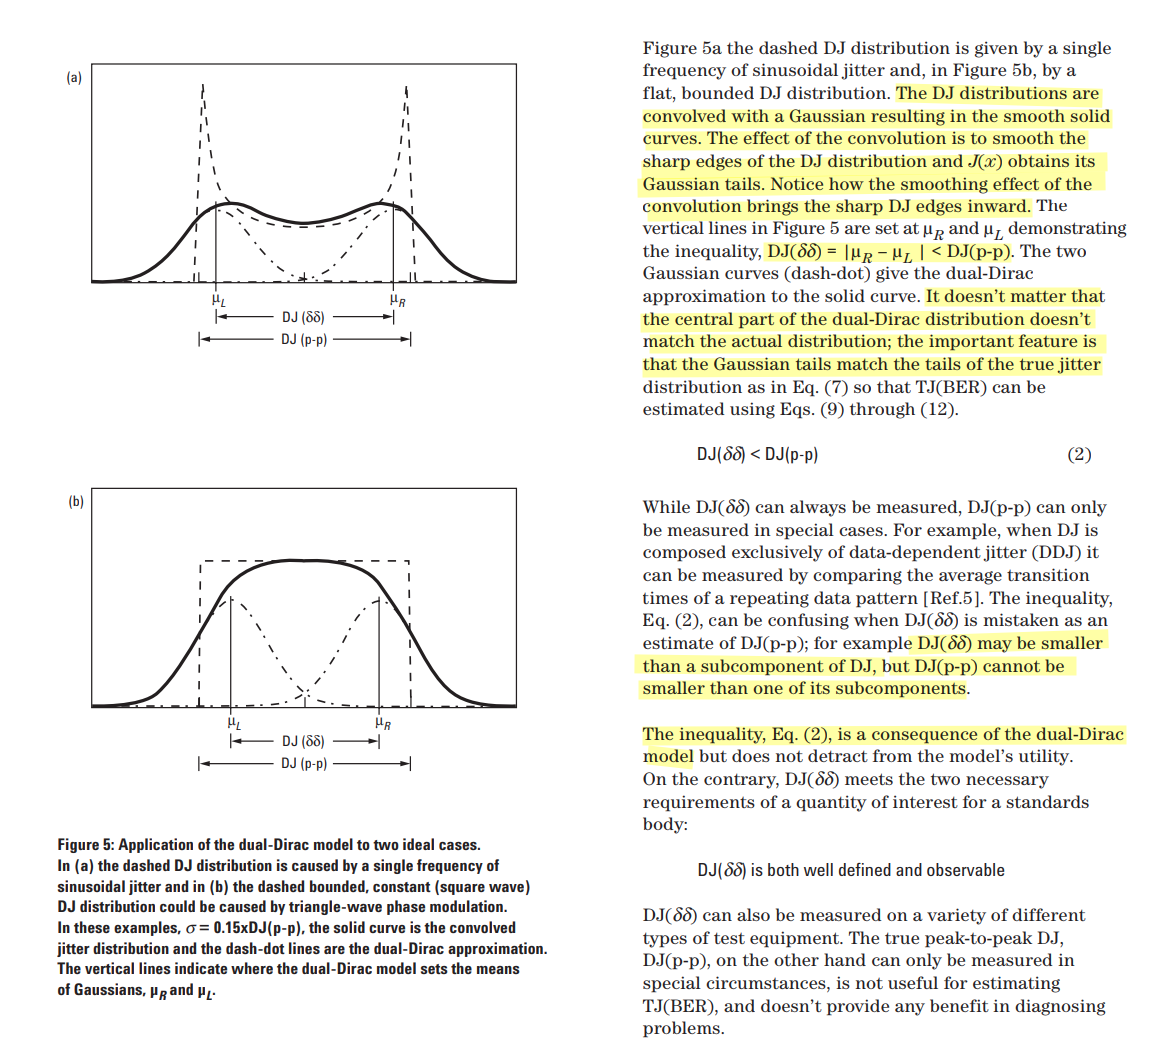
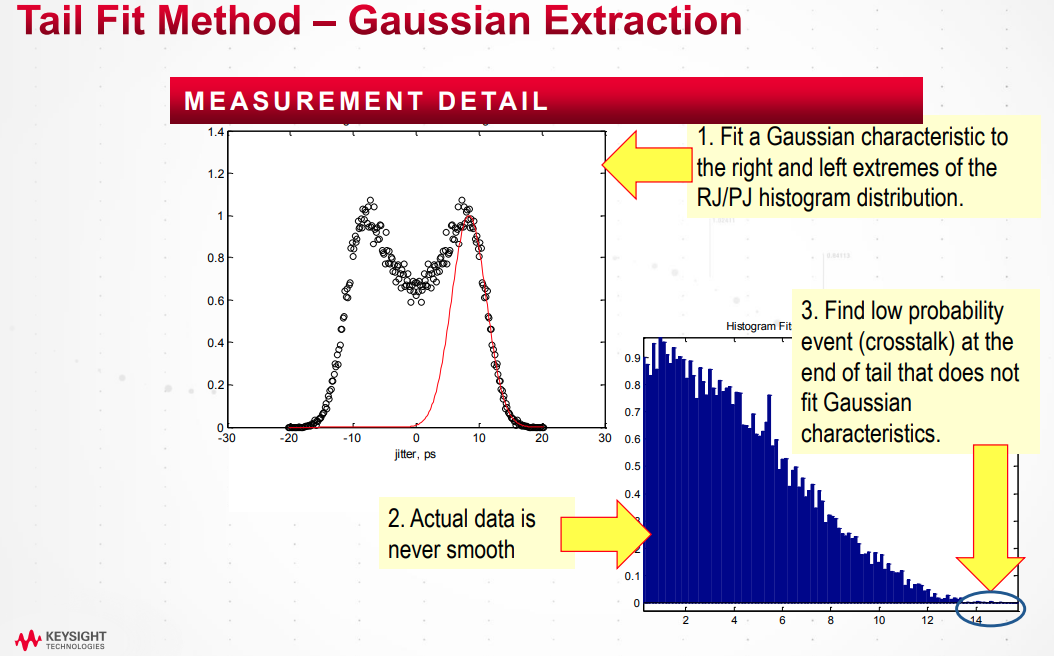
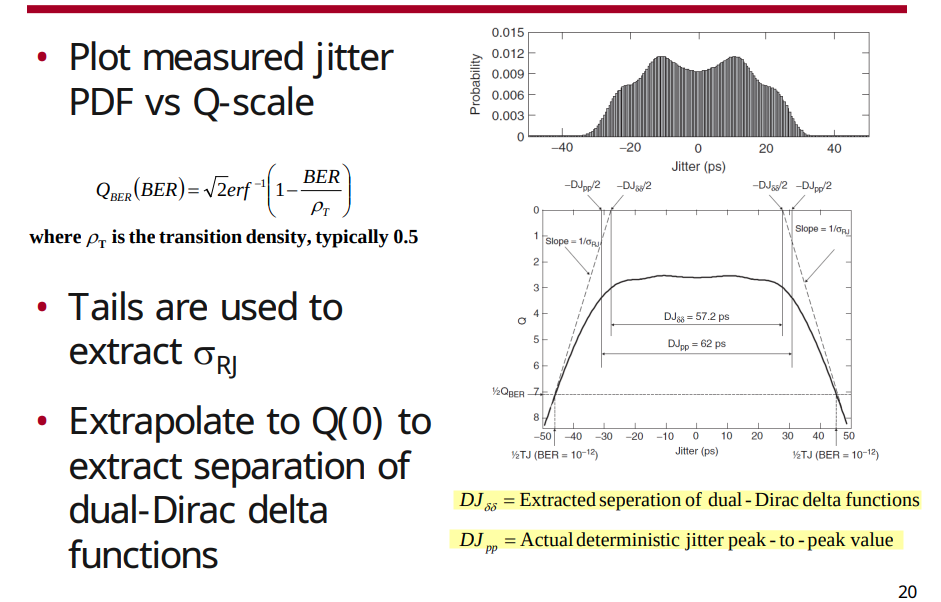
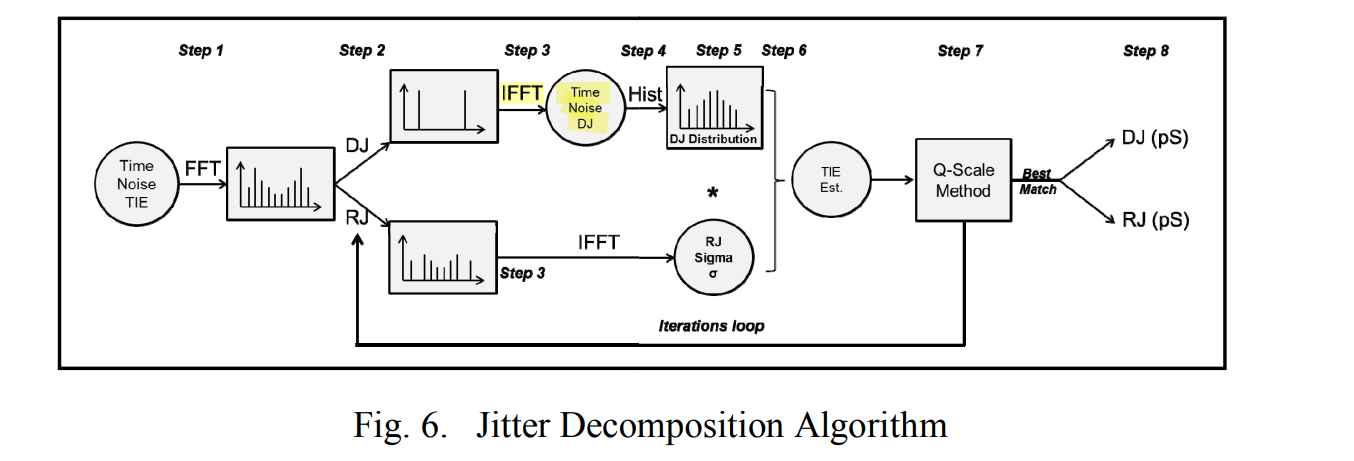
Jitter separation lets you learn if the components
of jitter are random or deterministic. That is, if they are caused by
crosstalk, channel loss, or some other phenomenon. The identification of
jitter and noise sources is critical when debugging failure sources in
the transmission of high-speed serial signals
Tail Fit Method
Spectral method
RJ Extraction Methods
Rationale
Spectral
Speed/Consistency to Past Measurements; Accuracy in low
Crosstalk or Aperiodic Bounded Uncorrelated Jitter (ABUJ)
conditions
Tail Fit
General Purpose; Accuracy in high Crosstalk or ABUJ
conditions
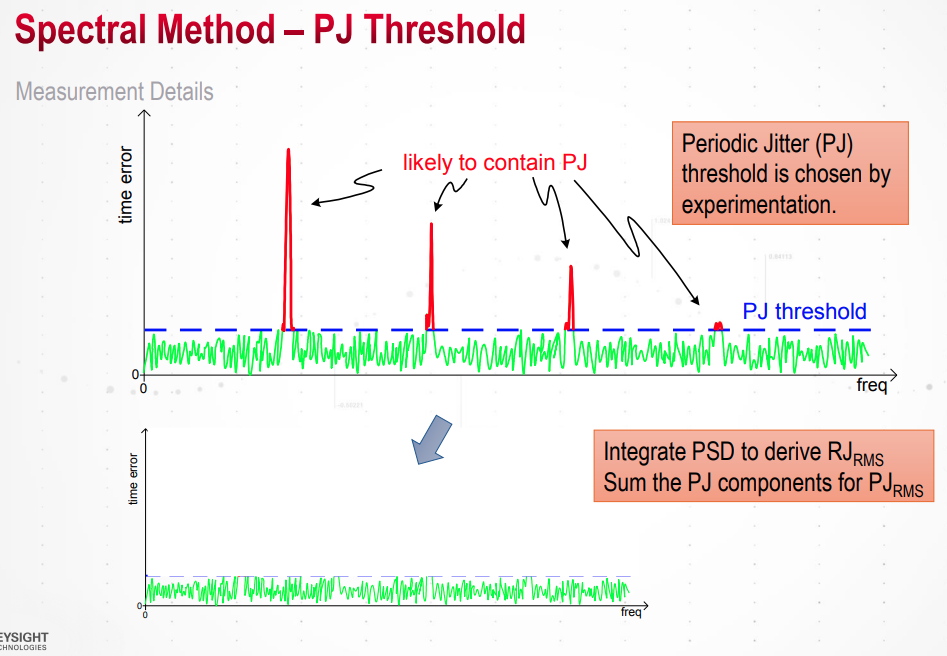
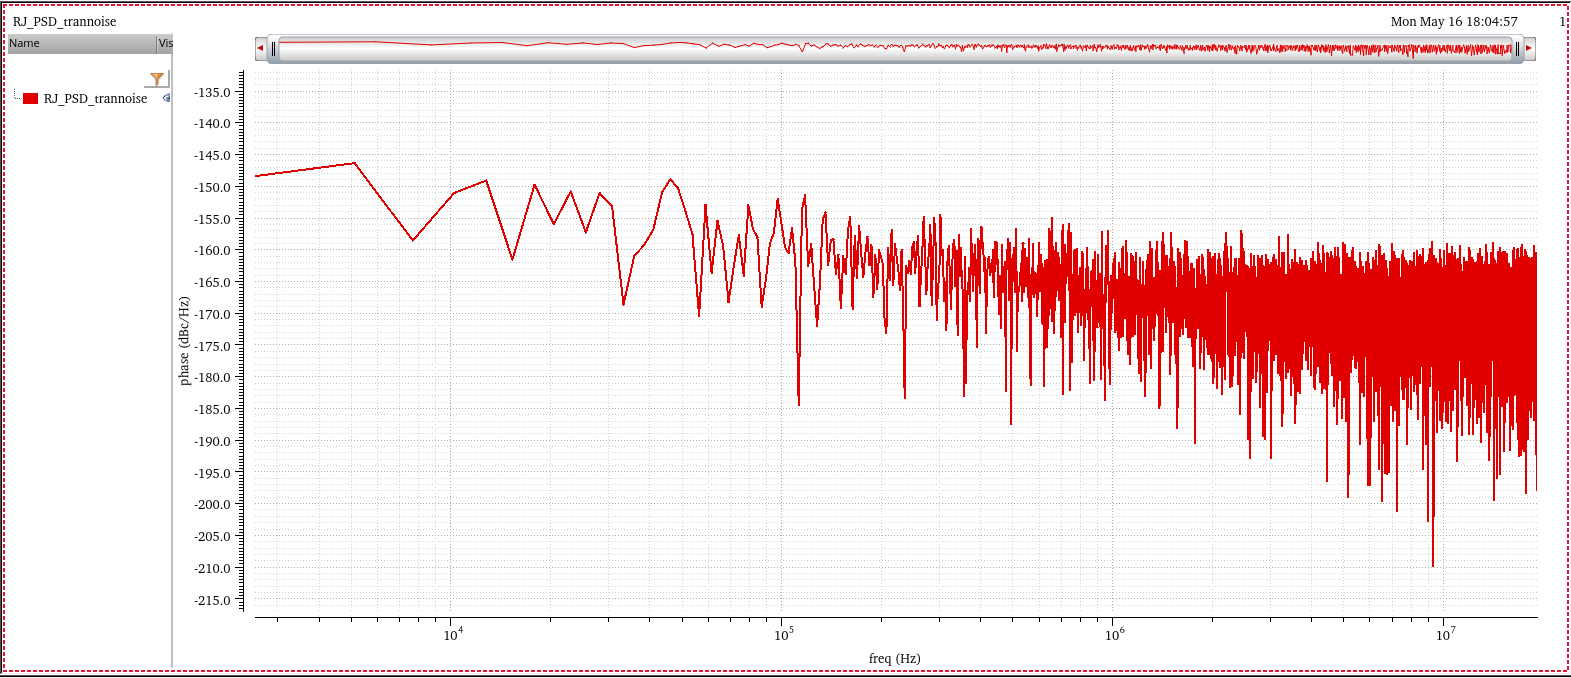
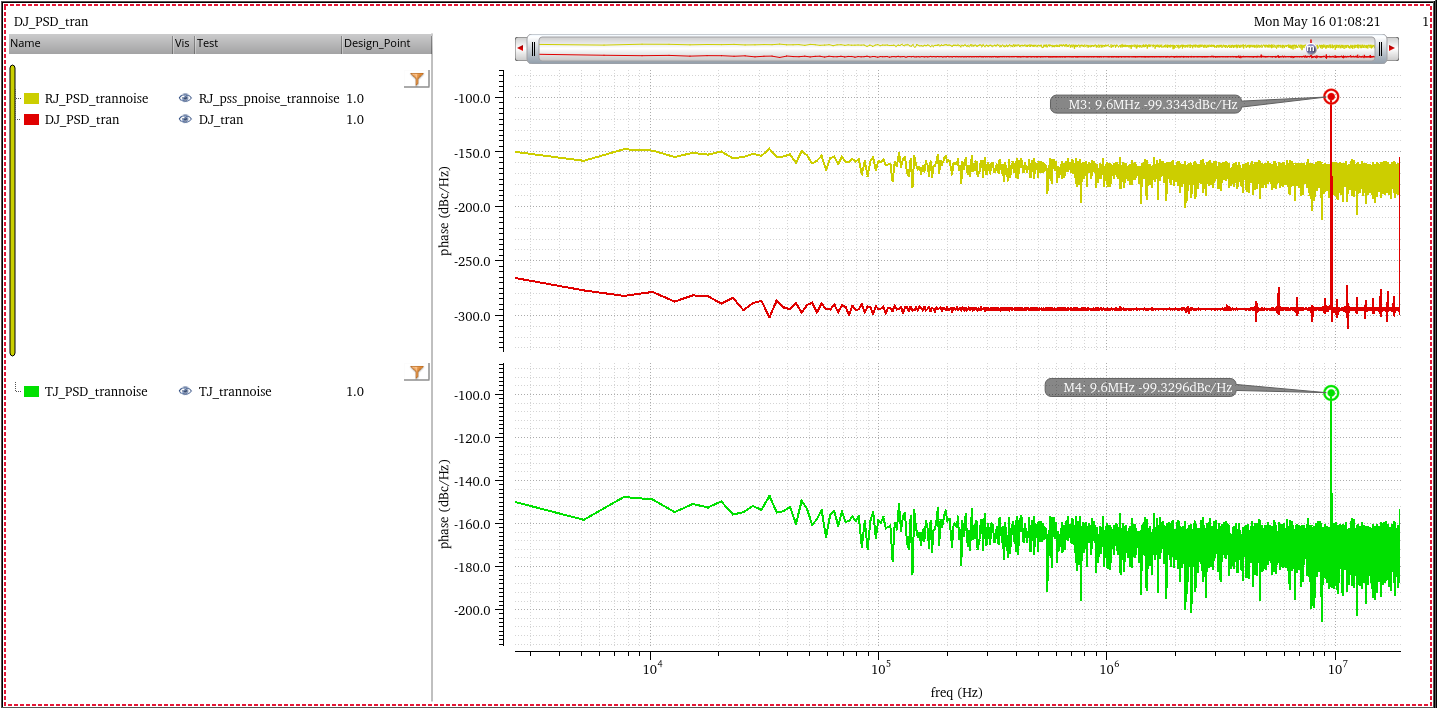
power spectral density (PSD) represents jitter spectrum and peaks in
the spectrum can be interpreted as PJ or DDJ, while the average noise
floor is the power of RJ
1 2 3 4 5 6 7 8 9 10 11 12 13 14 15 16 17
S1 = sum(win); S2 = sum(win.^2); N = length(win); spec_nospur2 = (spec_nospur*S1).^2/N/S2; % To obtain linear spectrum for rj rj_utj = sqrt(sum(spec_nospur2))*1e12;
spec = 1*ones(length(spec_nospur), 1)*1e-21; spec(index) = specx(index); % insert fft nyquist frequency component between positive frequency and % negative frequency component % DC;posFreq;nyqFreq;negFreq spec_ifft = [spec;specnyq;conj(spec(end:-1:2))]'; sfactor = sum(win)/sqrt(2); spec_ifft = spec_ifft*sfactor; sig_rec = real(ifft(spec_ifft)); sig_rec = sig_rec(:); sig_rec_utj = sig_rec./win(1:end);
Tail Fit Method
Tail fitting algorithm based on the Gaussian tail
model by using probability distribution of collected jitter
value
1 2 3 4 5 6 7 8 9 10 11 12 13
bin_sig = bin_sig*1e12;
x = qfuncinv(cdf_sig);
% coef(1)*bin_sig + coef(2) = x % which x is norm(0, 1) % bin_sig = (x - coef(2))/coef(1) % Then bin is norm(-coef(2)/coef(1), 1/coef(1)) coef = polyfit(bin_sig, x, 1); sigma = 1/coef(1); mu = -coef(2)*sigma;
fprintf('sigma=%.3fps, mu=%.3fps\n', sigma, mu);
Least Squares (LS) method
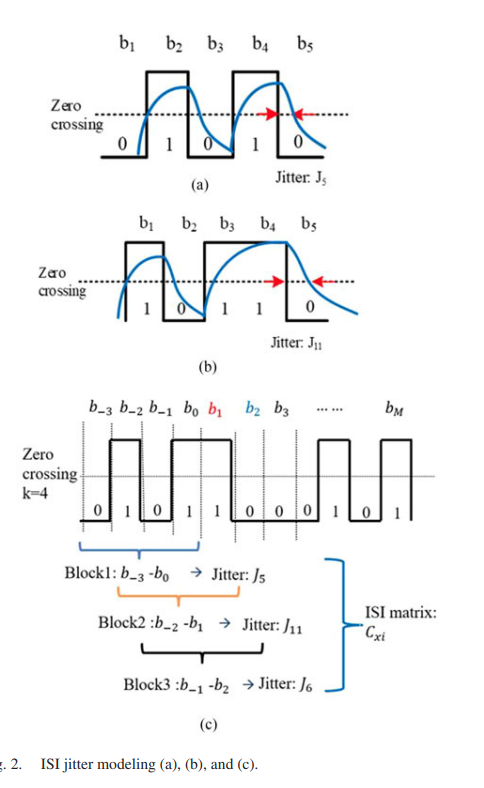
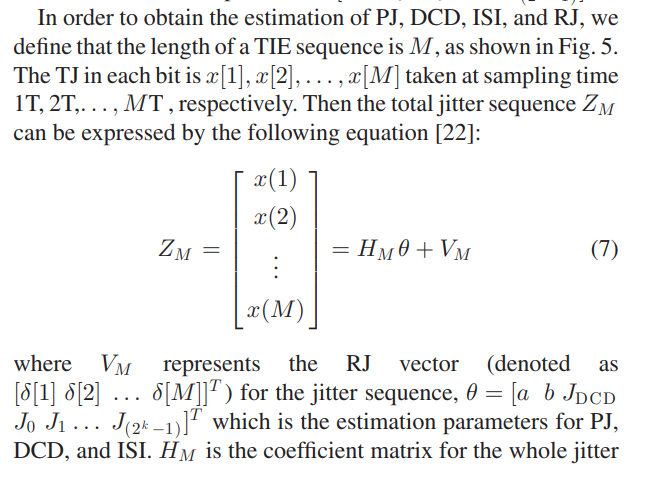
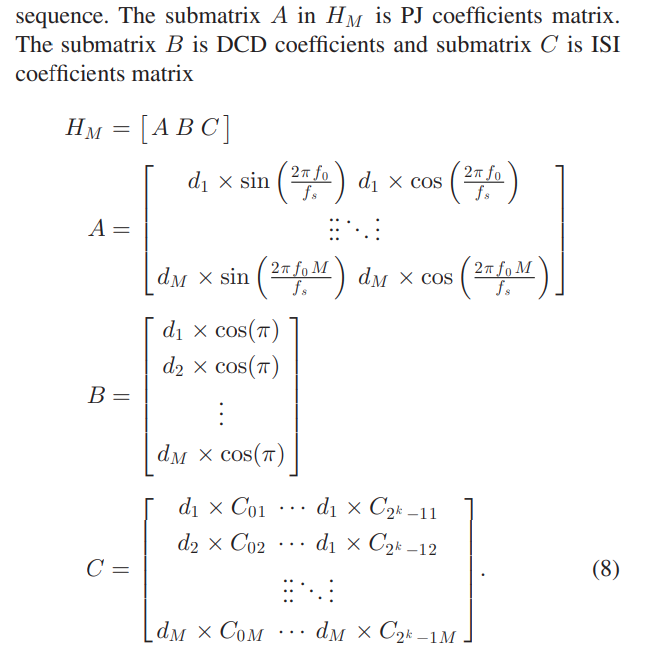
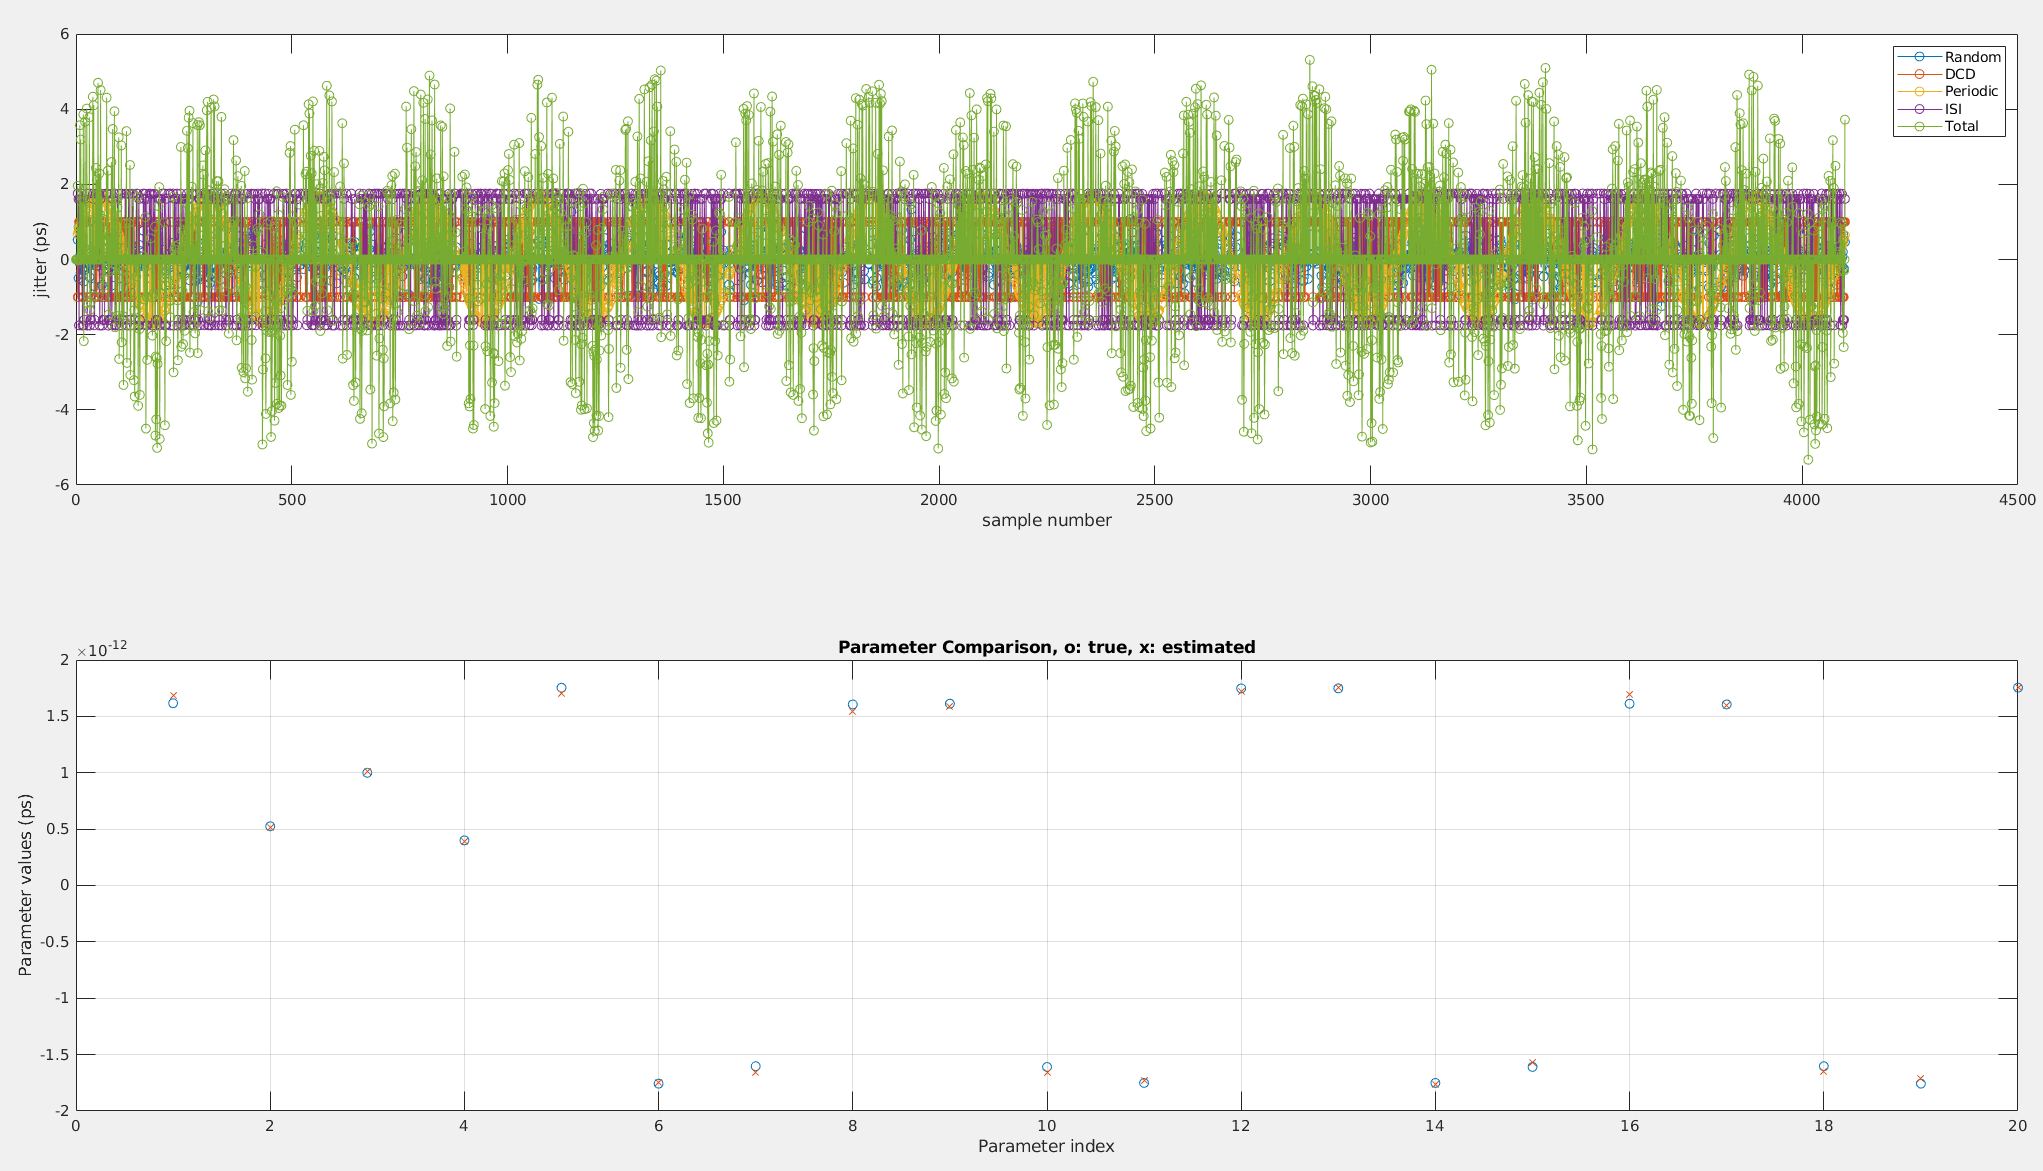
It is known that TIE jitter is a linear equation, shown in below
formula \[
x[n] = d_n \times \left[ \Delta t_{pj}[n]+\Delta t_{DCD}[n] +\Delta
t_{ISI}[n]+\Delta t_{RJ}[n]\right]
\] LS can be used to estimate the PJ, DCD, RJ , and ISI
parameters \([a,b,J_{DCD},J_0,
J_1...J_{(2^k-1)}]\)
Jitter modeling
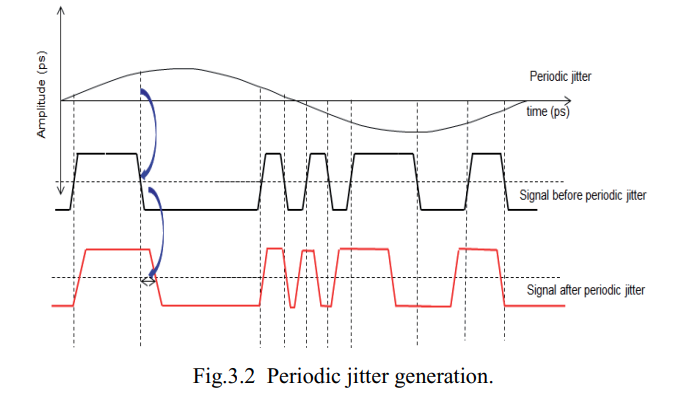
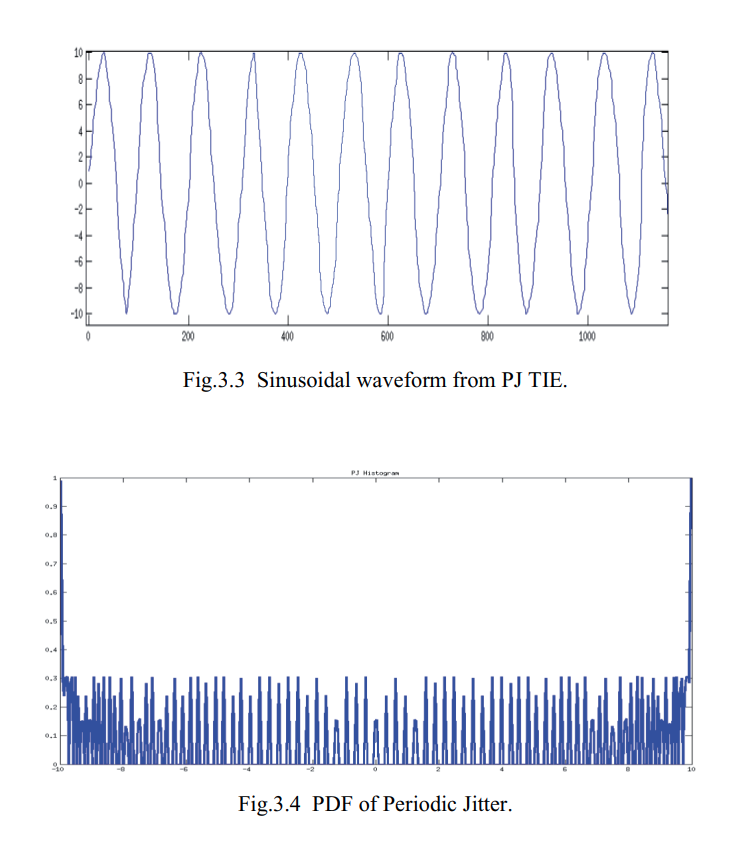
Periodic Jitter (PJ)
PJ is a repeating jitter \[
\Delta t_{PJ}[n]=A\sin(2\pi f_0\cdot nT_s + \theta)=a \sin(2\pi f_0
\cdot nT_s)+b\cos(2\pi f_0 \cdot nT_s)
\] where \(f_0\) represents the
fundamental frequency of PJ; \(A\) is
the amplitude of PJ; \(T_s\) is the
data stream period, and \(\theta\) is
the initial phase of PJ
In the spectrum, the frequency of maximum amount of the jitter is PJ
frequency \(f_0\).
Duty Cycle Distortion (DCD)
DCD is viewed as a series of adjacent positive and negative
impulses\[
\Delta t_{DCD}[n] = J_{DCD}\times (-1)^n =
[-J_{DCD},J_{DCD},-J_{DCD},J_{DCD},...]
\] Where \(J_{DCD}\) is the DCD
amplitude.
Random Jitter (RJ)
RJ is created by unbounded jitter sources, such as Gaussian white
noise. The statistical PDF for RJ is enerally treated as a Gaussian
distribution \[
f_{RJ}(\Delta t) = \frac{1}{\sqrt{2\pi\sigma}}\exp(-\frac{(\Delta
t)^2}{2\sigma^2})
\]
DJ/RJ
K. Bidaj, J. -B. Begueret, N. Houdali, J. Deroo and S. Rieubon,
"Time-domain PLL modeling and RJ/DJ jitter decomposition," 2016 IEEE
International Symposium on Circuits and Systems (ISCAS), Montreal, QC,
Canada, 2016 [https://sci-hub.se/10.1109/ISCAS.2016.7527201]
Periodic Jitter Generator
& Insertion
Analysis and Estimation of Jitter Sub-Components: Classification
and Segregation of Jitter Components
Reference
Li, Mike Peng. Jitter, Noise, and Signal Integrity at High-
Speed. Prentice Hall, 2008.
—,DesignCon2007, Simultaneous Jitter Analysis in Time, Frequency,
and Statistical Domains and Their Interrelationships [pdf]
—,DesignCon2023, Accuracy and Challenges of PAM4 jitter and noise
measurements for >100Gbps Serial Links [pdf]
—, "A new method for jitter decomposition through its distribution
tail fitting," International Test Conference 1999. Proceedings (IEEE
Cat. No.99CH37034), 1999, pp. 788-794, [https://sci-hub.jp/10.1109/TEST.1999.805809]
Y. Duan and D. Chen, "Accurate jitter decomposition in high-speed
links," 2017 IEEE 35th VLSI Test Symposium (VTS), 2017, pp. 1-6, doi:
10.1109/VTS.2017.7928918.
Y. Duan and D. Chen, "Fast and Accurate Decomposition of
Deterministic Jitter Components in High-Speed Links," in IEEE
Transactions on Electromagnetic Compatibility, vol. 61, no. 1, pp.
217-225, Feb. 2019, doi: 10.1109/TEMC.2018.2797122.
"Jitter Analysis: The Dual-Dirac Model, RJ/DJ, and Q-Scale",
Whitepaper: Keysight Technologies, U.S.A., Dec. 2017
Sharma, Vijender Kumar and Sujay Deb. "Analysis and Estimation of
Jitter Sub-Components." (2014).
Qingqi Dou and J. A. Abraham, "Jitter decomposition in ring
oscillators," Asia and South Pacific Conference on Design Automation,
2006
E. Balestrieri, L. De Vito, F. Lamonaca, F. Picariello, S. Rapuano
and I. Tudosa, "The jitter measurement ways: The jitter decomposition,"
in IEEE Instrumentation & Measurement Magazine, vol. 23, no. 7, pp.
3-12, Oct. 2020, doi: 10.1109/MIM.2020.9234759.
McClure, Mark Scott. "Digital jitter measurement and separation." PhD
diss., 2005.
Ren, Nan, Zaiming Fu, Shengcu Lei, Hanglin Liu, and Shulin Tian.
"Jitter generation model based on timing modulation and cross point
calibration for jitter decomposition." Metrology and Measurement Systems
28, no. 1 (2021).
K. Bidaj, J. -B. Begueret and J. Deroo, "RJ/DJ jitter decomposition
technique for high speed links," 2016 IEEE International Conference
on Electronics, Circuits and Systems (ICECS) [https://sci-hub.se/10.1109/ICECS.2016.7841269]
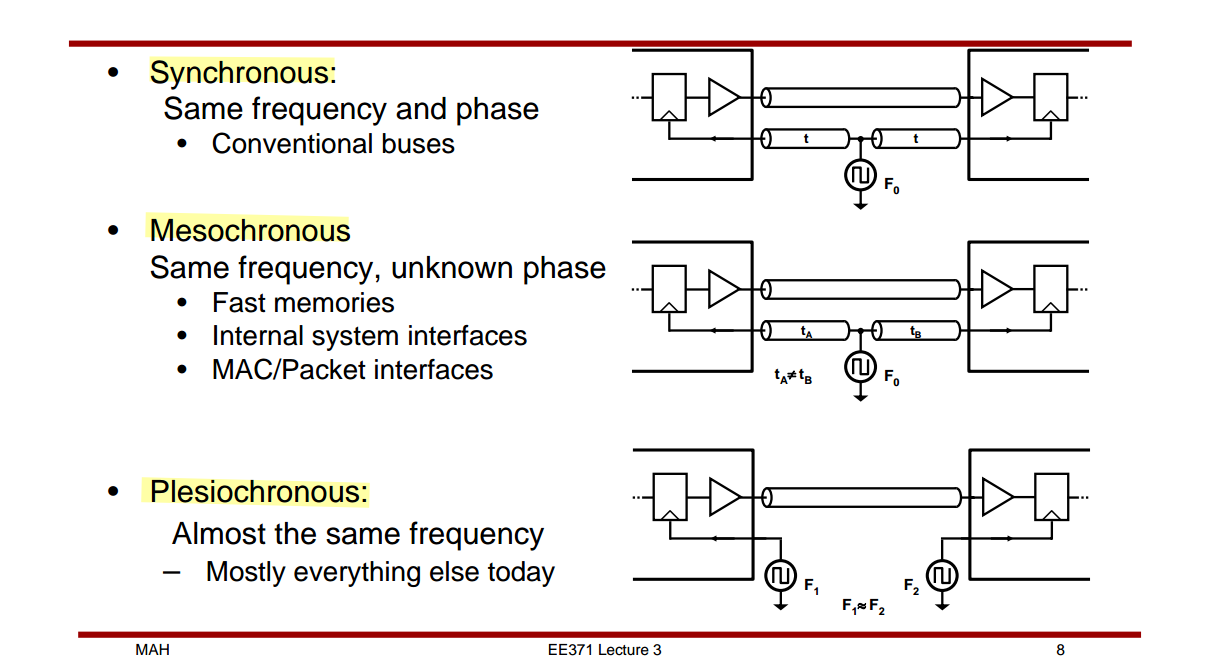
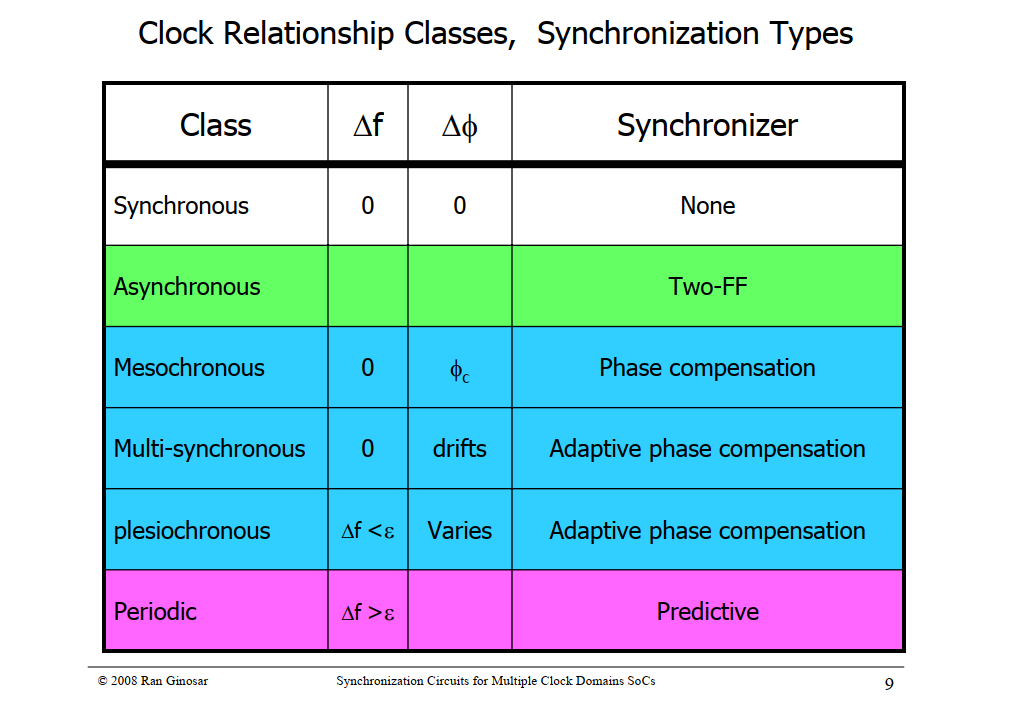
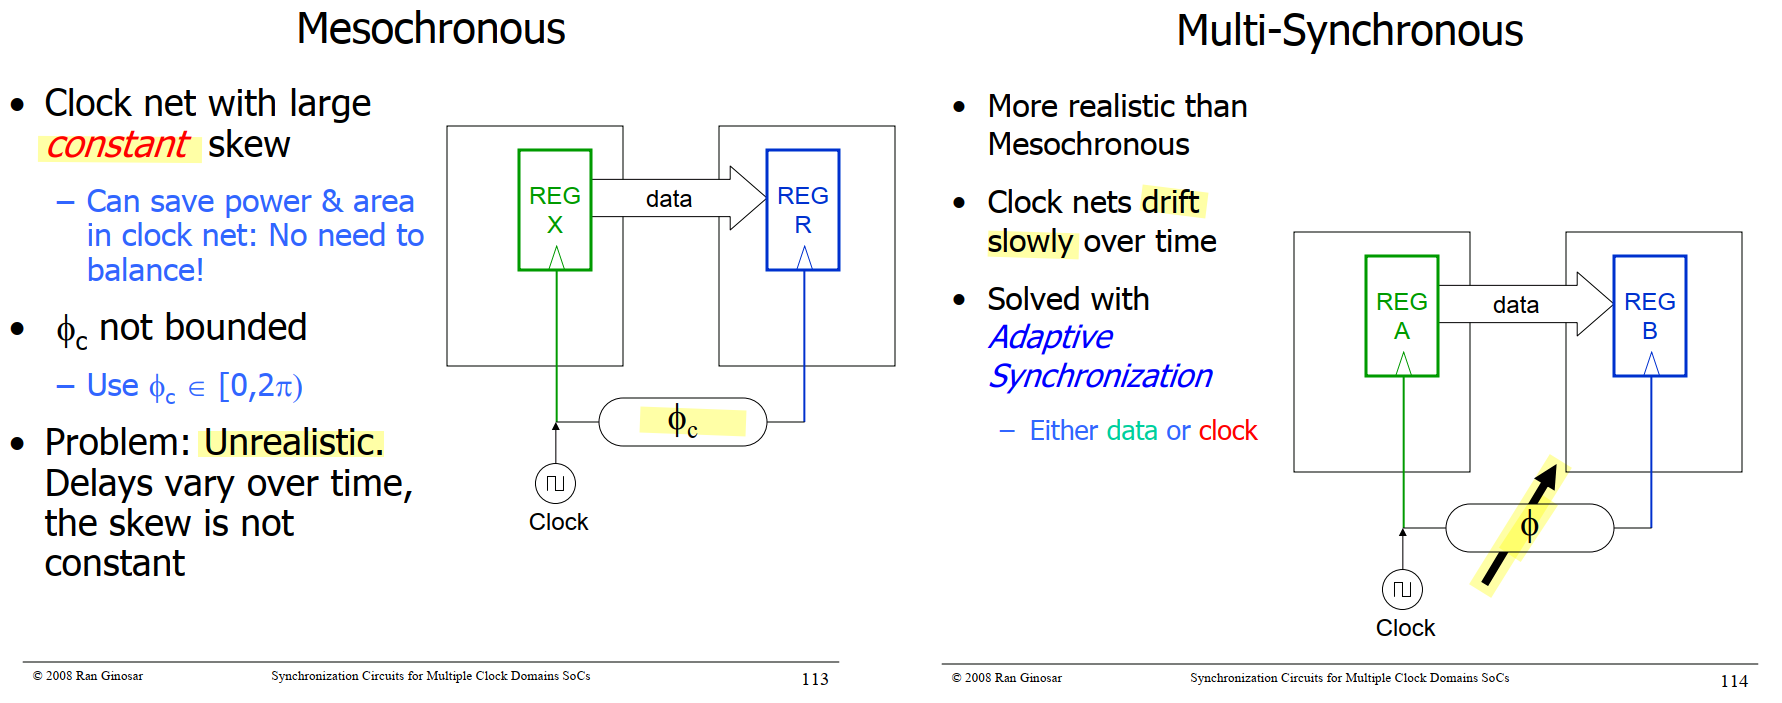
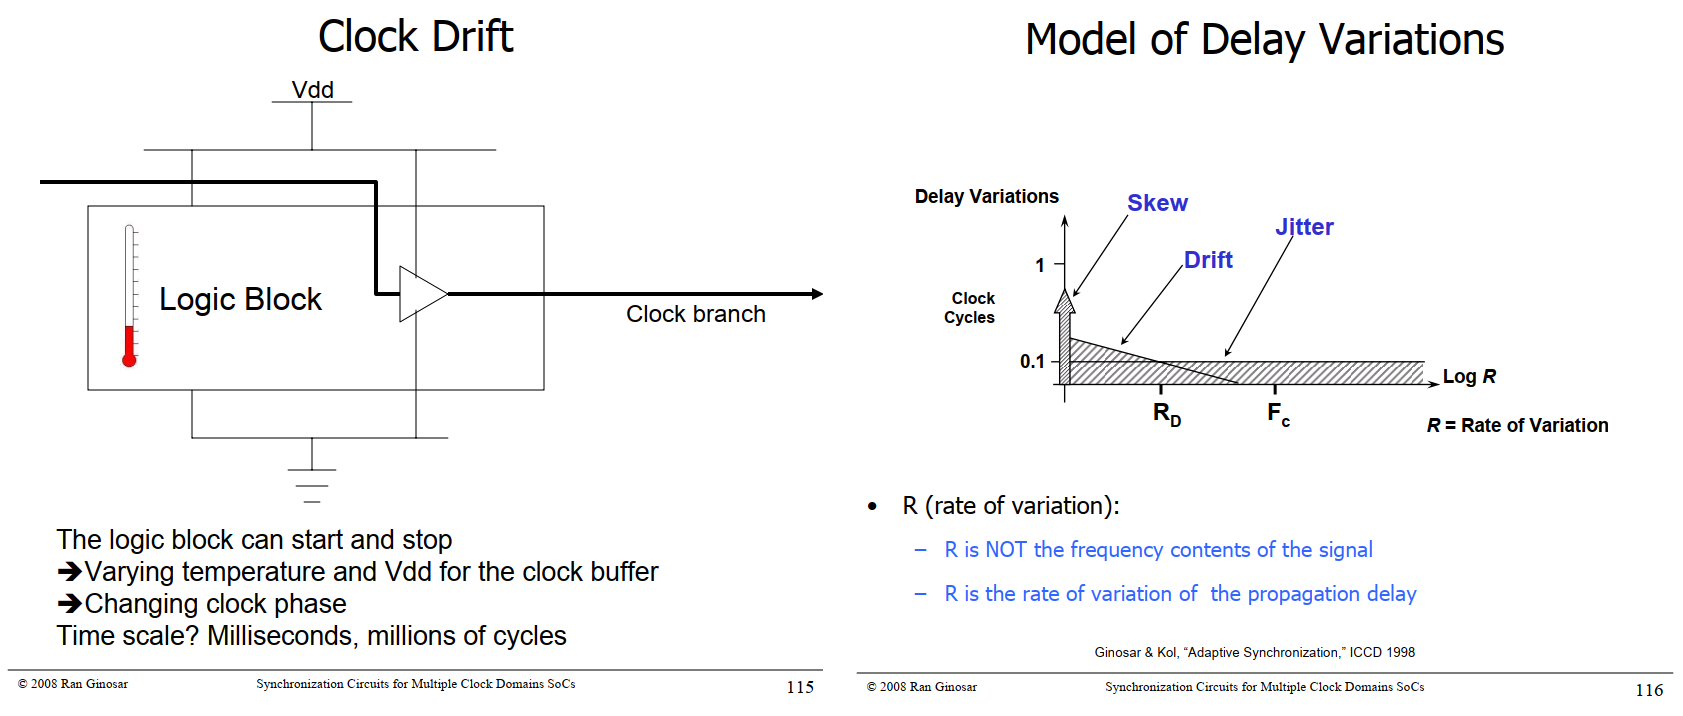
Ran Ginosar, ISCAS2008 Tutorial-4: Synchronization Circuits for
Multiple Clock Domain SoCs
Synchronous,
Mesochronous,
Plesiochronous
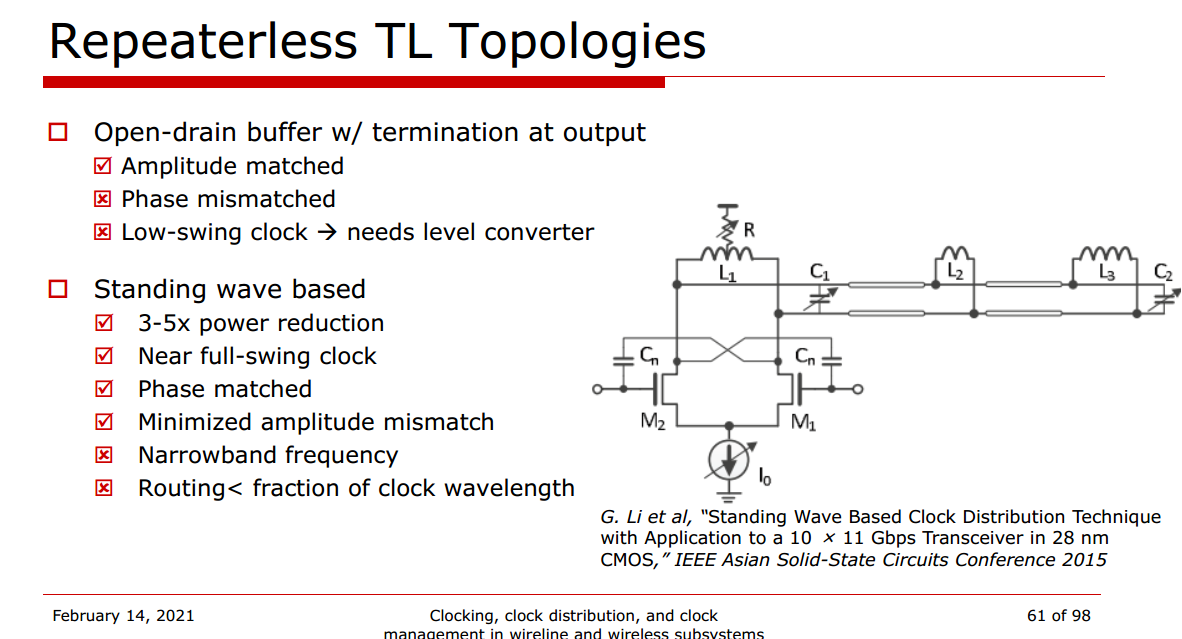
Standing Wave
Based Clock Distribution Technique
G. Li, W. Lee, D. Cui, B. Zhang, A. Momtaz and J. Cao, "Standing wave
based clock distribution technique with application to a 10 × 11 Gbps
transceiver in 28 nm CMOS," 2015 IEEE Asian Solid-State Circuits
Conference (A-SSCC), Xiamen, China, 2015, pp. 1-4 [https://sci-hub.se/10.1109/ASSCC.2015.7387451]
T. Ali et al., "6.4 A 180mW 56Gb/s DSP-Based Transceiver for
High Density IOs in Data Center Switches in 7nm FinFET Technology,"
2019 IEEE International Solid-State Circuits Conference -
(ISSCC), San Francisco, CA, USA, 2019, pp. 118-120 [https://sci-hub.se/10.1109/ISSCC.2019.8662523]
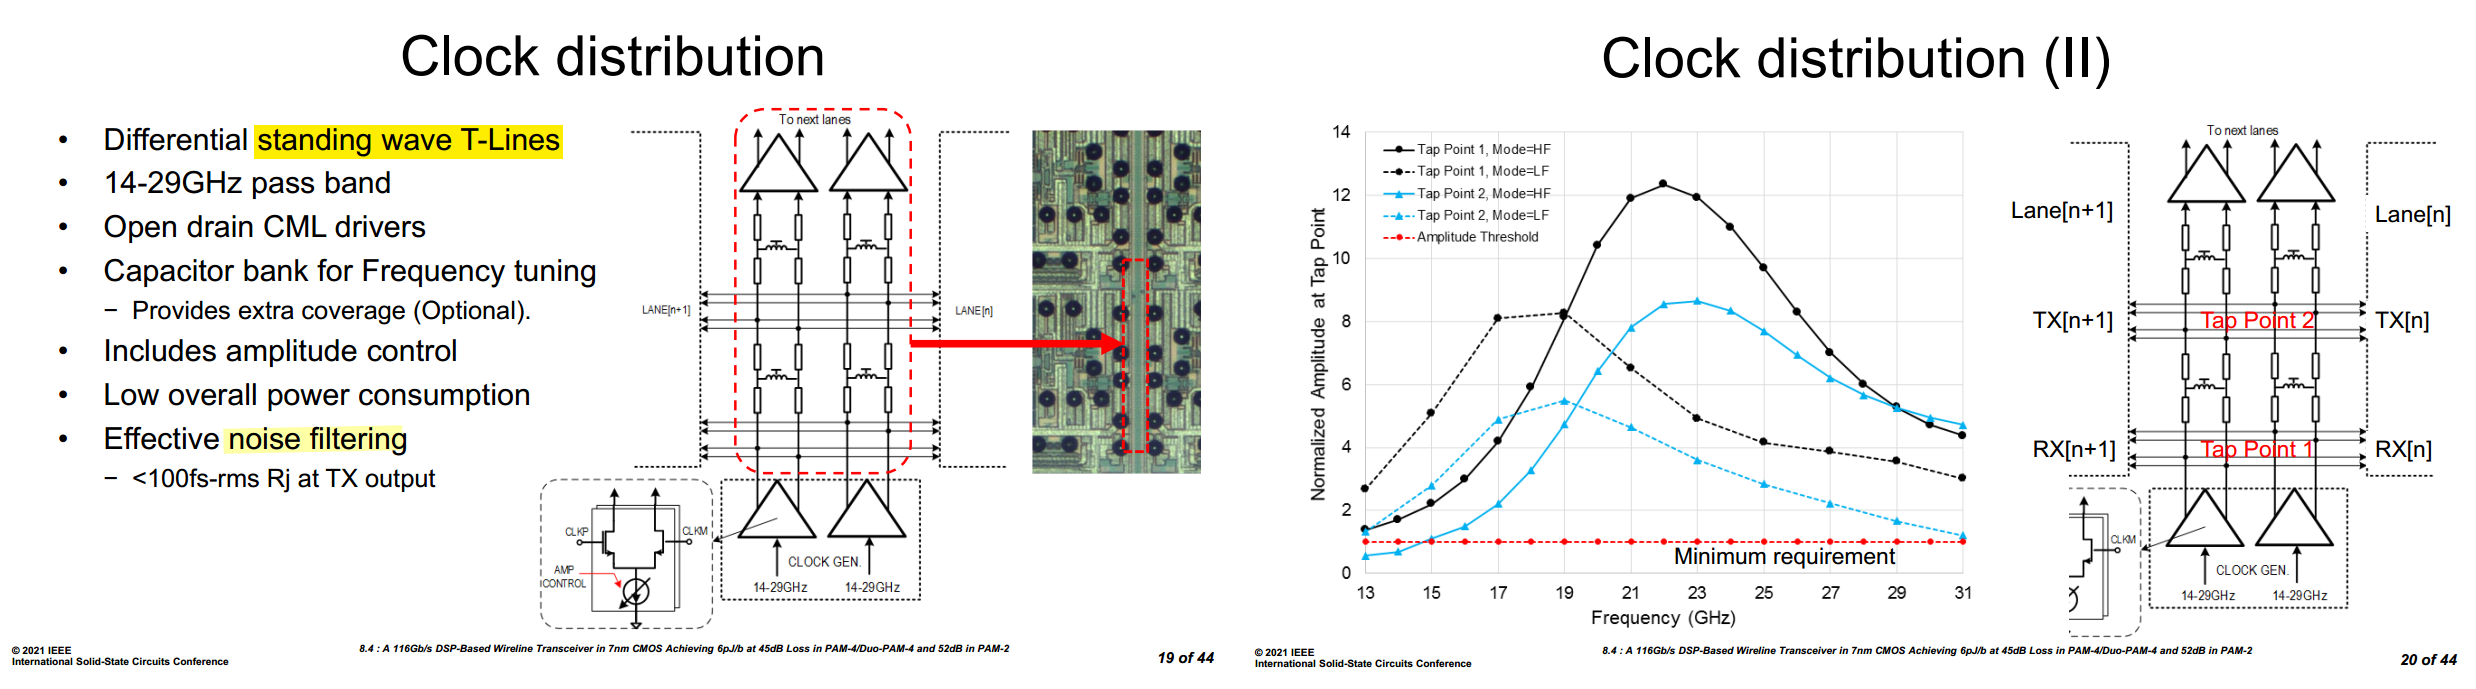
M. -A. LaCroix et al., "8.4 A 116Gb/s DSP-Based Wireline
Transceiver in 7nm CMOS Achieving 6pJ/b at 45dB Loss in PAM-4/Duo-PAM-4
and 52dB in PAM-2," 2021 IEEE International Solid-State Circuits
Conference (ISSCC), San Francisco, CA, USA, 2021, pp. 132-134 [https://sci-hub.ru/10.1109/ISSCC42613.2021.9366030]
T. Shibasaki et al., "3.5 A 56Gb/s NRZ-electrical 247mW/lane
serial-link transceiver in 28nm CMOS," 2016 IEEE International
Solid-State Circuits Conference (ISSCC), San Francisco, CA, USA,
2016, pp. 64-65 [https://sci-hub.se/10.1109/ISSCC.2016.7417908]
TODO 📅
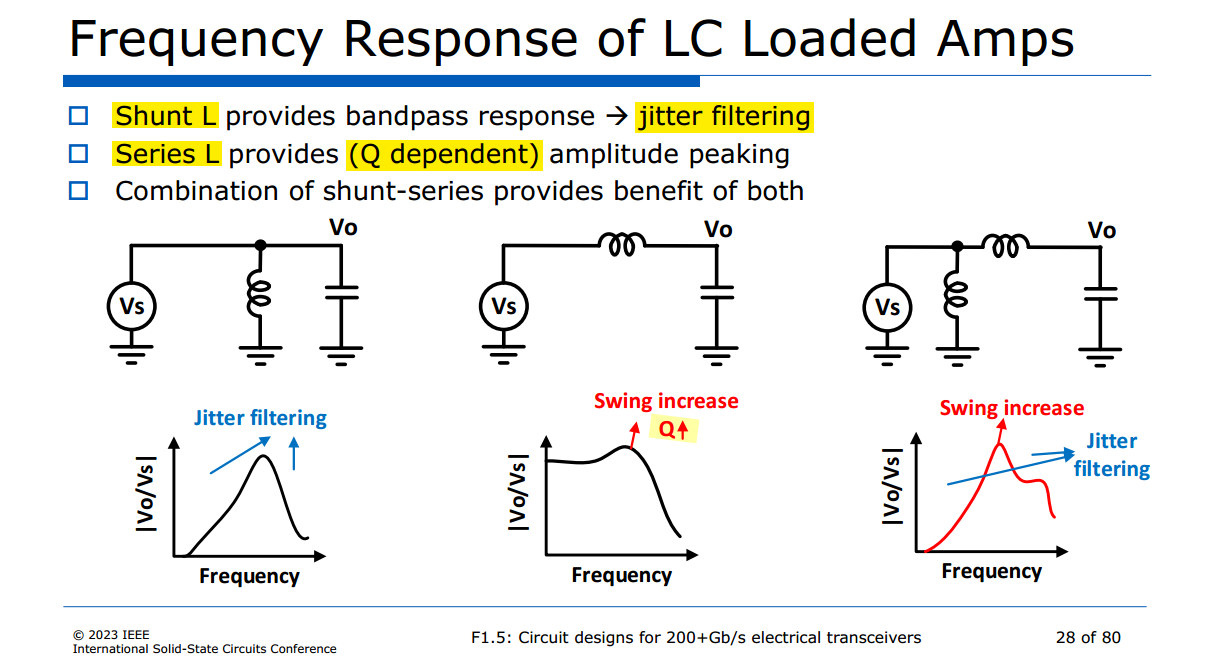
LC Loaded Amps
Cascaded PLLs
Chembiyan T, A General Theory of Cascaded PLL Design [link]
Nicola Da Dalt, ISSCC 2012 T5: JITTER basic and advanced concepts,
statistics and applications
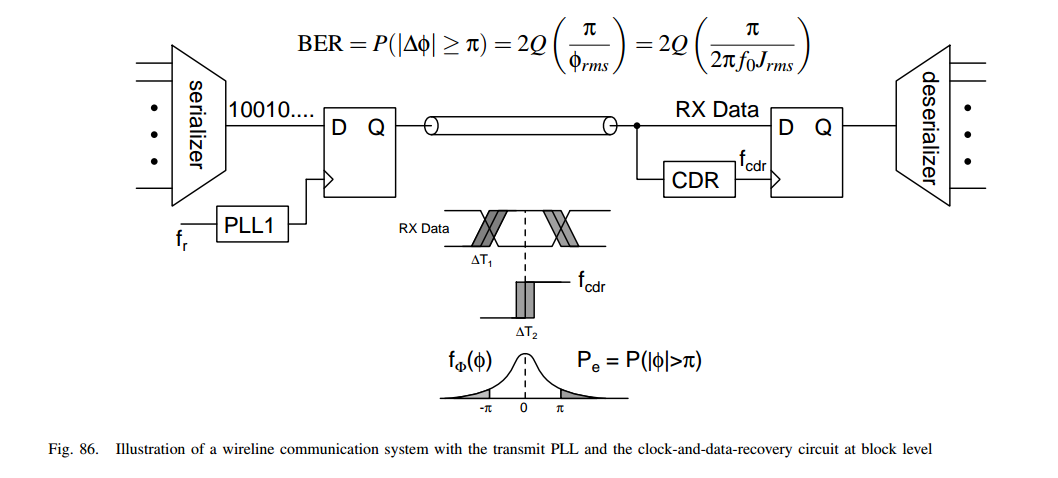
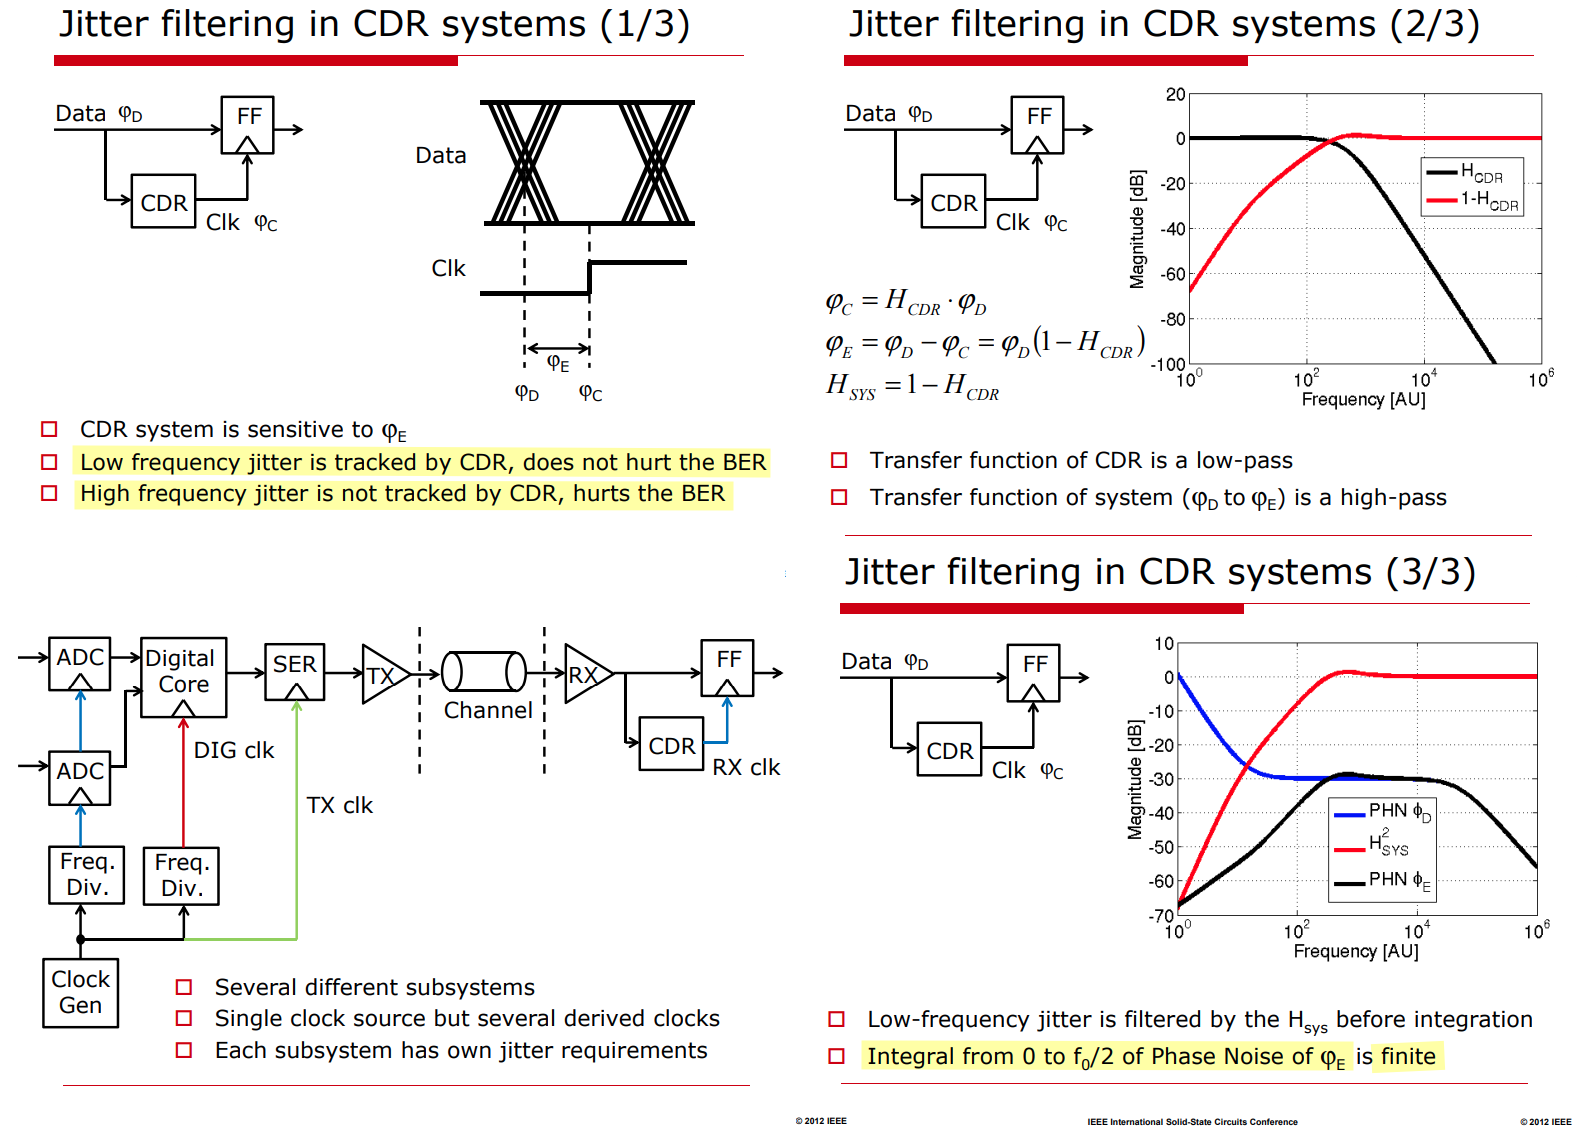
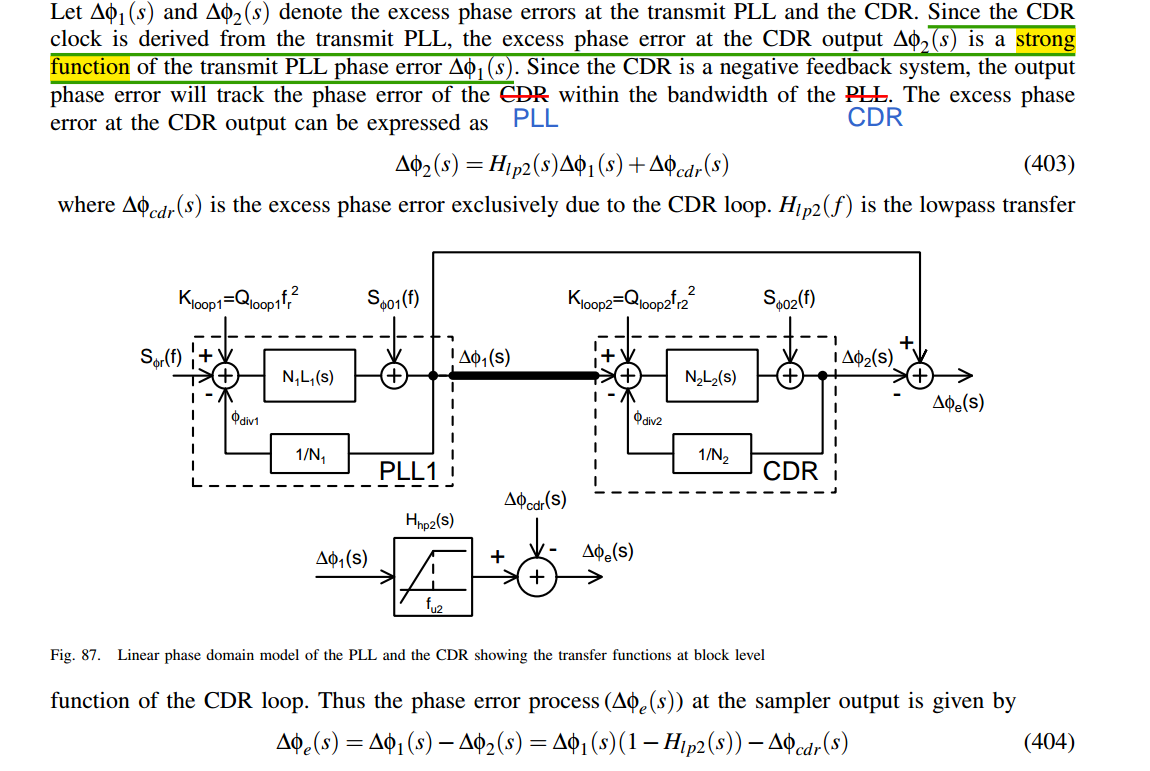
To understand the impact of the clock jitter on the performance of a
wireline system, the transfer functions of the PLL in the
transmitter side and the CDR loop in the receiver should
be taken into consideration
the minimum jitter occurs at the point
where the transmit PLL UGB is minimum and the
CDR UGB is maximized
the net rms jitter that impacts the performance of a wireline
transceiver is much lower than the rms jitter of the transmit PLL
the jitter requirements of the transmit PLL on the wireline system
is much more relaxed compared to the wireless transceiver
BTW, the psd value at half of fundamental frequency (\(f_s/2\)) is duty cycle distortion due
to the NMOS/PMOS imbalance, because of rising only
data
Random Jitter
RJ can be accurately and efficiently measured using
PSS/Pnoise or HB/HBnoise.
Note that the transient noise can also be used to
compute RJ;
However, the computation cost is typically very high, and the
accuracy is lesser as compared to PSS/Pnoise and HB/HBnoise.
Since RJ follows a Gaussian distribution, it can be fully
characterized using its Root-Mean-Squared value (RMS) or the standard
deviation value (\(\sigma\))
The Peak-to-Peak value of RJ (\(\text{RJ}_{\text{p-p}}\)) can be calculated
under certain observation conditions \[
\text{RJ}_{\text{p-p}}\equiv K \ast \text{RJ}_{\text{RMS}}
\] Here, \(K\) is a constant
determined by the BER specification of the system given in the following
Table
BER
Crest factor (K)
\(10^{-3}\)
6.18
\(10^{-4}\)
7.438
\(10^{-5}\)
8.53
\(10^{-6}\)
9.507
\(10^{-7}\)
10.399
\(10^{-8}\)
11.224
\(10^{-9}\)
11.996
\(10^{-10}\)
12.723
\(10^{-11}\)
13.412
\(10^{-12}\)
14.069
\(10^{-13}\)
14.698
1 2 3 4
K = 14.698; Ks = K/2; p = normcdf([-Ks Ks]); BER = 1 - (p(2)-p(1));
The phase noise is traditionally defined as the
ratio of the power of the signal in 1Hz bandwidth at offset \(f\) from the carrier \(P\), divided by the power of the carrier
\[
\ell (f) = \frac {S_v'(f_0+f)}{P}
\] where \(S_v'\) is is
one-sided voltage PSD and \(f
\geqslant 0\)
Under narrow angle assumption\[
S_{\varphi}(f)= \frac {S_v'(f_0+f)}{P}
\] where \(\forall f\in \left[-\infty
+\infty\right]\)
Using the Wiener-Khinchin theorem, it is possible to easily derive
the variance of the absolute jitter(\(J_{ee}\))via integration of the
corresponding PSD \[
J_{ee,rms}^2 = \int S_{J_{ee}}(f)df
\]
And we know the relationship between absolute jitter and excess phase
is \[
J_{ee}=\frac {\varphi}{\omega_0}
\] Considering that phase noise is normally symmetrical about the
zero frequency, multiplied by two is shown as below
\[
J_{ee,rms} = \frac{\sqrt{2\int_{0}^{+\infty}\ell(f)df}}{\omega_0}
\] where phase noise is in linear units not in logarithmic
ones.
Because the unit of phase noise in Spectre-RF is logarithmic
unit (dBc), we have to convert the unit before applying the
above equation \[
\ell[linear] = 10^{\frac {\ell [dBc/Hz]}{10}}
\] The complete equation using the simulation result of
Spectre-RF Pnoise is \[
J_{ee,rms} = \frac{\sqrt{2\int_{0}^{+\infty}10^{\frac {\ell
[dBc/Hz]}{10}}df}}{\omega_0}
\]
The above equation has been verified for sampled pnoise,
i.e. Jee and Edge Phase Noise.
For pnoise-sampled(jitter), Direct Plot Form -
Function: Jee:Integration Limits can calculate it conveniently
But for pnoise-timeaveage, you have to use the
below equation to get RMS jitter.
One example, integrate to \(\frac{f_{osc}}{2}\) and \(f_{osc} = 16GHz\)
Of course, it apply to conventional pnoise simulation.
On the other hand, output rms voltage noise, \(V_{out,rms}\) divied by slope should be
close to \(J_{ee,rms}\)\[
J_{ee,rms} = \frac {V_{out,rms}}{slope}
\]
—, "A Generalized Power Supply Induced Jitter Model Based on Power
Supply Rejection Ratio Response," in IEEE Transactions on Very Large
Scale Integration (VLSI) Systems, vol. 29, no. 6, pp. 1052-1060,
June 2021
—, DesignCon 2021. A Generalized Power Supply Induced Jitter Model
Based on Power Supply Rejection Ratio Response [paper]
—, "Power Supply Induced Jitter: Introduction and Recent Advances,"
in IEEE Transactions on Signal and Power Integrity, vol. 5, pp.
22-32, 2026
X. Mo, J. Wu, N. Wary and T. C. Carusone, "Design Methodologies for
Low-Jitter CMOS Clock Distribution," in IEEE Open Journal of the
Solid-State Circuits Society, vol. 1, pp. 94-103, 2021. [https://ieeexplore.ieee.org/stamp/stamp.jsp?arnumber=9559395]
A sampled pxf analysis can be used to simulate the
deterministic jitter of a circuit due to power supply
ripple
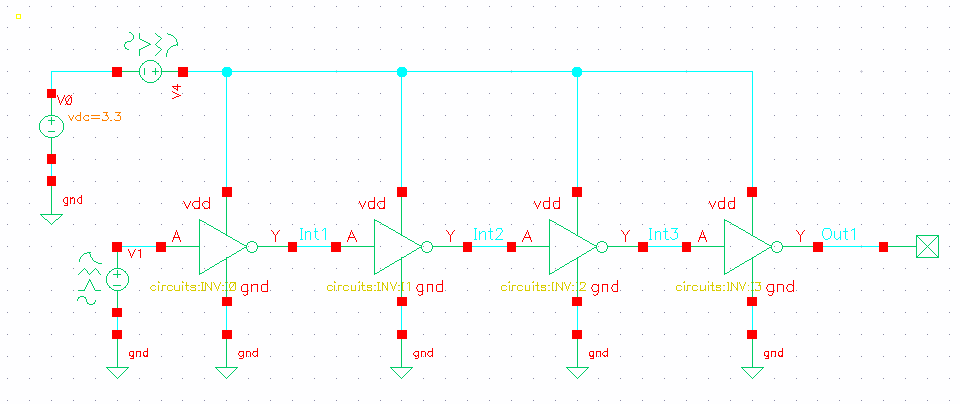
TODO 📅
reference
Nicola Da Dalt, Intel. ISSCC 2017 Forum: High-Performance Clock
Generation and Distribution in Very-High-Speed Wireline Transceivers
Mozhgan Mansuri. ISSCC2021 SC3: Clocking, Clock Distribution, and
Clock Management in Wireline/Wireless Subsystems
Jihwan Kim,Intel, ISSCC 2023 Forum F1.5: Circuit Designs for
200+Gb/s Electrical Transceivers
J. Kim et al., "8.1 A 224Gb/s DAC-Based PAM-4 Transmitter
with 8-Tap FFE in 10nm CMOS," 2021 IEEE International Solid-State
Circuits Conference (ISSCC), San Francisco, CA, USA, 2021, pp.
126-128
Article (20500632) Title: How to simulate Random and Deterministic
Jitters
J. Kim et al., "A 112 Gb/s PAM-4 56 Gb/s NRZ Reconfigurable
Transmitter With Three-Tap FFE in 10-nm FinFET," in IEEE Journal of
Solid-State Circuits, vol. 54, no. 1, pp. 29-42, Jan. 2019, [https://sci-hub.ru/10.1109/JSSC.2018.2874040]
— et al., "A 224-Gb/s DAC-Based PAM-4 Quarter-Rate Transmitter With
8-Tap FFE in 10-nm FinFET," in IEEE Journal of Solid-State Circuits,
vol. 57, no. 1, pp. 6-20, Jan. 2022, [https://sci-hub.ru/10.1109/JSSC.2021.3108969]
J. N. Tripathi, V. K. Sharma and H. Shrimali, "A Review on Power
Supply Induced Jitter," in IEEE Transactions on Components, Packaging
and Manufacturing Technology, vol. 9, no. 3, pp. 511-524, March 2019 [https://sci-hub.st/10.1109/TCPMT.2018.2872608]
H. Kim, J. Fan and C. Hwang, "Modeling of power supply induced jitter
(PSIJ) transfer function at inverter chains," 2017 IEEE International
Symposium on Electromagnetic Compatibility & Signal/Power Integrity
(EMCSI), Washington, DC, USA, 2017 [https://sci-hub.st/10.1109/ISEMC.2017.8077937]
Rhee, W. (2020). Phase-locked frequency generation and clocking :
architectures and circuits for modern wireless and wireline
systems. The Institution of Engineering and Technology
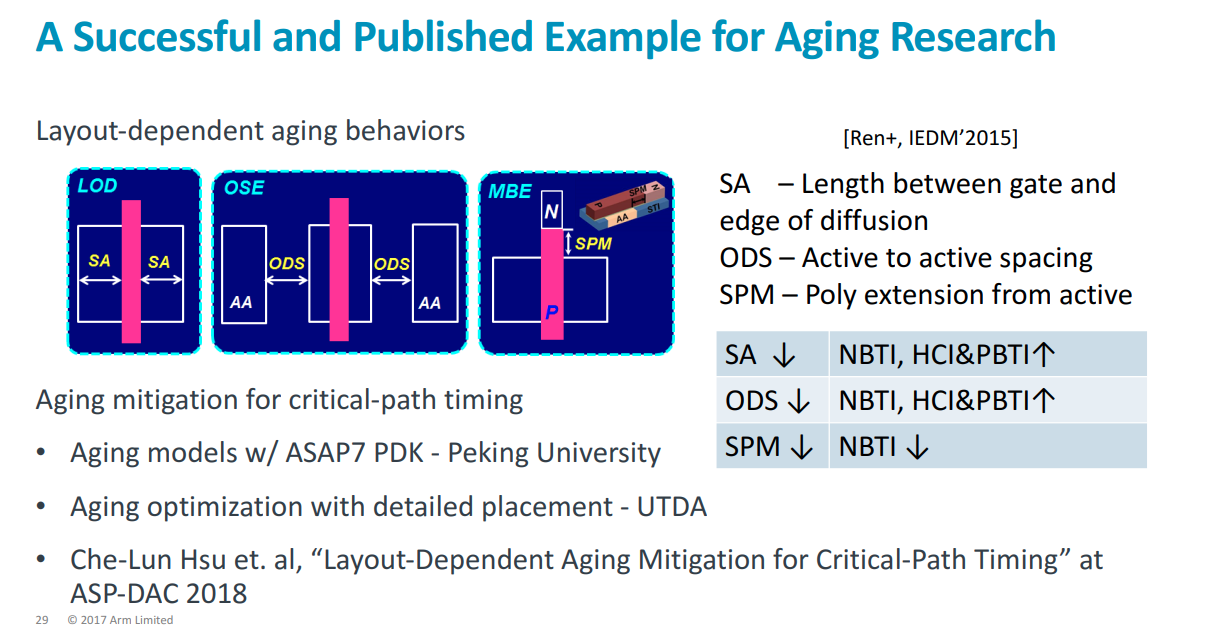
Performing FFT to a signal with a large DC offset would
often result in a big impulse around frequency 0 Hz, thus masking out
the signals of interests with relatively small amplitude.
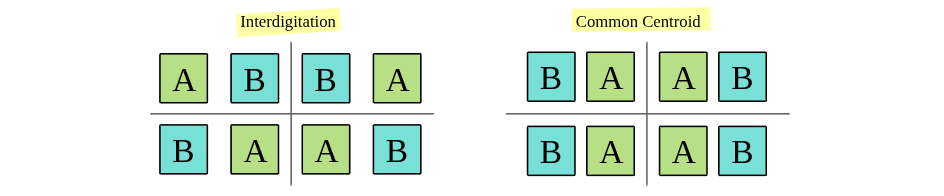
One method to remove DC offset from the original signal before
performing FFT
Subtracting the Mean of Original Signal
You can also not filter the input, but set zero to the zero frequency
point for FFT result.
Nyquist component
If we go back to the definition of the DFT \[
X(N/2)=\sum_{n=0}^{N-1}x[n]e^{-j2\pi
(N/2)n/2}=\sum_{n=0}^{N-1}x[n]e^{-j\pi n}=\sum_{n=0}^{N-1}x[n](-1)^n
\] which is a real number.
The discrete function \[
x[n]=\cos(\pi n)
\] is always \((-1)^n\) for
integer \(n\)
One general sinusoid at Nyquist and has phase shift \(\theta\), this is \(T=2\) and \(T_s=1\)
Moreover \(B \cdot (-1)^n = B\cdot \cos(\pi
n)\), then \[
B\cdot \cos(\pi n) = A \cdot \cos(\pi n + \theta)
\] We can NOT distinguish one from another.
Fs = 1000; % Sampling frequency T = 1/Fs; % Sampling period L = 1500; % Length of signal t = (0:L-1)*T; % Time vector S = 0.7*sin(2*pi*50*t) + sin(2*pi*120*t); X = S + 2*randn(size(t)); figure(1) plot(1000*t(1:50),X(1:50)) title('Signal Corrupted with Zero-Mean Random Noise') xlabel('t (milliseconds)') ylabel('X(t)')
figure(2) Y = fft(X); P2 = abs(Y/L); %!!! two-sided spectrum P2. P1 = P2(1:L/2+1); %!!! single-sided spectrum P1 P1(2:end-1) = 2*P1(2:end-1); % exclude DC and Nyquist freqency f = Fs*(0:(L/2))/L; figure(2) plot(f,P1) title('Single-Sided Amplitude Spectrum of X(t)') xlabel('f (Hz)') ylabel('|P1(f)|')
DC and Nyquist bins are special because they have no mirror
twin:
Frequency Bin
Location in FFT
Mirror Twin?
Action for Single-Sided Plot
DC (0 Hz)
First element
None
Leave alone (Multiply by 1)
Positive Freqs
First half
Has a twin in the second half
Double it (Multiply by 2)
Nyquist ((F_s/2))
Exact middle
None (Shared)
Leave alone (Multiply by 1)
Negative Freqs
Second half
Discarded entirely
Dropped
Doubling them would double-count their energy and give you an
artificially inflated amplitude.
Alternative View
The direct current (DC) bin (\(k=0\)) and the bin at \(k=N/2\), i.e., the bin that corresponds to
the Nyquist frequency are purely real and unique.
sinusoidal waveform with \(10Hz\),
amplitude 1 is \(cos(2\pi f_c t)\). The
plot is shown as below with sampling frequency is \(20Hz\)
Amplitude and Phase spectrum, sampled with \(f_s=20\) Hz
The FFT magnitude of \(10Hz\) is
1 and its phase is 0 as shown as
above, which proves the DFT and IDFT.
Caution: the power of FFT is related to samples (DFT
Parseval's theorem), which may not be the power of continuous signal.
The average power of samples is ([1 -1 1 -1 -1 1 ...]) is
1, that of corresponding continuous signal is \(\frac{1}{2}\).
Power spectrum derived from FFT provide information of samples, i.e.
1
Moreover, average power of sample [1 -1 1 -1 1 ...] is same with DC
[1 1 1 1 ...].
After successful compilation, you can run the simulation using the
vvp runtime engine:
1
vvp sim.vvp +VCDFILE=output.vcd
+VCDFILE=output.vcd: This is the custom plusarg.
"$value$plusargs("VCDFILE=%s", filename)": The simulator
searches for +VCDFILE=. It extracts the string after the
= sign and saves it into the filename
variable.
$dumpfile(filename): This opens a VCD file named
output.vcd.
$dumpvars(0, DUT): This dumps all signals inside the
module instance named DUT and everything below it
1 2 3 4 5 6 7 8
string filename;
initialbegin if ($value$plusargs("VCDFILE=%s",filename)) begin $dumpfile(filename); $dumpvars(0, DUT); end end
For use with --batch, perform automatic expansions as a
stand-alone tool. This sets up the appropriate Verilog mode environment,
updates automatics with M-x verilog-auto on all command-line files, and
saves the buffers. For proper results, multiple filenames need to be
passed on the command line in bottom-up order.
-f verilog-auto-save-compile
Update automatics with M-x verilog-auto, save the buffer, and
compile
Emacs
--no-site-file
Another file for site-customization is site-start.el.
Emacs loads this before the user's init file
(.emacs, .emacs.el or
.emacs.d/.emacs.d). You can inhibit the loading of this
file with the option --no-site-file
--batch
The command-line option --batch causes Emacs to run
noninteractively. The idea is that you specify Lisp programs to run;
when they are finished, Emacs should exit.
--load, -l FILE, load Emacs Lisp FILE using the load
function;
--funcall, -f FUNC, call Emacs Lisp function FUNC with
no arguments
-f FUNC
--funcall, -f FUNC, call Emacs Lisp function FUNC with
no arguments
--load, -l FILE
--load, -l FILE, load Emacs Lisp FILE using the load
function
Verilog-mode is a standard part of GNU Emacs as of 22.2.
multiple directories
AUTOINST only search in the file's directory
default.
You can append below verilog-library-directories for
multiple directories search
1 2 3
// Local Variables: // verilog-library-directories:("." "subdir" "subdir2") // End:
plusargs are command-line switches supported by the
simulator. As per SystemVerilog LRM arguments beginning with the
+ character will be available using the
$test$plusargs and $value$plusargsPLI
APIs.
1 2 3
$test$plusargs (user_string)
$value$plusargs (user_string, variable)
1 2 3 4 5 6 7 8 9 10 11 12 13 14 15 16
// tb.v module tb; int a; initialbegin if($test$plusargs("RUNSIM")) begin $display("There is RUNSIM plusargs"); endelsebegin $display("There is NO $test$plusargs"); end if($value$plusargs("SEED=%d",a)) begin $display("SEED=%d",a); endelsebegin $display("There is NO $value$plusargs"); end end endmodule
compile
1 2
$ vlib work $ vlog -sv tb.v
simulate (QuestaSim)
without plusargs
1
$ vsim work.tb -c -do "run; exit"
1 2 3 4 5 6 7 8 9
# // # Loading sv_std.std # Loading work.tb(fast) # run # There is NO $test$plusargs # There is NO $value$plusargs # exit # End time: 13:04:23 on Jun 04,2022, Elapsed time: 0:00:01 # Errors: 0, Warnings: 0
Article (20488135) Title: Selecting Different Delay Modes in GLS
(RAK)
Article (20447759) Title: Gate Level Simulation (GLS): A Quick Guide
for Beginners
Inertial delay
Inertial delay models are simulation delay models that filter pulses
that are shorted than the propagation delay of Verilog gate
primitives or continuous assignments
(assign #5 y = ~a;)
COMBINATIONAL LOGIC ONLY !!!
Inertial delays swallow glitches
sequential logic implemented with procedure
assignments DON'T follow the rule
reg in; ///////////////////////////////////////////////////// wire out; assign #2.5 out = in; ///////////////////////////////////////////////////// initialbegin in = 0; #16; in = 1; #2; in = 0; #10; in = 1; #4; in = 0; end
//////////// combination logic //////////////////////// always @(*) #2.5 out = in; /////////////////////////////////////////////////////// /* the above code is same with following code always @(*) begin #2.5; out = in; end */ initialbegin in = 0; #16; in = 1; #2; in = 0; #10; in = 1; #4; in = 0; end
alwaysbegin clk = 0; #5; foreverbegin clk = ~clk; #5; end end //////////// sequential logic ////////////////// always @(posedge clk) #2.5 out <= in; /////////////////////////////////////////////// initialbegin in = 0; #16; in = 1; #2; in = 0; #10; in = 1; end
initialbegin #50; $finish(); end
endmodule
As shown above, sequential logic DON'T follow inertial delay
Transport delay
Transport delay models are simulation delay models that pass all
pulses, including pulses that are shorter than the propagation delay of
corresponding Verilog procedural assignments
Transport delays pass glitches, delayed in time
Verilog can model RTL transport delays by adding explicit
delays to the right-hand-side (RHS) of a nonblocking
assignment
reg in; reg out; /////////////// nonblocking assignment /// always @(*) begin out <= #2.5 in; end ///////////////////////////////////////// initialbegin in = 0; #16; in = 1; #2; in = 0; #10; in = 1; #4; in = 0; end
reg in; reg out; /////////////// blocking assignment /// always @(*) begin out = #2.5 in; end ///////////////////////////////////////// initialbegin in = 0; #16; in = 1; #2; in = 0; #10; in = 1; #4; in = 0; end
initialbegin #50; $finish(); end
endmodule
It seems that new event is discarded before previous
event is realized.
clocking block in
SystemVerilog
Assignment at <interface>.<clocking block>.<output
signal> (i.e. synchronous) do NOT change
<interface>.<output signal> until active clock edge.
What is the "+:" operator called in Verilog? [link]
A range of contiguous bits can be selected and is known as
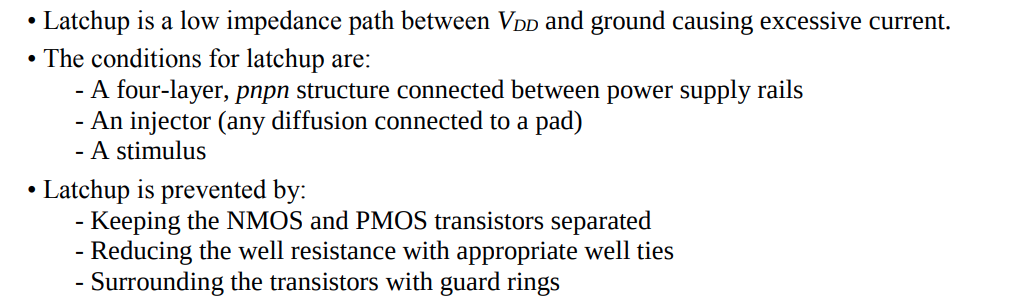
part-select. There are two types of part-selects, one
with a constant part-select and another with an
indexed part-select
1 2
reg [31:0] addr; addr [23:16] = 8'h23; //bits 23 to 16 will be replaced by the new value 'h23 -> constant part-select
Having a variable part-select allows it to be used effectively in
loops to select parts of the vector. Although the starting bit can be
varied, the width has to be
constant.
[<start_bit +: ] // part-select increments from
start-bit
[<start_bit -: ] // part-select decrements from
start-bit
$display("unsigned out(%%d): %0d", outSumUs); $display("unsigned out(%%b): %b", outSumUs); end endmodule
xcelium
1 2 3 4 5 6 7
xcelium> run signed out(%d): -12 signed out(%b): 10100 unsigned out(%d): 20 unsigned out(%b): 10100 xmsim: *W,RNQUIE: Simulation is complete. xcelium> exit
vcs
1 2 3 4 5 6
Compiler version S-2021.09-SP2-1_Full64; Runtime version S-2021.09-SP2-1_Full64; May 7 17:24 2022 signed out(%d): -12 signed out(%b): 10100 unsigned out(%d): 20 unsigned out(%b): 10100 V C S S i m u l a t i o n R e p o r t
observation
When signed and unsigned is mixed,
the result is by default unsigned.
Prepend to operands with 0s instead of extending
sign, even though the operands is signed
LHS DONT affect how the simulator operate on the
operands but what the results represent, signed or unsigned
Therefore, although outSumUs is declared as signed, its
result is unsigned
subtraction example
In logic arithmetic, addition and subtraction are commonly used for
digital design. Subtraction is similar to addition except that the
subtracted number is 2's complement. By using 2's complement for the
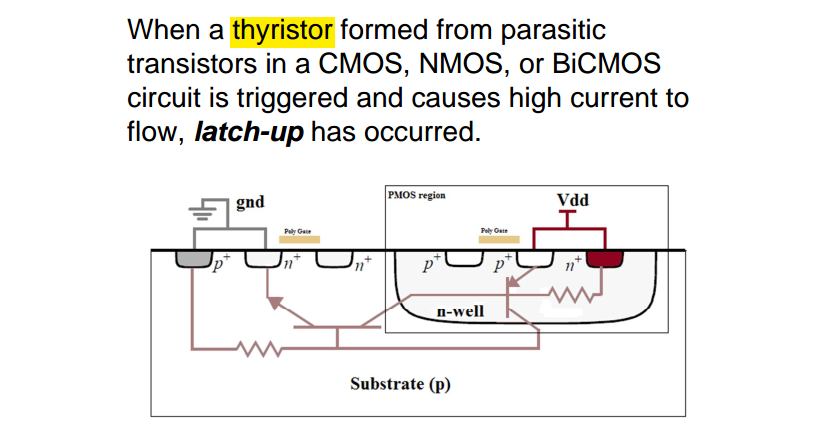
subtracted number, both addition and subtraction can be unified to using
addition only.
$display("unsigned out(%%d): %0d", outSubUs); $display("unsigned out(%%b): %b", outSubUs); end endmodule
1 2 3 4 5 6
Compiler version S-2021.09-SP2-1_Full64; Runtime version S-2021.09-SP2-1_Full64; May 7 17:46 2022 signed out(%d): -3 signed out(%b): 11101 unsigned out(%d): 29 unsigned out(%b): 11101 V C S S i m u l a t i o n R e p o r t
1 2 3 4 5 6
xcelium> run signed out(%d): -3 signed out(%b): 11101 unsigned out(%d): 29 unsigned out(%b): 11101 xmsim: *W,RNQUIE: Simulation is complete.
$display("unsigned out(%%d): %0d", outSubUs); $display("unsigned out(%%b): %b", outSubUs); end endmodule
1 2 3 4 5 6
Compiler version S-2021.09-SP2-1_Full64; Runtime version S-2021.09-SP2-1_Full64; May 7 17:50 2022 signed out(%d): 13 signed out(%b): 01101 unsigned out(%d): 13 unsigned out(%b): 01101 V C S S i m u l a t i o n R e p o r t
1 2 3 4 5 6 7
xcelium> run signed out(%d): 13 signed out(%b): 01101 unsigned out(%d): 13 unsigned out(%b): 01101 xmsim: *W,RNQUIE: Simulation is complete. xcelium> exit
Verilog has a nasty habit of treating everything as unsigned unless
all variables in an expression are signed. To add insult to injury, most
tools won’t warn you if signed values are being ignored.
If you take one thing away from this post:
Never mix signed and unsigned variables in one
expression!
Chronologic VCS simulator copyright 1991-2021 Contains Synopsys proprietary information. Compiler version S-2021.09-SP2-2_Full64; Runtime version S-2021.09-SP2-2_Full64; Nov 19 11:02 2022 Coordinates (7,7): x : 00000111 7 y : 00000111 7 Move +4: x1: 00001011 11 *LOOKS OK* y1: 00001011 11 Move -4: x1: 00010011 19 *SURPRISE* y1: 00000011 3 V C S S i m u l a t i o n R e p o r t Time: 60 CPU Time: 0.260 seconds; Data structure size: 0.0Mb
// %t format will scale the rounded value to represent timeprecision // 1.1002*10e-9/1e-12 = 11002 $display("$realtime %%t = %t", $realtime); $display("$time %%t = %t", $time); end endmodule
The time unit and time precision can be specified in the following
two ways:
Using the compiler directive `timescale
Using the keywords timeunit and
timeprecision
1 2 3 4 5 6 7 8 9 10
module D (...); timeunit100ps; timeprecision10fs; ... endmodule
module E (...); timeunit100ps / 10fs; // timeunit with optional second argument ... endmodule
The minimum of timeprecision determine %t
output, the nearest timeunit and timeprecision
determine the round of $realtime and $time. Of
course, the simulator follow the time tick shown by
$realtime.
It specifies the FSDB file name created by the Novas object files for
FSDB dumping. If it is not specified, then the default FSDB file name is
"novas.fsdb".
This command is valid only before executing
$fsdbDumpvars and is ignored if specified after
$fsdbDumpvars
$fsdbSuppress
The fsdbSuppressutility is used to skip dumping of few
instances, scopes, modules and signals. The
fsdbSuppressutility is a system task like other fsdb
tasks.
For $fsdbSuppress() to be effective, it needs to be
specified/called before$fsdbDumpvars
$fsdbAutoSwitchDumpfile
Automatically switch to a new dump file when the working FSDB file
reaches the specified size or the specified wall time period.
After the dumping is finished, a virtual FSDB file
(*.vf) is automatically created and list all of the generated
FSDB files with the correct sequence. Only the virtual FSDB
file, rather than all of the FSDB files, needs to be loaded to
view the simulation results
When specified in the design to switch based on file
size:
For VCS users, to include memory, MDA, packed array and structure
information in the generated FSDB file, the -debug_access
option must be included when VCS is invoked to compile the
design
depth
Specify how many sub-scope levels under the given scope you want to
dump.
Specify this argument as 1 to dump the signals
under the given scope
Specify this argument as 0 to dump all signals
under the given scope and its descendant scopes.
0: all signals in all scopes.
1: all signals in current scope.
2: all signals in the current scope and all scopes one level
below.
n: all signals in the current scope and all scopes n-1 levels
below.
initialbegin clk = 1'b0; forever #5 clk = ~clk; end
initialbegin #100; $finish(); end
initialbegin #10; $fsdbDumpfile("tb.fsdb"); //$fsdbDumpvars(0); // same with $fsdbDumpvars(0, tb) //$fsdbDumpvars(1); // same with $fsdbDumpvars(1, tb) //$fsdbDumpvars(2); // same with $fsdbDumpvars(2, tb) //$fsdbDumpvars(1, tb.u_div2); $fsdbDumpvars(0, tb.u_div2); #80$finish(); end
endmodule
module divider2 ( input clk ); reg div2;
divider2neg u_div2neg(div2); always@(posedge clk) begin div2 = ~div2; end initialbegin div2 = 1'b0; end
endmodule
module divider2neg ( input clk ); reg div2neg;
always@(negedge clk) begin div2neg = ~div2neg; end initialbegin div2neg= 1'b0; end
endmodule
compile
1
vcs -full64 -kdb -debug_access+all tb.v
simulate
1
./simv
load fsdb
1
verdi -ssf tb.fsdb
$fsdbDumpon, $fsdbDumpoff
1 2 3
$fsdbDumpon(["+fsdbfile+filename"])
$fsdbDumpoff(["+fsdbfile+filename"])
These FSDB dumping commands turn dumping on and off.
fsdbDumpon/fsdbDumpoff has the highest priority and
overrides all other FSDB dumping commands.
fsdbDumpon/fsdbDumpoff is not restricted to only
fsdbDumpvars. If there is more than one FSDB file open for
dumping at one simulation run, fsdbDumpon/fsdbDumpoff may
only affect a specific FSDB file by specifying the specific file
name.
+fsdbfile+filename: Specify the FSDB file name. If not
specified, the default FSDB file name is "novas.fsdb"
$fsdbDumpFinish
This command closes all FSDB files in the current simulation and
stops dumping of signals. Although all FSDB files are closed
automatically at the end of simulation, this dumping command can be
invoked to explicitly close the FSDB files during the
simulation
VCD
$dumpfile
The declaration onf $dumpfile must come before the
$dumpvars or any other system tasks that specifies
dump.
1
$dumpfile("test.vcd");
argument is necessary, there is no default value
$dumpvars
The $dumpvars is used to specify which variables are to
be dumped ( in the file mentioned by $dumpfile). The
simplest way to use it is without any argument.
1
$dumpvars(<levels> <, <module_or_variable>>* );
$dumplimit
It is possible that you inadvertantly generate huge file in Gigabytes
( for examples while dumping a Gigahertz clock for one second). To
reduce such occurrences, we may use $dumplimit. It usage
is
1
$dumplimit(<filesize>);
$dumpoff and $dumpon
During the simulation if you are bothered about about only during a
certain interval then you can use $dumpoff and
$dumpon. The following example shows its usage. It will
dump the changes for first 100 units of time and then between 10200 and
10400 units of time.
The system task has no versions to accept octal data or decimal
data.
The 1st argument is the data file name.
The 2nd argument is the array to receive the data.
The 3rd argument is an optional start address, and if you provide
it, you can also provide
The 4th argument optional end address.
Note, the 3rd and 4th argument address is for array not data
file.
If the memory addresses are not specified anywhere, then the system
tasks load file data sequentially from the lowest address toward the
highest address.
The standard before 2005 specify that the system tasks load file data
sequentially from the left memory address bound to the right memory
address bound.
With implict sign extension, the implementation of
signed arithmetic is DIFFERENT from
that of unsigned. Otherwise, their implementations are
same.
The implementations manifest the RTL's behaviour correctly
add without implicit sign
extension
unsigned
rtl
1 2 3 4 5 6 7
module TOP ( inputwire [2:0] data0 ,inputwire [2:0] data1 ,outputwire [2:0] result ); assign result = data0 + data1; endmodule
synthesized netlist
1 2 3 4 5 6 7 8 9 10 11 12 13 14 15 16 17 18 19
///////////////////////////////////////////////////////////// // Created by: Synopsys DC Ultra(TM) in wire load mode // Version : S-2021.06-SP5 // Date : Sat May 7 11:43:27 2022 /////////////////////////////////////////////////////////////
module TOP ( data0, data1, result ); input [2:0] data0; input [2:0] data1; output [2:0] result; wire n4, n5, n6;
module TOP ( inputwiresigned [2:0] data0 ,inputwiresigned [2:0] data1 ,outputwiresigned [2:0] result ); assign result = data0 + data1; endmodule
synthesized netlist
1 2 3 4 5 6 7 8 9 10 11 12 13 14 15 16 17 18 19
///////////////////////////////////////////////////////////// // Created by: Synopsys DC Ultra(TM) in wire load mode // Version : S-2021.06-SP5 // Date : Sat May 7 11:48:54 2022 /////////////////////////////////////////////////////////////
module TOP ( data0, data1, result ); input [2:0] data0; input [2:0] data1; output [2:0] result; wire n4, n5, n6;
module TOP ( inputwire [2:0] data0 // 3 bit unsigned ,inputwire [1:0] data1 // 2 bit unsigned ,outputwire [2:0] result // 3 bit unsigned ); assign result = data0 + data1; endmodule
synthesized netlist
1 2 3 4 5 6 7 8 9 10 11 12 13 14 15 16 17 18 19
///////////////////////////////////////////////////////////// // Created by: Synopsys DC Ultra(TM) in wire load mode // Version : S-2021.06-SP5 // Date : Sat May 7 12:15:58 2022 /////////////////////////////////////////////////////////////
module TOP ( data0, data1, result ); input [2:0] data0; input [1:0] data1; output [2:0] result; wire n4, n5, n6;
///////////////////////////////////////////////////////////// // Created by: Synopsys DC Ultra(TM) in wire load mode // Version : S-2021.06-SP5 // Date : Sat May 7 12:21:51 2022 /////////////////////////////////////////////////////////////
UC Berkeley CS150 Lec #20: Finite State Machines [slides]
always@( * )
always@( * ) blocks are used to describe Combinational
Logic, or Logic Gates. Only = (blocking) assignments should
be used in an always@( * ) block.
Latch Inference
If you DON'T assign every element that can be
assigned inside an always@( * ) block every time that
always@( * ) block is executed, a latch will be inferred
for that element
The approaches to avoid latch generation:
set default values
proper use of the else statement, and other flow
constructs
without default values
latch is generated
RTL
1 2 3 4 5 6 7 8 9 10 11 12 13 14
module TOP ( inputwire Trigger, inputwire Pass, outputreg A, outputreg C ); always @(*) begin A = 1'b0; if (Trigger) begin A = Pass; C = Pass; end end endmodule
synthesized netlist
1 2 3 4 5 6 7 8 9 10 11 12 13 14 15
///////////////////////////////////////////////////////////// // Created by: Synopsys DC Ultra(TM) in wire load mode // Version : S-2021.06-SP5 // Date : Mon May 9 17:09:18 2022 /////////////////////////////////////////////////////////////
module TOP ( Trigger, Pass, A, C ); input Trigger, Pass; output A, C;
Default values are an easy way to avoid latch generation
RTL
1 2 3 4 5 6 7 8 9 10 11 12 13 14
module TOP ( inputwire Trigger, inputwire Pass, outputreg A, outputreg C ); always @(*) begin A = 1'b0; C = 1'b1; if (Trigger) begin A = Pass; C = Pass; end end
synthesized netlist
1 2 3 4 5 6 7 8 9 10 11 12 13 14 15 16
///////////////////////////////////////////////////////////// // Created by: Synopsys DC Ultra(TM) in wire load mode // Version : S-2021.06-SP5 // Date : Mon May 9 17:12:47 2022 /////////////////////////////////////////////////////////////
module TOP ( Trigger, Pass, A, C ); input Trigger, Pass; output A, C;
regsigned [8:0] t; // extend 1b begin if(plus) begin t = {a[7], a} + {1'b0, b}; satop_sus8b = (t[8:7]==2'b01) ? {1'b0, {7{1'b1}}} // up saturate for signed : t[7:0]; endelsebegin t = {a[7], a} - {1'b0, b}; satop_sus8b = (t[8:7]==2'b10) ? {1'b1, {7{1'b0}}} // dn saturate for signed : t[7:0]; end end endfunction
A power spectrum is equal to the square of the absolute value of
DFT.
The sum of all power spectral lines in a power spectrum is equal to
the power of the input signal.
The integral of a PSD is equal to the power of the input
signal.
power spectrum has units of \(V^2\)
and power spectral density has units of \(V^2/Hz\)
Parseval's theorem is a property of the Discrete
Fourier Transform (DFT) that states: \[
\sum_{n=0}^{N-1}|x(n)|^2 = \frac{1}{N}\sum_{k=0}^{N-1}|X(k)|^2
\] Multiply both sides of the above by \(1/N\): \[
\frac{1}{N}\sum_{n=0}^{N-1}|x(n)|^2 =
\frac{1}{N^2}\sum_{k=0}^{N-1}|X(k)|^2
\]\(|x(n)|^2\) is instantaneous
power of a sample of the time signal. So the left side of the equation
is just the average power of the signal over the N
samples. \[
P_{\text{av}} = \frac{1}{N^2}\sum_{k=0}^{N-1}|X(k)|^2\text{, }V^2
\] For the each DFT bin, we can say: \[
P_{\text{bin}}(k) = \frac{1}{N^2}|X(k)|^2\text{,
k=0:N-1, }V^2/\text{bin}
\] This is the power spectrum of the signal.
Note that \(X(k)\) is the
two-sided spectrum. If \(x(n)\) is real, then \(X(k)\) is symmetric about \(fs/2\), with each side containing half of
the power. In that case, we can choose to keep just the
one-sided spectrum, and multiply Pbin by 2
(except DC & Nyquist):
rng default Fs = 1000; t = 0:1/Fs:1-1/Fs; x = cos(2*pi*100*t) + randn(size(t)); N = length(x); xdft = fft(x); xsq_sum_avg = sum(x.^2)/N; specsq_sum_avg = sum(abs(xdft).^2)/N^2;
where xsq_sum_avg is same with
specsq_sum_avg
For a discrete-time sequence x(n), the DFT is defined as: \[
X(k) = \sum_{n=0}^{N-1}x(n)e^{-j2\pi kn/N}
\] By it definition, the DFT does NOT apply to
infinite duration signals.
Different scaling is needed to apply for amplitude spectrum, power
spectrum and power spectrum density, which shown as below
\(f_s\) in Eq.(13) is sample
rate rather than frequency resolution.
And Eq.(13) can be expressed as \[
\text{PSD}(k) =\frac{1}{f_{\text{res}}\cdot
N\sum_{n}w^2(n)}\left|X_{\omega}(k)\right|^2
\] where \(f_{\text{res}}\) is
frequency resolution
We define the following two sums for normalization purposes:
where Normalized Equivalent Noise BandWidth is
defined as \[
\text{NENBW} =\frac{N S_2}{S_1^2}
\] and Effective Noise BandWidth is \[
\text{ENBW} =f_{\text{res}} \cdot \frac{N S_2}{S_1^2}
\]
For Rectangular window, \(\text{ENBW}
=f_{\text{res}}\)
This equivalent noise bandwidth is required when the
resulting spectrum is to be expressed as spectral density (such as
for noise measurements).
plot(Fx1,10*log10(Pxx1),Fx2,10*log10(Pxx2),'r--'); legend('PSD via Eq.(13)','PSD via pwelch')
window effects
It is possible to correct both the amplitude and energy content of
the windowed signal to equal the original signal. However, both
corrections cannot be applied simultaneously
power spectral density (PSD)\[
\text{PSD} =\frac{\left|X_{\omega}(k)\right|^2}{f_s\cdot S_2}
\]
We have \(\text{PSD} =
\frac{\text{PS}}{\text{ENBW}}\), where \(\text{ENBW}=\frac{N \cdot
S_2}{S_1^2}f_{\text{res}}\)
linear power spectrum\[
\text{PS}_L=\frac{|X_{\omega}(k)|^2}{N\cdot S_2}
\]
usage: RMS value, total power \[
\text{PS}_L(k)=\text{PSD(k)} \cdot f_{\text{res}}
\]
Window Correction Factors
While a window helps reduce leakage (The window reduces the jumps at
the ends of the repeated signal), the window itself distorts the data in
two different ways:
Amplitude – The amplitude of the signal
is reduced
This is due to the fact that the window removes information in the
signal
Energy – The area under the curve, or
energy of the signal, is reduced
Window correction factors are used to try and
compensate for the effects of applying a window to data. There are both
amplitude and energy correction factors.
Window Type
Amplitude Correction (\(K_a\))
Energy Correction (\(K_e\))
Rectangluar
1.0
1.0
hann
1.9922
1.6298
blackman
2.3903
1.8155
kaiser
1.0206
1.0204
Only the Uniform window (rectangular window), which is equivalent to
no window, has the same amplitude and energy correction factors.
In literature, Coherent power gain is defined show
below, which is close related to \(K_a\)\[
\text{Coherent power gain (dB)} = 20 \; log_{10} \left( \frac{\sum_n
w[n]}{N} \right)
\]
With amplitude correction, by multiplying by two, the peak
value of both the original and corrected spectrum match. However
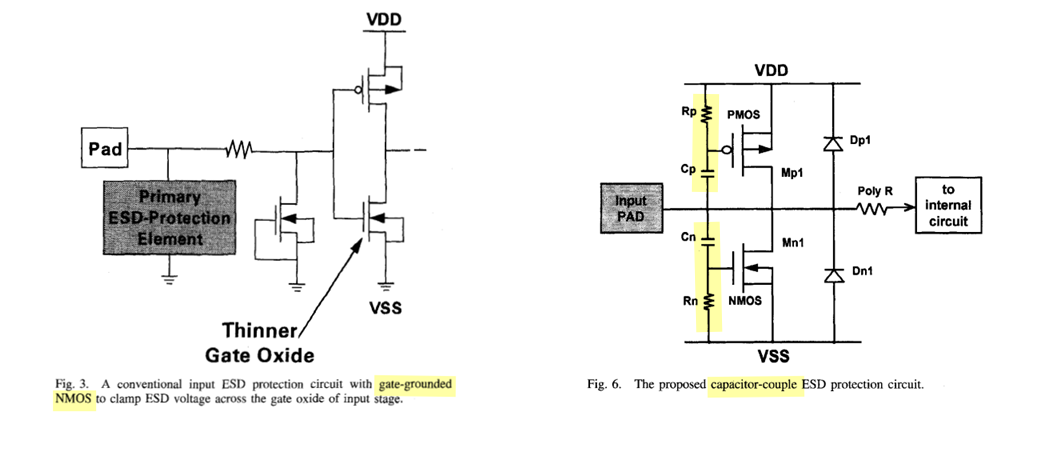
the energy content is not the same.
The amplitude corrected signal (red) appears to have more energy, or
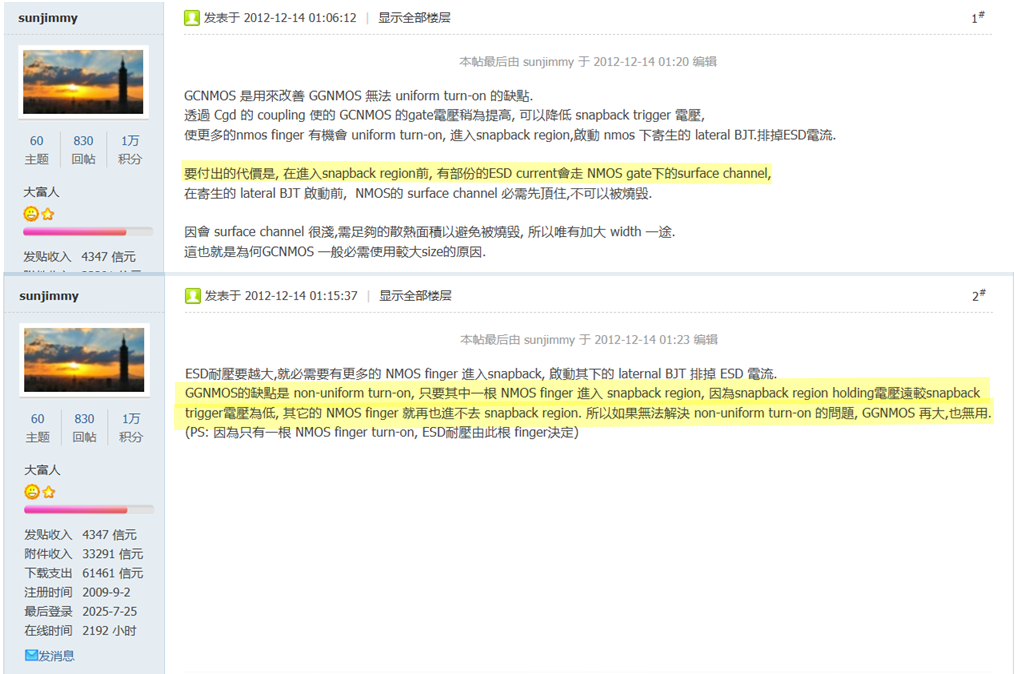
area under the curve, than the original signal (blue).
Multiplying the values in the spectrum by 1.63, rather than 2, makes
the area under the curve the same for both the original signal
(blue) and energy corrected signal (red)
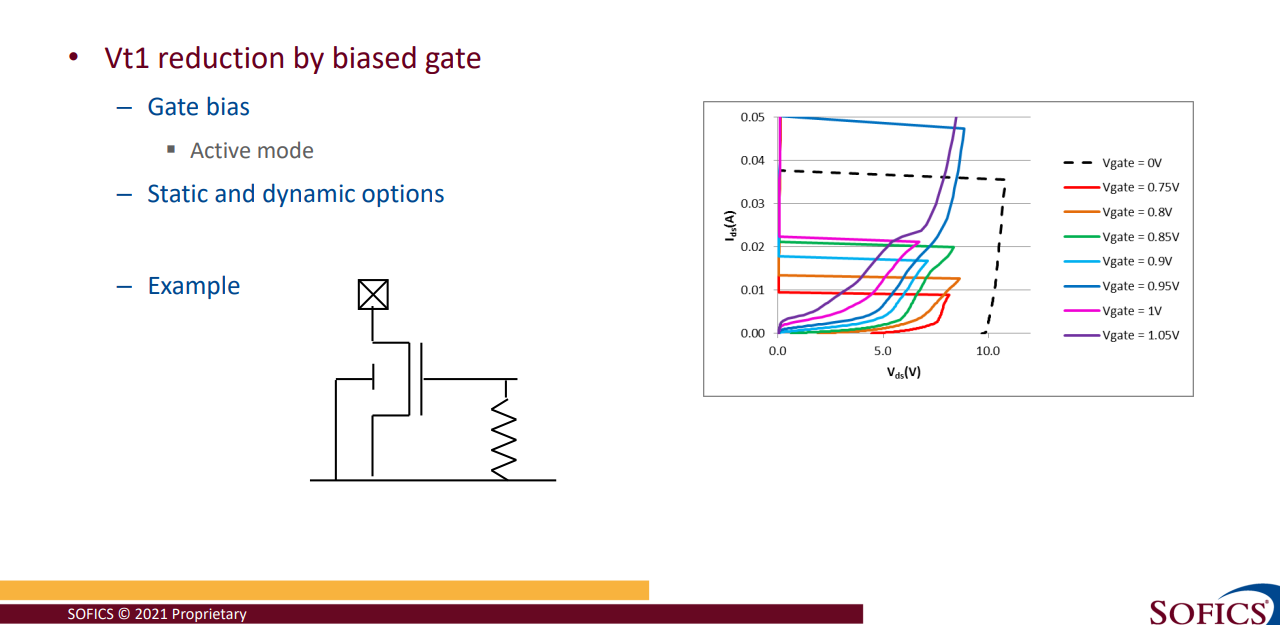
hanning's correction factors:
1 2 3 4
N = 256; w = hanning(N); Ka = N/sum(w) Ke = sqrt(N/sum(w.^2))
%% plot psd of two methods plot(Fx1,10*log10(Pxx1),Fx2,10*log10(Pxx2),'r--'); legend('PSD via Eq.(13)','PSD via pwelch') grid on; xlabel('Freq (Hz)'); ylabel('dB; V^2/Hz')
We may also want to know for example the RMS value of the signal, in
order to know how much power the signal generates. This can be done
using Parseval’s theorem.
For a periodic signal, which has a discrete
spectrum, we obtain its total RMS value by summing the included signals
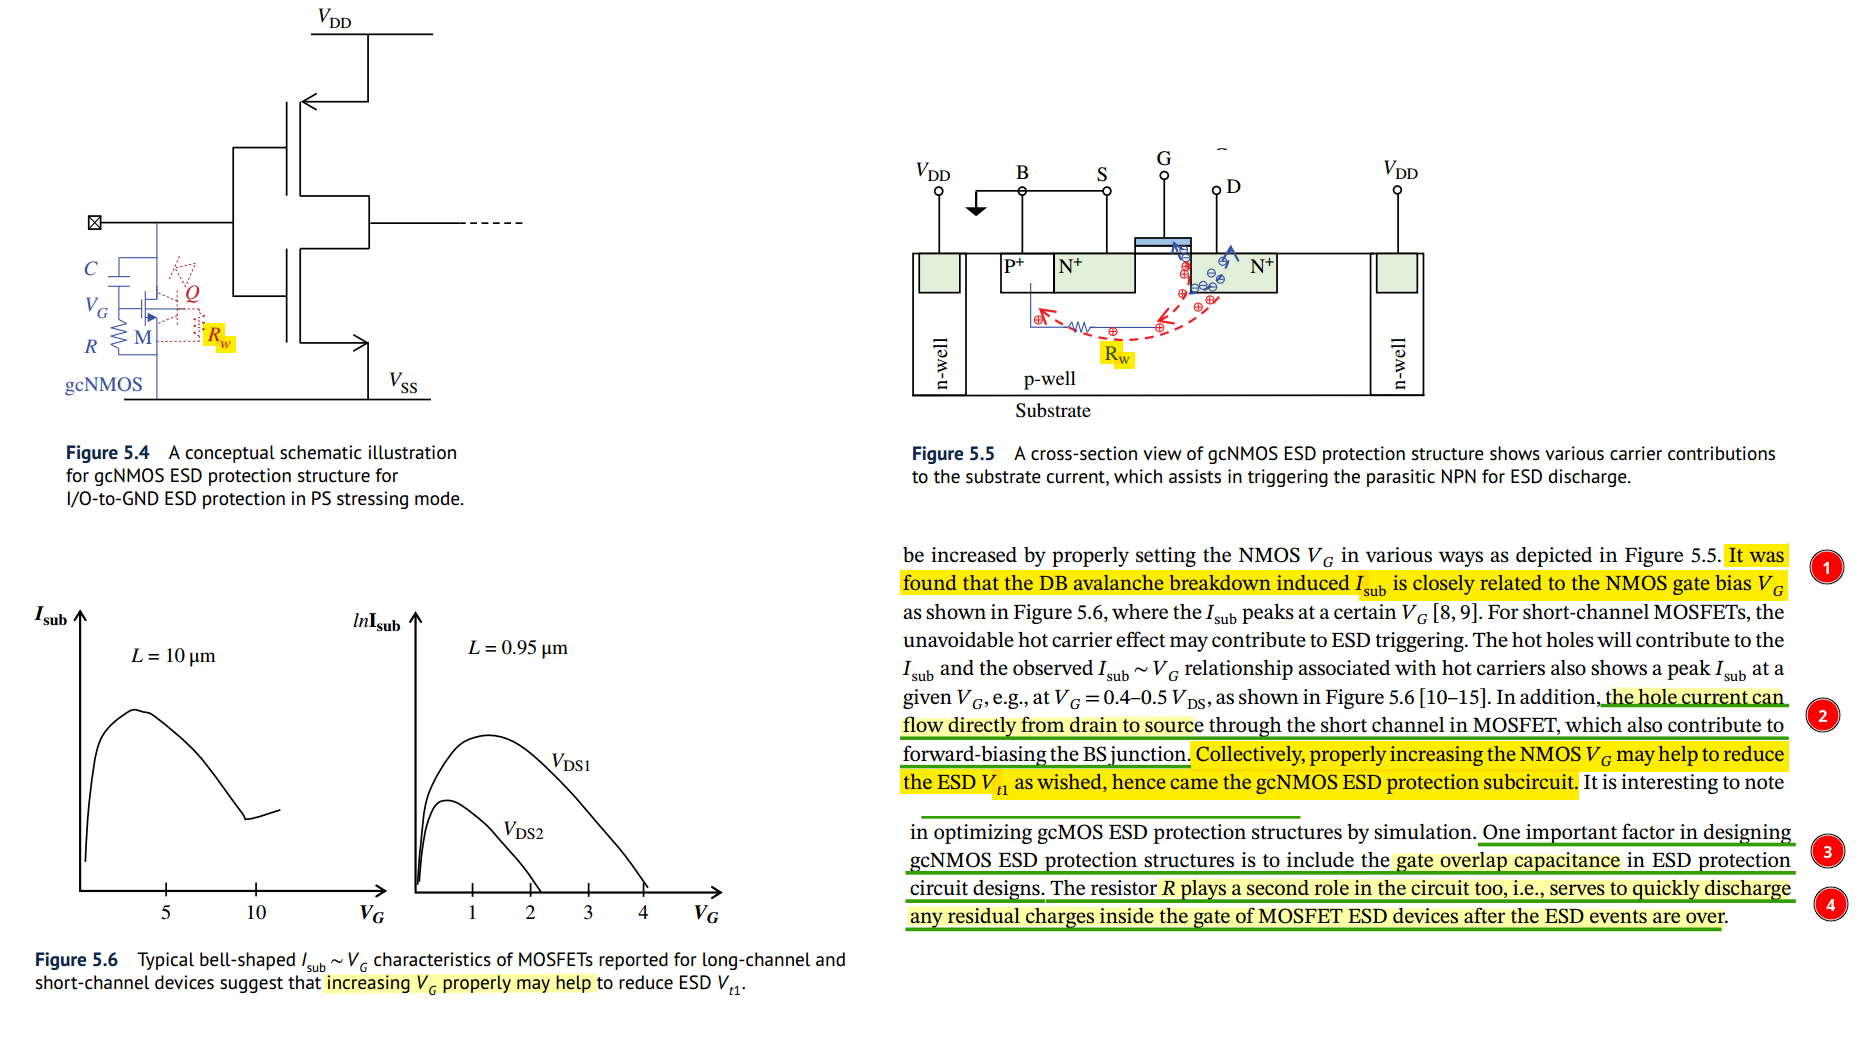
using \[
x_{\text{rms}}=\sqrt{\sum R_{xk}^2}
\] Where \(R_{xk}\) is the RMS
value of each sinusoid for \(k=1,2,3,...\) The RMS value of a signal
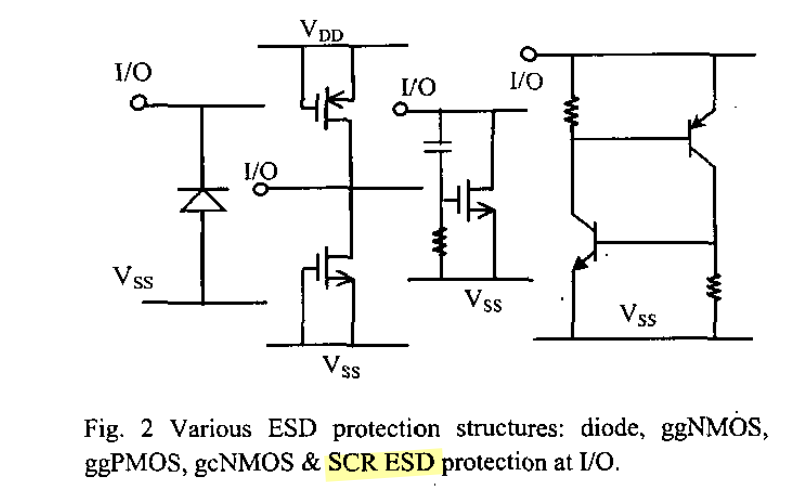
consisting of a number of sinusoids is consequently equal to the
square root of the sum of the RMS values.
This result could also be explained by noting that sinusoids of
different frequencies are orthogonal, and can therefore
be summed like vectors (using Pythagoras’ theorem)
For a random signal we cannot interpret the spectrum in the same way.
As we have stated earlier, the PSD of a random signal contains all
frequencies in a particular frequency band, which makes it
impossible to add the frequencies up. Instead, as the PSD is a
density function, the correct interpretation is to sum the area under
the PSD in a specific frequency range, which then is the square of the
RMS, i.e., the mean-square value of the signal \[
x_{\text{rms}}=\sqrt{\int G_{xx}(f)df}=\sqrt{\text{area under the
curve}}
\] The linear spectrum, or RMS
spectrum, defined by \[\begin{align}
X_L(k) &= \sqrt{\text{PSD(k)} \cdot f_{\text{res}}}\\
&=\sqrt{\frac{\left|X_{\omega}(k)\right|^2}{f_{\text{res}}\cdot
N\sum_{n}\omega^2(n)} \cdot f_{\text{res}}} \\
&= \sqrt{\frac{\left|X_{\omega}(k)\right|^2}{N\sum_{n}\omega^2(n)}}
\\
&= \sqrt{\frac{|X_{\omega}(k)|^2}{N\cdot S_2}}
\end{align}\]
The corresponding linear power spectrum or
RMS power spectrum can be defined by \[\begin{align}
\text{PS}_L(k)&=X_L(k)^2=\frac{|X_{\omega}(k)|^2}{S_1^2}\frac{S_1^2}{N\cdot
S_2} \\
&=\text{PS}(k) \cdot \frac{S_1^2}{N\cdot S_2}
\end{align}\]
So, RMS can be calculated as below \[\begin{align}
P_{\text{tot}} &= \sum \text{PS}_L(k) \\
\text{RMS} &= \sqrt{P_{\text{tot}}}
\end{align}\]
DFT averaging
we use \(N= 8*\text{nfft}\) time
samples of \(x\) and set the number of
overlapping samples to \(\text{nfft}/2 =
512\). pwelch takes the DFT of \(\text{Navg} = 15\) overlapping segments of
\(x\), each of length \(\text{nfft}\), then averages the \(|X(k)|^2\) of the DFT’s.
In general, if there are an integer number of segments that cover all
samples of N, we have \[
N = (N_{\text{avg}}-1)*D + \text{nfft}
\] where \(D=\text{nfft}-\text{noverlap}\). For our
case, with \(D = \text{nfft}/2\) and
\(N/\text{nfft} = 8\), we have \[
N_{\text{avg}}=2*N/\text{nfft}-1=15
\] For a given number of time samples N, using overlapping
segments lets us increase \(N_{avg}\)
compared with no overlapping. In this case, overlapping of 50% increases
\(N_{avg}\) from 8 to 15. Here is the
Matlab code to compute the spectrum:
1 2 3 4 5 6 7 8
nfft= 1024; N= nfft*8; % number of samples in signal n= 0:N-1; x= A*sin(2*pi*f0*n*Ts) + .1*randn(1,N); % 1 W sinewave + noise noverlap= nfft/2; % number of overlapping time samples window= hanning(nfft); [pxx,f]= pwelch(x,window,noverlap,nfft,fs); % W/Hz PSD PdB_bin= 10*log10(pxx*fs/nfft); % dBW/bin
DFT averaging reduces the variance \(\sigma^2\) of the noise spectrum by a
factor of \(N_{avg}\), as long as
noverlap is not greater than nfft/2
fftshift
The result of fft and its index is shown as below
After fftshift
1 2 3 4 5
>> fftshift([01234567])
ans =
45670123
1 2 3 4 5 6 7 8 9
clear; N = 100; fs = 1000; fx = 100; x = cos(2*pi*fx/fs*[0:1:N-1]); s = abs(fftshift(fft(x)))/N; fx = linspace(0,N-1,N)*fs/N -fs/2; plot(fx, s, 'o-', 'linewidth', 2); grid on; grid minor;
dft and
psd function in virtuoso
dft always return
To compensate windowing effect, \(W(n)\), the dft output should
be multiplied by \(K_a\), e.g. 1.9922
for hanning window.
psd function has taken into account \(K_e\), postprocessing is
not needed
reference
Heinzel, Gerhard, A. O. Rüdiger and Roland Schilling. "Spectrum and
spectral density estimation by the Discrete Fourier transform (DFT),
including a comprehensive list of window functions and some new at-top
windows." (2002). URL: https://holometer.fnal.gov/GH_FFT.pdf
Rapuano, Sergio, and Harris, Fred J., An Introduction to FFT and Time
Domain Windows, IEEE Instrumentation and Measurement Magazine, December,
2007. https://ieeexplore.ieee.org/document/4428580
Jens Ahrens, Carl Andersson, Patrik Höstmad, Wolfgang Kropp,
“Tutorial on Scaling of the Discrete Fourier Transform and the Implied
Physical Units of the Spectra of Time-Discrete Signals” in 148th
Convention of the AES, e-Brief 56, May 2020 [ pdf,
web
].
Manolakis, D., & Ingle, V. (2011). Applied Digital Signal
Processing: Theory and Practice. Cambridge: Cambridge University
Press. doi:10.1017/CBO9780511835261